Core Feature: Contact Management Follow
Grab your life jacket, because we are about to dive deep into Contact management. Although Propertybase is a productivity powerhouse (focused on all aspects of real estate) at it's core, Propertybase is a customer relationship management tool. Using these features in Propertybase effectively will allow you to capture and assign leads, stay in touch with customers and ultimately close more deals.
New Contacts
There are two ways that new Contacts enter Propertybase. They can be entered manually, through User entry, or entered automatically, through an integration or automated process. In the steps below, we will walkthrough the process of entering a new Contact manually.
Table of Contents
Creating a New Contact
The fastest way to create a new Contact is through the main navigation menu.
- Click the down arrow next to Contacts, then select New Contact.

This will take you to a new screen with fields for basic Contact information. To create a new Contact, fill out this information and click Save in the top right corner of the screen.

Duplicate Checking
Entering duplicate information into a Contact field will trigger the Potential Duplicate feature. This feature will keep your customer database clean and void of duplicates. You can also modify which fields trigger the duplicate message. For information about those duplicate rules, click here.

Contact Types
Within Propertybase there are two types of contacts: Individual and Company. While they function similarly, they are termed differently because they each have their own page layout and business relationships.
Individual Contacts are people interested in your business, but have no ties to a specific company. For example: a family looking to buy a home. These records can be accessed under the Contacts tab.
Company Contacts are business contacts that are related to a company. These Contacts are unique because they are all related to a specific Company record. For example: multiple brokers working for an agency.
Both Contact types can be created as described in the "Creating a New Contact" section above.
Lead Automation
Ever wish new Contacts and Leads would just appear in your account? Good thing you chose Propertybase! Thanks to Front Desk, a service developed exclusively for Propertybase customers, it is possible to capture leads from a variety of online sources and have them automatically appear into your account.
For more information on Front Desk and available lead sources, click here.
Lead Routing
Want to take the aforementioned automation a step further? Once you've set up Front Desk to import new Leads into your Propertybase account automatically, enable the Lead Routing feature to automatically route those Leads to the appropriate agent or team. With a little configuration you can completely automate the process of receiving and assigning new Leads.
Managing Contacts
You can view your existing Contacts at anytime by clicking the Contacts tab in the main navigation menu.

List Views
Upon loading the page, you will be presented with a list of "Recently Viewed" Contacts. Looking empty? This can happen if you haven't viewed Contacts recently. To select a different view, such as "All Contacts", click the arrow next to the current view and select from the list (as shown below.)
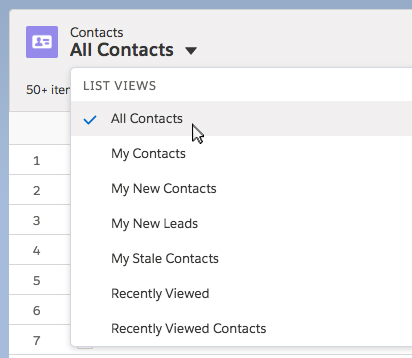
In Propertybase terms, these views are called "List Views". Which is simply a list of records filtered by certain criteria. List Views are a powerful way to focus on certain customers and quickly make business decisions. Decisions like "Who should I call today?" or "Who should I invite to my next showing?" for example.
For more information on creating custom List Views, click here.
Contact Details
Selecting a Contact from a List View will open that Contact's detail page. Did you know? You can also open a Contact's detail page by selecting their name in the Contacts tab menu. Let's review the Contact detail features available in Propertybase.
Table of Contents
- Actions
- Header Details
- Stage Path
- Details Tab
- Importance of Routing Source
- Related Tab
- Email Tab
- Activity
Actions
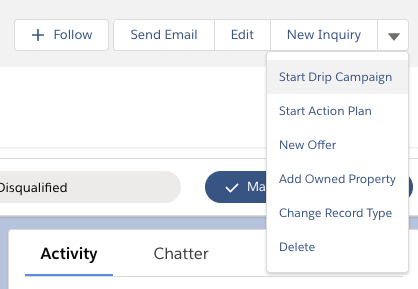
One of the first things you will see are Contact "actions" at the top of the page. Here you can perform a variety of actions based on the record selected.
|
Follow You can follow any record in Propertybase by clicking the Follow button. Once followed, any changes to this record will show up in your feed. Send Email Clicking this button will open a blank Quicksend message in a new window, addressed to the current Contact. (Clicking the "Email" tab on a Contact record will perform a similar action.) Edit Just what it sounds like! Clicking this button will allow you to edit the current Contact record. New Inquiry Clicking this button will allow you to create a new Inquiry, with Contact details related to the current Contact automatically filled in. Start Drip Campaign Click this button to quickly create an Drip Campaign for this Contact. Start Action Plan Click this button to quickly create an Action Plan for this Contact. New Offer Clicking this button will allow you to create a new Offer, with Contact details related to the current Contact automatically filled in. Add Owned Property Clicking this button will allow you to create a new Owed Property, with Property details related to the current Contact automatically filled in. Change Record Type Accidentally create a Contact instead of Company? Clicking this button will allow you to quickly change record type. Delete Quickly delete the current Contact. |
|
Header Details
To the left of the Actions described above is the Contact Header. In this area you will find some of the most useful and actionable Contact details. These details are conveniently positioned at the top of the page for quick reference.

Did you know you can modify the fields that appear in the header?
Follow the steps below to modify the Contact header details.
- Click the gear icon at the top of the page, next click Edit Object.
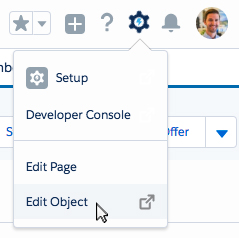
- On the left side of the screen, click Compact Layouts.

- Select Contact Compact Layout from the list of page layouts.

- On the next page, click Edit.
To modify Contact header details, use the "Add" and "Remove" arrow keys to move fields between "Available" and "Selected". You can change the order that fields appear using the "Top", "Up", "Down" and "Bottom" arrows on the right side.
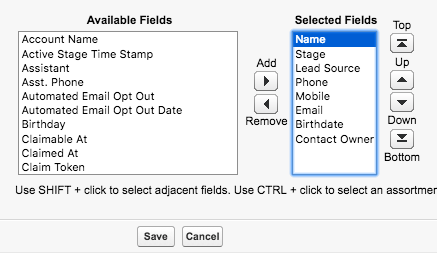
- Once finished, click Save.
Stage Path
Below Contact header details is the Contact path. This is a visual representation of the current Contact’s status. You can update this by clicking any stage and selecting “mark as current status”. Modifying the "Stage" field in Contact details (below) will also update this path!
Don’t have the contact path feature? Add it by following the instructions in this article.
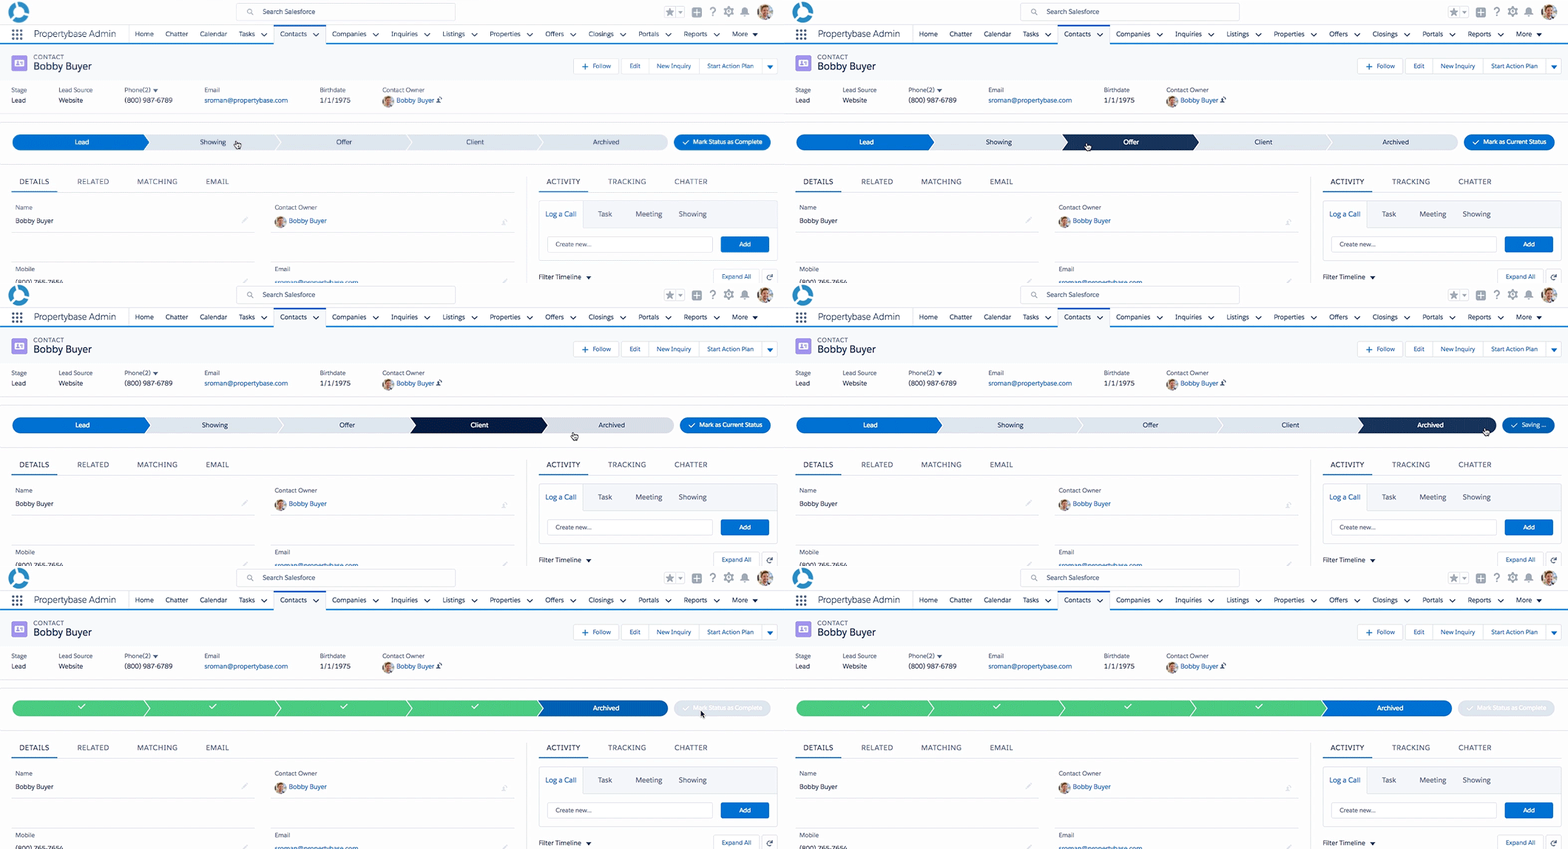
Details Tab
Underneath the Contact Path, is a series of tabs. The first tab, Details, displays additional Contact information for the current record. This includes everything from name and phone number, to qualification details as well as other information like address, birthday and email preferences. In Propertybase terms, this information is contained in "fields".
Editing a Field
You can edit any field by clicking the "pencil" icon to the right. Once you are done editing, click the Save button at the bottom of the screen. This is shown in the animation below. (You can also edit multiple fields by clicking the Edit button in the top right corner of the screen. See the "Actions" section above for more details.)
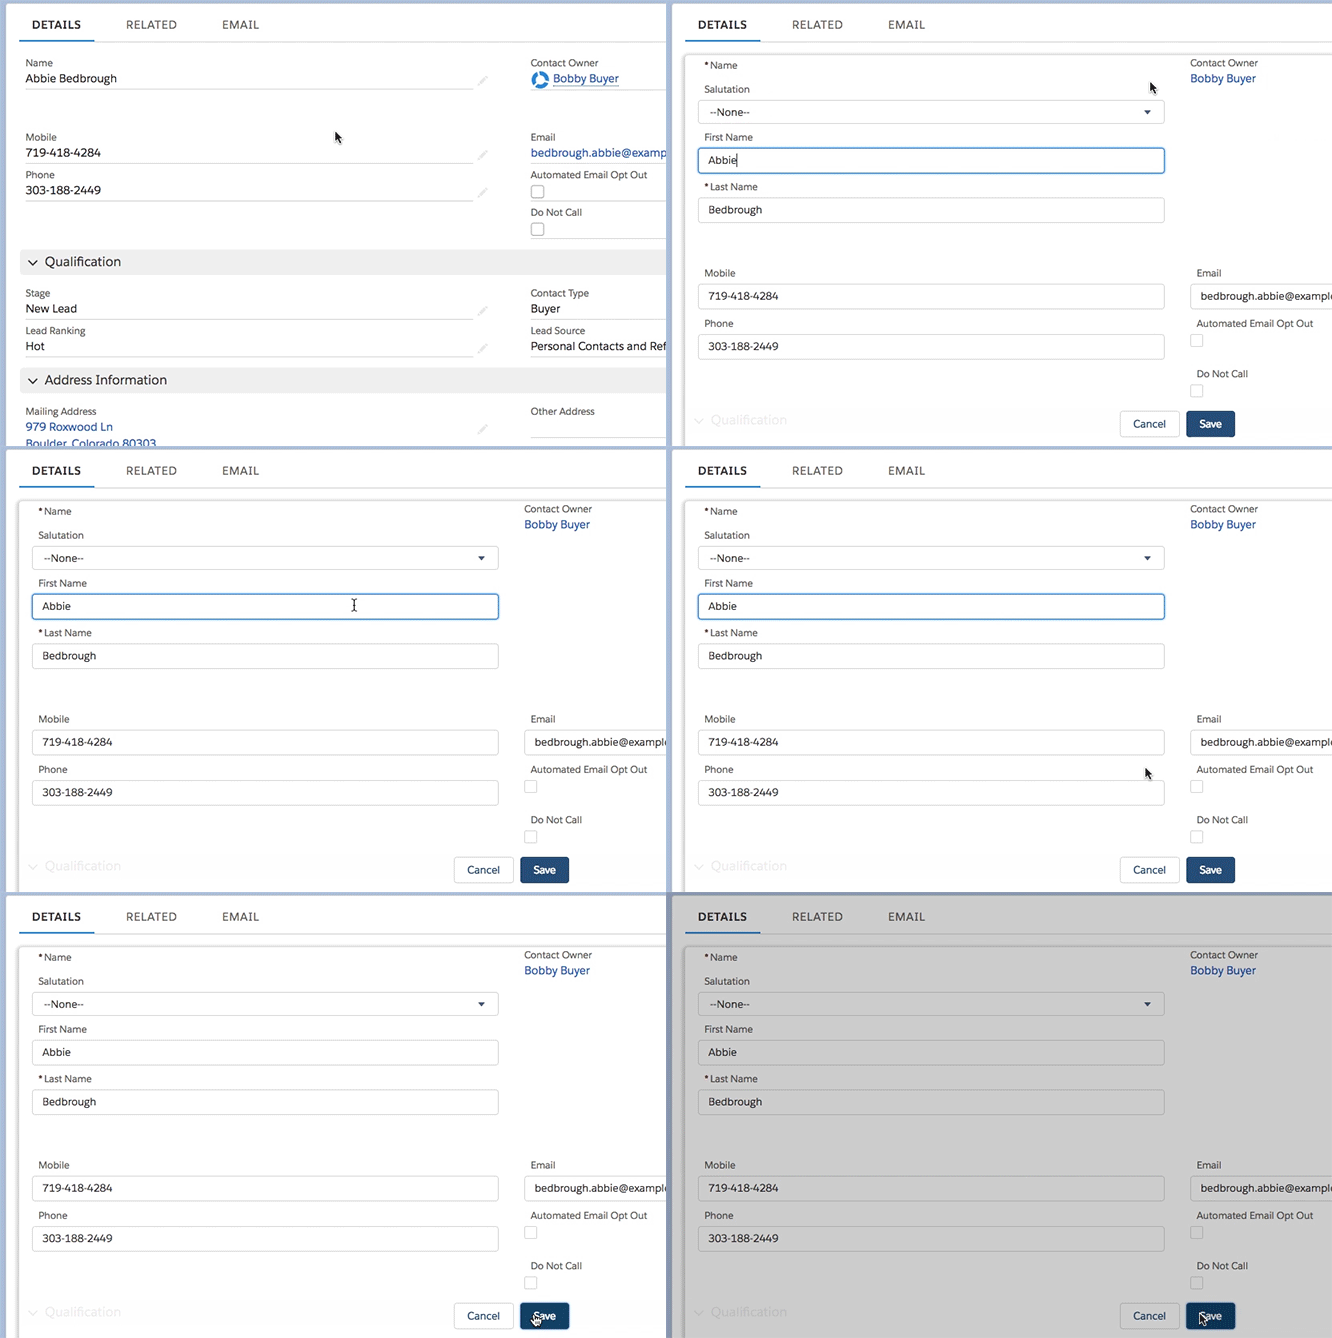
Importance of Routing Source
If you take advantage of the Lead Routing feature in Propertybase, the Routing Source field is important to understand. This field determines what team(s) will receive the current Contact lead. As soon as Routing Source receives a value, Lead Routing (if enabled) will assign the Contact to the appropriate team(s). This field can be updated manually (see "Editing a Field" above) or it can be updated automatically using process builder.
Click here to learn more about Lead Routing.

Related Tab
To the right of the Details tab is the Relate tab. Under this tab, is a list of other records, that relate to the current Contact record. The Related tab is a good demonstration of the power of Propertybase as a CMS. Here you can cross-reference data and view relationships between separate objects. This allows you to quickly visualize the entire relationship a customer has with your business.
For example, if the current Contact has previously put an offer on a property or inquired about a property, you will find that information here. You can also manually create new related records by clicking the “New” button next to any of the related objects.
Below is a list of related Inquiries. In this case, the Contact only has one. Here you can see the Inquiry ID, property type, price and bedrooms. Clicking the arrow on the far right will allow you to edit or delete the record. If a Contact has several related Inquiries you can click the "View All" link to see them. Although this example is specific to Inquiries, all other related objects follow a similar structure.

Did you know you can modify the columns that appear on related lists?
Follow the steps below to modify the columns shown for related records.
- Click the gear icon at the top of the page, next click Edit Object.

- On the left side of the screen, click Page Layouts.

- Select Individual Contact from the list of page layouts.

- Click the wrench icon next to the related object you want to edit.
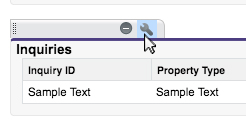
On the following screen you can use the arrow buttons to add or remove fields (left and right arrows) and reorder fields (up and down arrows.) You can also modify the sort order using the Sort By picklist. When you are done making changes, click the OK button.

Email Tab
To the right of the Matching tab is the Email tab. Under this tab, you will find the Propertybase Quicksend feature. Quicksend is a robust emailing tool unique to Propertybase. Quicksend allows you to quickly email multiple Contacts, draft messages using templates and merge fields, as well as attach Listings and files.
Click here to learn more about Quicksend.
Activity
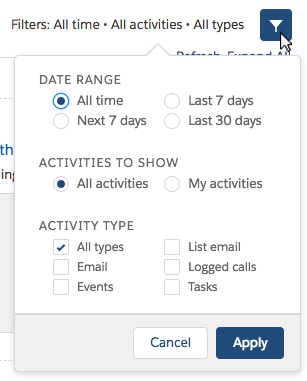
Want to quickly view all interactions you've had with a customer? Look no further than the Activity tab! This component shows you a list of all Calls, Tasks, Events and Showings that relate to the current Contact. To create a new Activity, simply click the corresponding tab, fill out the required fields and click save.

Tracking
Next to the Activity tab, is the Tracking tab. This component will show you a list of all emails that have been sent to the current Contact. These emails shown here are sent using Quicksend (see "Email Tab" above.) Email Tracking show the email subject, email status and how many recipients viewed your message. Clicking on the email subject will display additional information about the email.
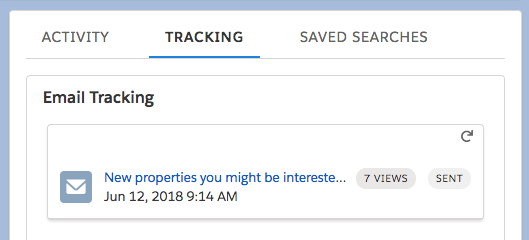
Saved Searches
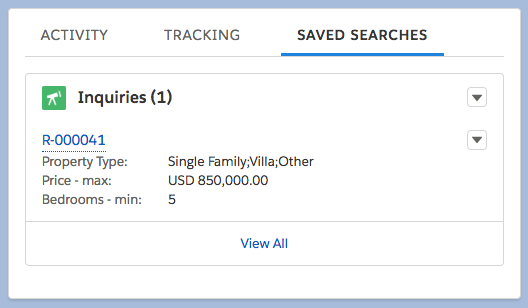
Next to the Tracking tab, is the Saved Searches tab. Here you will find a list of the most recent Inquiries for the current Contact. This data is the same as the Inquiries found under the Related tab (see "Related Tab" above.)
This is Part 1 of 10 in our Propertybase Core Features series. We recommend you continue to follow along, in order, as we walk through the entire Propertybase process, in detail, from lead to close.
Propertybase Core Features: Table of Contents
- Contact Management
- Create & Manage Companies
- Sending Email with Quicksend
- Inquiry Management
- Listing Management
- Property Management (Coming Soon)
- Offer Management (Coming Soon)
- Closing Management (Coming Soon)
- Using Reports
- Using Dashboards
Next Up: Create & Manage Companies
After familarizing yourself with how to manage Contacts, it's time to learn about the difference (and similarities) between Contacts and Companies. Without Companies, it would be difficult to track relationships between individual Contacts, especially when they are part of larger Company.
Click here to learn about managing Companies in Propertybase.




Comments
0 comments
Article is closed for comments.