How to Use Lead Routing Follow
How would you like to automatically route incoming leads to specific agents and teams at designated times? This is now possible thanks to Propertybase Lead Routing. This powerful feature allows you to designate terms for incoming leads based on their routing source and distribute them among your agents and teams. In this article we will provide both a quick and comprehensive overview of Lead Routing features, as well as the configuration steps required to get started.
Note: You must update to the latest version of Propertybase to use Lead Routing.
Quick Start
Before jumping into the weeds of this legendary feature, it's important to understand how it works. Using the process graphic below as a visual guide, let's walk through the underlying processes of Lead Routing.
Note: See the "Feature Overview" tab for a more detailed explanation of the information below.
Feature Overview
Once you've completed the configuration steps you are ready to customize Teams, Distributors and Routing Sources. If you have not completed the configuration steps, and would like to follow along below, please do so now by clicking the "Configuration" tab.
Table of Contents
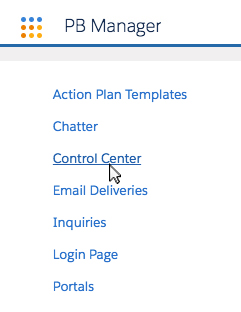
When you're ready to begin, open the Control Center. This is where all Lead Routing settings are located.
Not sure how to access the Control Center?
Enable Lead Routing
First things first, let's enable Lead Routing in your account.
- Click the Settings tab.

- On the Settings tab, toggle the global switch.

Nice! Lead Routing is activated. Time to create some Teams!
Teams
Teams are comprised of Users who receive a specific type of lead. Teams must contain at least one User, but there is no limit to how many Users can be on a Team. Once a Team has been created a Routing Source must be assigned.
Once a Team has been created and a Routing Source has been assigned, the method in which User's "share" leads is determined by the Distributor. (See "Distributors" tab.) To create a Team, follow the instructions below.
Creating and Modifying Teams
- Click the Teams tab.

- Next, click Create New Team.

- Once you've named your Team and added Users, click Save.

You can view all of your Teams from the main Lead Routing screen, under the Teams tab.

Assigning Routing Sources
Once a Team has been created, it must be assigned a Routing Source. Routing Sources will vary from business to business, but some examples include "Portals", "Leads Over a Million", "Family Houses", "Regional", etc.
Note: To customize Routing Sources, see the "Configuration" tab on this page.
You can assign or modify Routing Sources under the Assign Teams tab under Team Management.

Once a Team has been created and a Routing Source has been assigned, a Distributor must be selected for the Team.
Distributors
Distributors, as the name implies, are simply the methods in which a leads get distributed. At the time of writing Propertybase offers three Distributors: Click to Claim, Auto-Assign and Round Robin. To select or change the Distributor for a Team, click the Edit Distributor link located on the Teams tab.
Click to Claim
Click to Claim is "free-for-all" Distributor type that sends new leads to all Team members via a simple email message. This email contains a link and the first Team member to click the link receives the lead.

Auto-Assign
Auto-Assign is a single assignment Distributor type that assigns lead to a single User. Teams with the Distributor type of Auto-Assign can contain multiple Users, but leads are only assigned to one at any given time.

Round Robin
Round Robin is a rotational Distributor type that assigns leads, in order, from "top" to "bottom". You can reorder Team members at any time, using the arrows on the far right of the screen, however the "Next Up" indicator will stay in the same position. That is, unless you click the Restart Rotation button at the top of the list. Doing so will move the "Next Up" indicator to the top of the link and start the rotation from the beginning.

Status
Lead Routing offers several different status types for Users. There are four different types of status: active, inactive, opt-out and disabled. In this section we will review each status and how they effect lead distribution.

Active
This is the default state for Users. As the name implies, this status means the User is active and ready to receive incoming leads.
Inactive
Inactive means that the User has been disabled in the Distributor edit screen. Inactive Users cannot receive leads from the Distributor in which they are disabled. In other words, "Inactive" is a status that is Distributor-specific.
Opt-Out
This status is completely controlled by the User. If a User is taking a sick day, on vacation or temporarily unable to receive leads, they have the power to "opt-out" of receiving leads temporarily. This can be toggled on the Propertybase homepage inside the "Login" box.

Disabled
Disabled means that the User has been disabled by the Propertybase administrator. A disabled User cannot receive any leads. They also cannot change their status. Only a Propertybase administrator can change a disabled User's status.
Administrators can disable a User by unchecking them (and clicking Save) under User Administration in the Control Center.

Admin Settings
Propertybase Administrators can choose to receive a BCC of all leads. This setting can be found under Admin Settings under the Notifications tab. Use the checkboxes next to each Administrators name to enable or disable this feature.

Duplication Check
When a new Contact or Inquiry enters Propertybase, Lead Routing will check if it has previously been assigned to a User. If so, that Contact or Inquiry will automatically go to the previous User and bypass other Lead Routing processes. When this happens, the previous record owner will receive an email notifying him or her that a duplicate lead is available.
Note: This setting is not configurable at this time.
Notifications
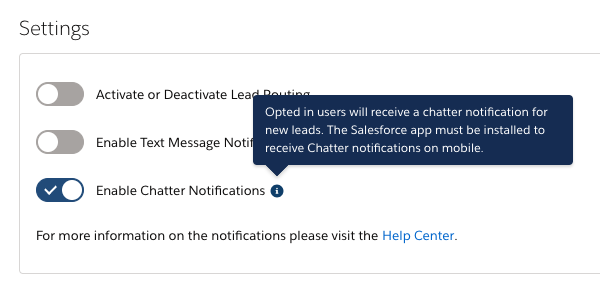
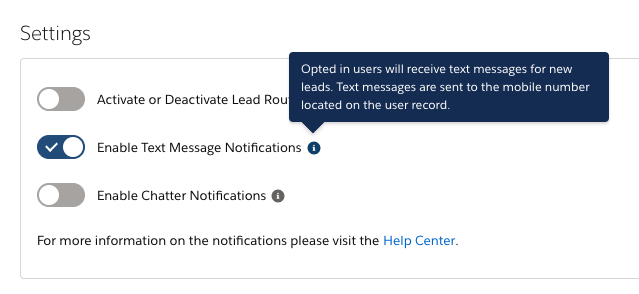
Two notification types are available for lead routing: mobile application (e.g. Chatter) and text message. Both of these notification types can be activated through the settings tab in Lead Routing.
Note: Text Messaging is only available in North America and Australia.
Mobile Application Notifications (Chatter)
To receive lead routing notifications through the Propertybase mobile application, each agent will need to install this application on their mobile device. Click here to download. These notifications are delivered through the Chatter feature in Propertybase. These notifications can be turned on through the Lead Routing settings page.
Text Message Notifications
To receive lead routing notifications via text message, each agent must have their mobile number saved to their user record page. These notifications can be turned on through the Lead Routing settings page. Please click the red box below to complete the required configuration for text message notifications.
Note:
SMS Notification Service currently only available in North America (+1) and Australia
Phone numbers must be internationally formatted in order to receive leads, so must include the proper country code e.g. for U.S. +1 123 123 1234.
Click here for required configuration for text message notifications.
The configuration steps below need to be completed once by an administrator. However every agent must check the opt in box (see last step) in order to receive text message notifications.
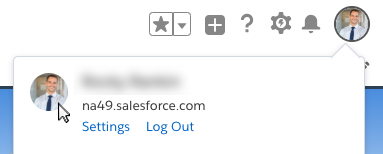
- Open the user profile page by clicking your image and then click your image again.
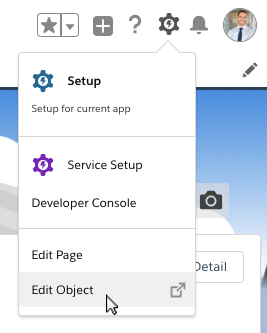
- From the user profile page, click the gear icon and then click Edit Object.
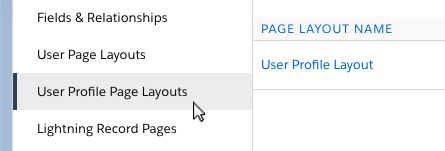
- On the following page, click User Profile Page Layouts.
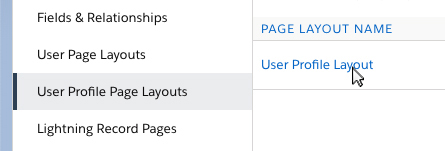
- Next, click User Profile Layout.
- Drag "Text Message Opt In" from the list of available fields and place it below "Mobile".
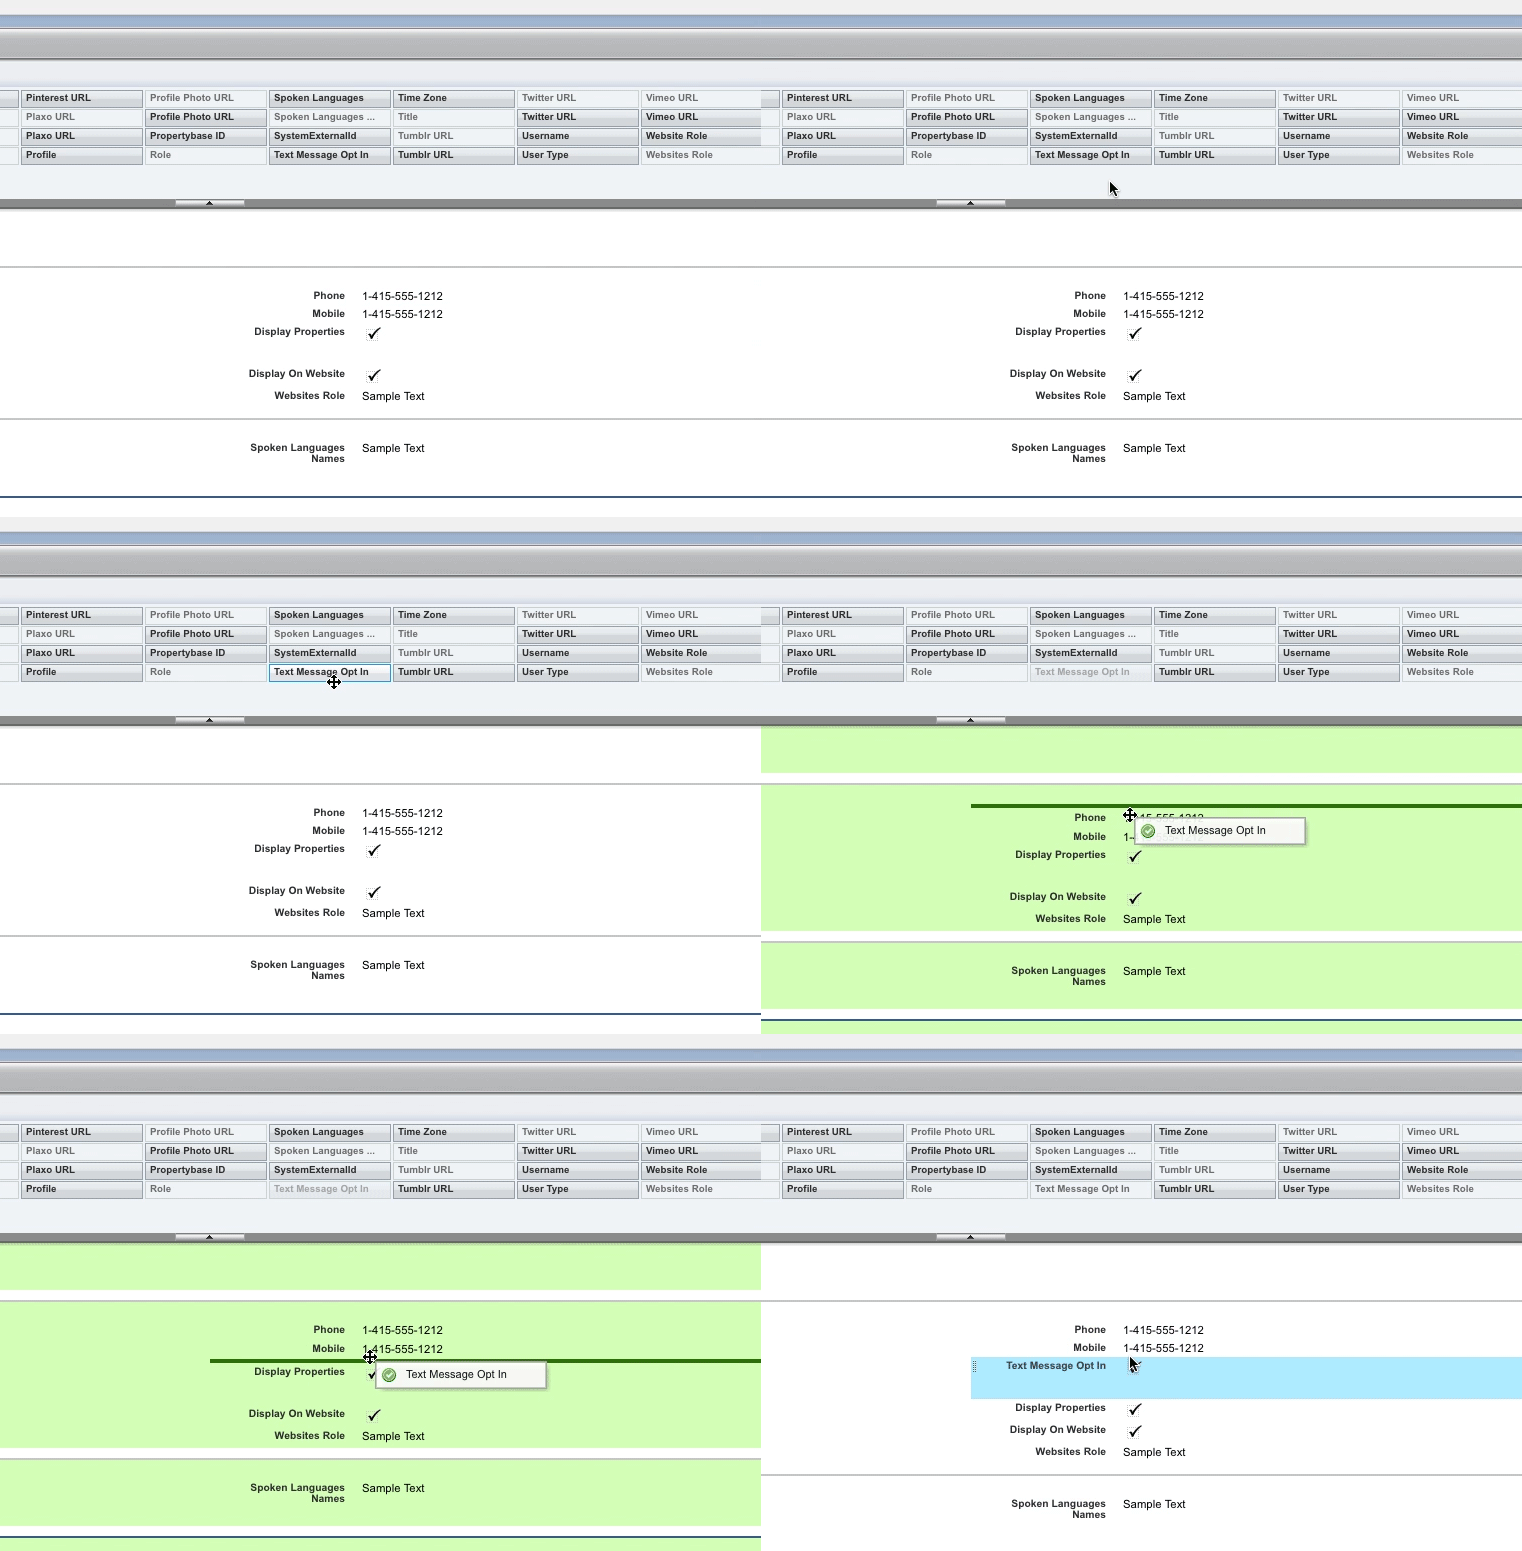
- In the top left corner, click Save.

That concludes the administrative steps for account configuration.
All users that wish to receive lead routing text notifications must complete the step below.
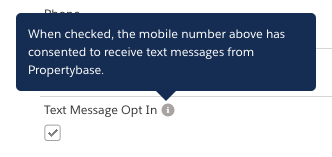
- Open the user profile page and enable the "Text Message Opt In" field.
Configuration
Before this feature can be activated, there are a few items that must be configured. First, public API access settings must be updated. This allows certain features within Lead Routing to work correctly. Second, the new "Routing Source" field should be added to the Contact record page. Next, "Routing Sources" should be updated to match your specific needs. Finally, we need to create Teams, select Distributors and map Routing Sources.
Table of Contents
- Update API Access
- Update Contact Record Page
- Edit Routing Sources
- Configure Routing Processes
- Enable Propertybase Mailservice
Update API Access
First let's update the public API access for your account. This will allow the "Click to Claim" feature within Lead Routing to access your account through email. More on that feature later. If you have previously configured a public API site, continue with the steps below.
If you have not previously configured a public API site, click here to do that now.
Not sure if you have an existing public API site?
Follow the steps below to determine if you have previously configured a public API site.
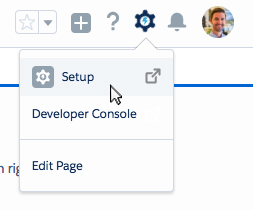
- Click the gear icon in the top right of the screen, then click Setup.
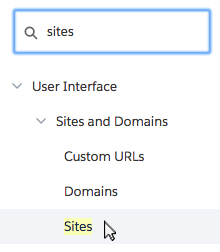
- Type 'sites' in the Quick Find menu, then click Sites.
- Scroll to the bottom of the page until you see a section titled "Sites".

Yes, you have a public API site:
- If a site called "Public API" or "Webservices" (or something similar) is listed, you do have an existing public API site. You can safely continue with the steps below.
No, you do not have a public API site:
- If you do not see any sites listed, you do not have an existing public API site. You must configure one before continuing with the steps below. Click here to do that now.
Once you have configured a public API site, continue below.
- Click the gear icon in the top right of the screen, then click Setup.

- Type 'sites' in the Quick Find menu, then click Sites.

- Scroll to the bottom of the page and click the name of your public API site.

- From the next page, click Public Access Settings.

- Under Apps, click Visualforce Page Access.
- Next to Visualforce Page Access, click Edit.
- Using the right arrow button (Add), move "pba.ClickToClaim" to the Enabled column.

- Click Save.
Update Contact Record Page
Next, we need to add the new "Routing Source" field to the Contact record page.
- Open any Contact record and then click Edit Object.

- Click Page Layouts on the left side of the screen.

- Next, click Contact Layout.

- Drag the Routing Source field down to the Contact Information section.

- Click Save.

In the next section, we will verify that we include the correct Routing Sources for your specific business needs.
Edit Routing Sources
Before we continue, if you haven't already, read through the information located in the "Quick Start" tab. It's important to understand the implications of different Routing Sources and which are applicable for your business. In the steps below, we will add and remove Routing Sources.
- Continuing from above, click Fields & Relationships on the left side of the screen.

- Scroll down and click Routing Source.

- Scroll down the page until you see Values.
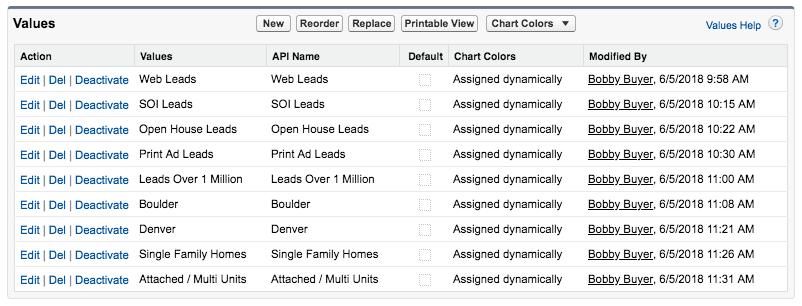
- Add and remove values on this page until you are satisfied.
Need some help determining values? Think about how you would like to route leads to your team members. Do you have a team that focuses solely on one region of business? That would be a good Routing Source (e.g. "Denver" or "Boulder"). Do you have an agent that owns all inquiries over a million dollars? That would also be a good Routing Source (e.g. "Leads Over a Million"). Remember, you can add or remove values at any time. That's the beauty of Propertybase!
Once you are satisfied with your Routing Sources, continue with the steps below.
Configure Routing Processes
As discussed in the "Quick Start" tab, two custom processes must be built for Lead Routing. Some accounts may already have these processes included, if so, please follow along and make modifications as necessary to fit your specific business needs.
- Click the gear icon in the top right of the screen, then click Setup.

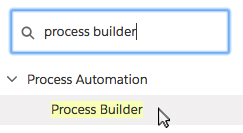
- Select Process Builder in the Setup menu.
- Click New in the top right corner of the screen.

- Fill out the New Process fields according to the image below.
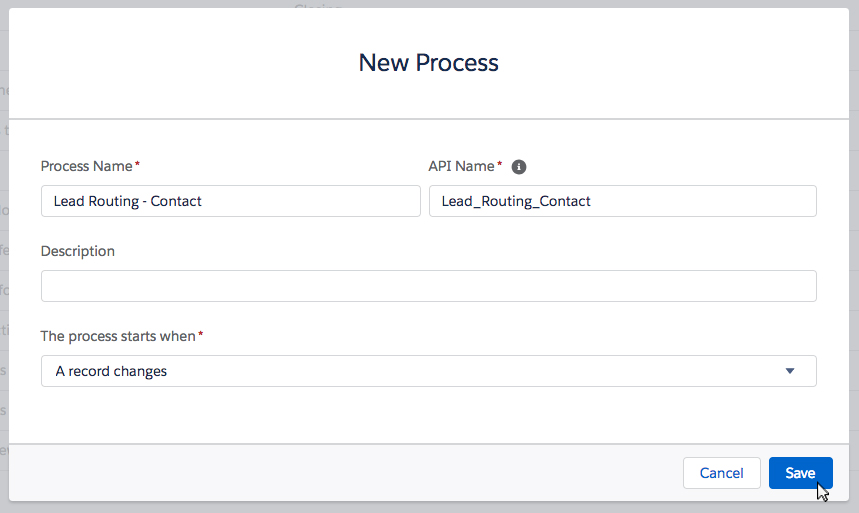
- Click Save.
Next we need to select the Object that will start our Process.
- Click Add Object.
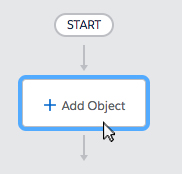
- On the right side of the screen, fill out the fields according to the image below.
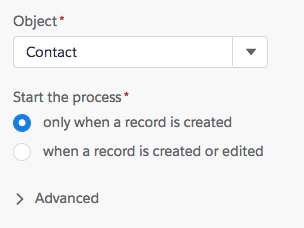
- Click Save.
Next we need to define what happens when a new Contact record is created. First, let's add criteria for new leads that come from the web.
- Click Add Criteria.
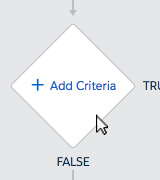
- On the right side of the screen, fill out the fields according to the image below.
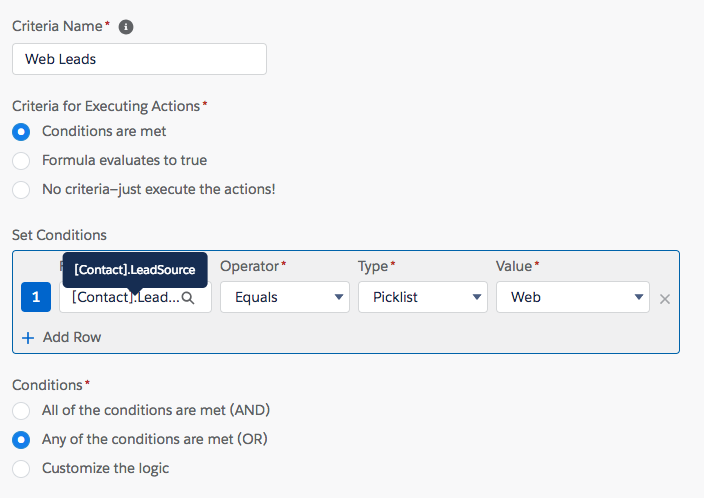
- Click Save.
Now that we have criteria for web leads established, let's add an immediate action to update the "Routing Source" to "Web Leads".
Note: If "Web Leads" is not an option in your account, go back to the "Edit Routing Sources" step above and add it.
- Click Add Action next to the Web Leads criteria we just created above.

- On the right side of the screen, fill out the fields according to the image below.
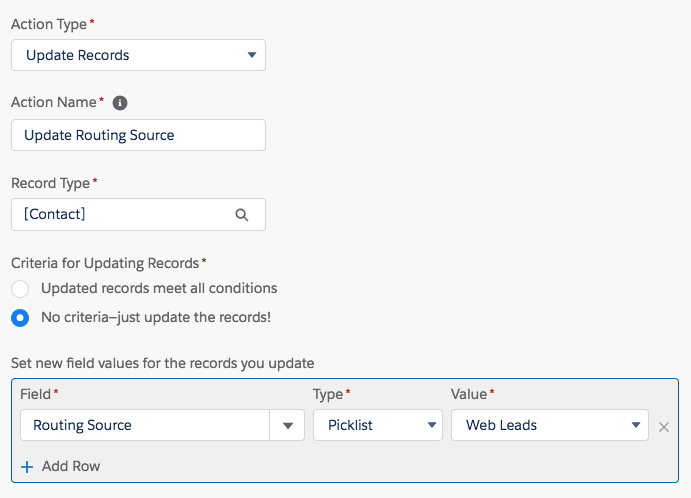
- Click Save.
Nice work! You just created the foundation of the Lead Routing - Contact process. In the steps below, we will continue to create Criteria and Immediate Actions for each additional Routing Source.
Remember, what we are creating in this walkthrough is a baseline for Lead Routing configuration. You should use Lead Source values and Routing Source values that are specific to your business.
- Click Add Criteria. (Below the Web Leads criteria we created above.)

- On the right side of the screen, fill out the fields according to the image below.
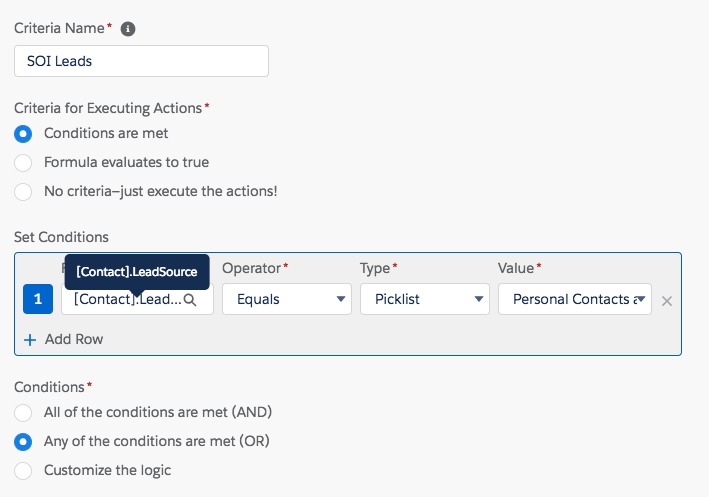
- Click Save.
- Click Add Action next to the Web Leads criteria we just created above.

- On the right side of the screen, fill out the fields according to the image below.
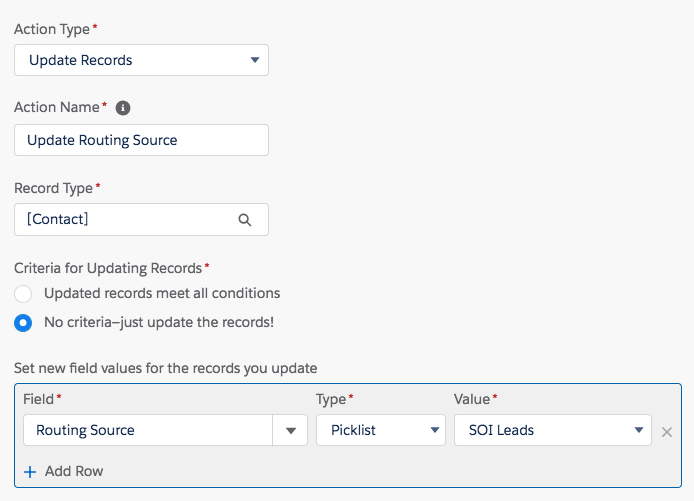
- Click Save.
- Click Add Criteria. (Below the SOI Leads criteria we created above.)

- On the right side of the screen, fill out the fields according to the image below.
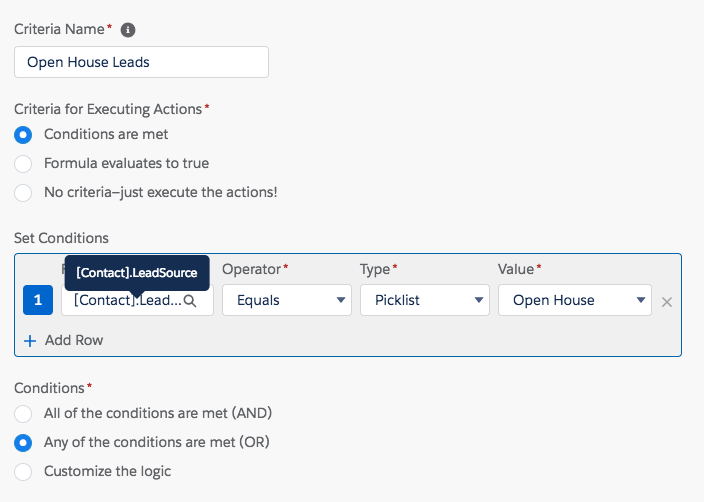
- Click Save.
- Click Add Action next to the Web Leads criteria we just created above.

- On the right side of the screen, fill out the fields according to the image below.
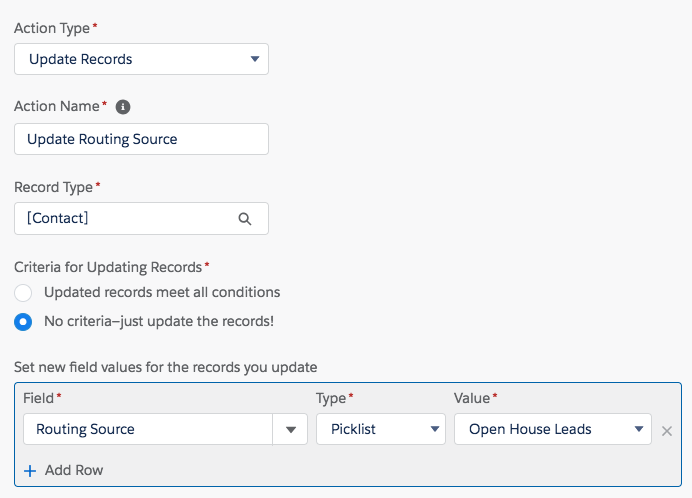
- Click Save.
- Click Add Criteria. (Below the Open House Leads criteria we created above.)

- On the right side of the screen, fill out the fields according to the image below.
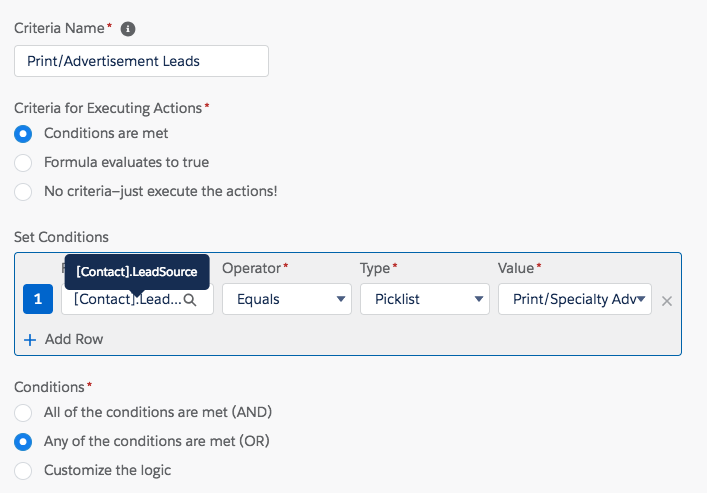
- Click Save.
- Click Add Action next to the Web Leads criteria we just created above.

- On the right side of the screen, fill out the fields according to the image below.
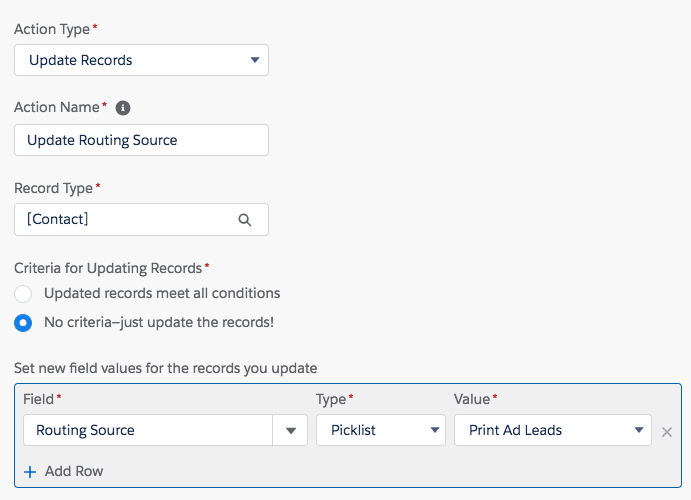
- Click Save.
Done! This process is ready to be activated.
- Click Activate in the top right corner.
- Click Confirm when prompted.

Now that we've created the Lead Routing - Contact process, let's repeat similar steps to create the Lead Routing - Inquiry process.
- Click View All Processes in the top menu.

- Click New in the top right corner of the screen.

- Fill out the New Process fields according to the image below.

- Click Save.
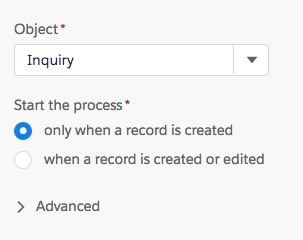
Next we need to select the Object that will start our Process.
- Click Add Object.

- On the right side of the screen, fill out the fields according to the image below.
- Click Save.
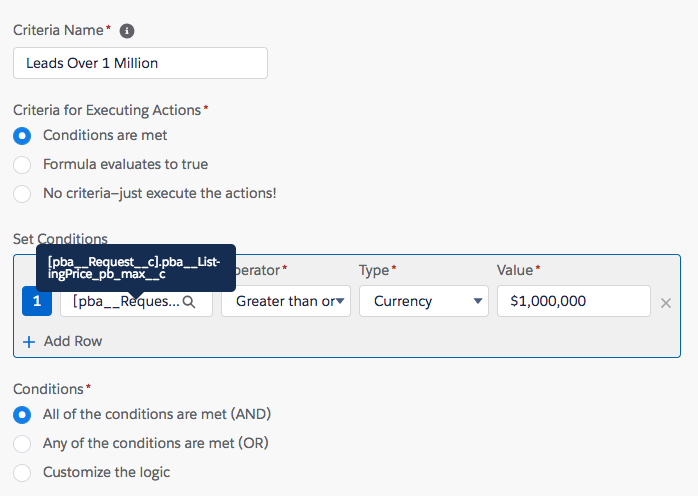
- Next, click Add Criteria.

- On the right side of the screen, fill out the fields according to the image below.
- Click Save.
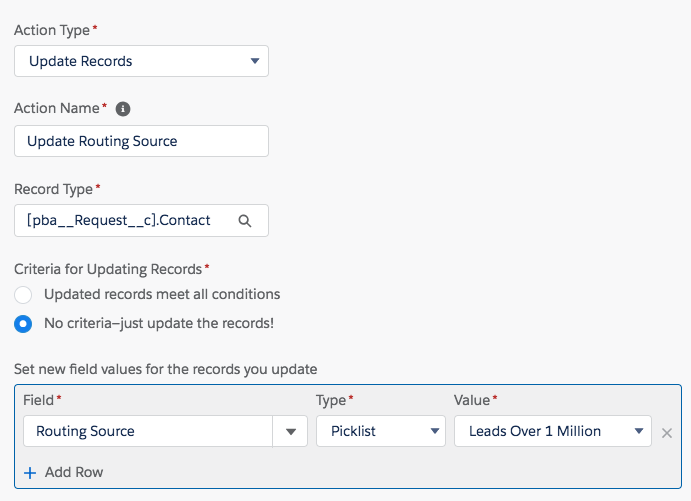
- Click Add Action next to the Web Leads criteria we just created above.
- On the right side of the screen, fill out the fields according to the image below.
- Click Save.
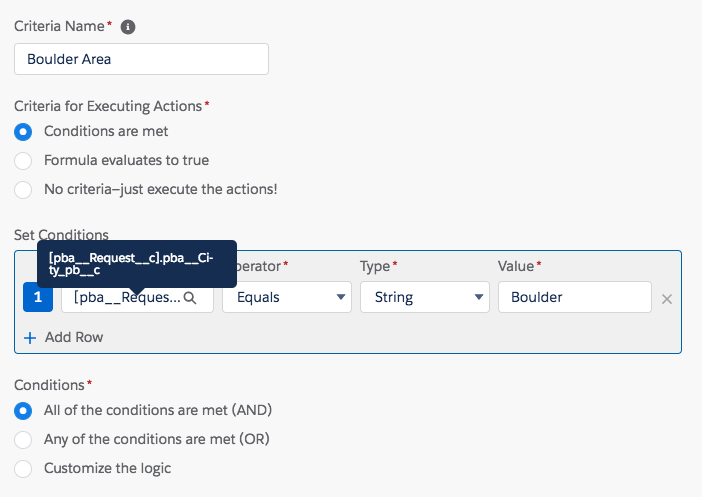
- Click Add Criteria.

- On the right side of the screen, fill out the fields according to the image below.
Note: Unless your business shares the beautiful town of Boulder, Colorado with Propertybase, update this criteria to match your local business region.
- Click Save.
- Click Add Action next to the Web Leads criteria we just created above.

- On the right side of the screen, fill out the fields according to the image below.
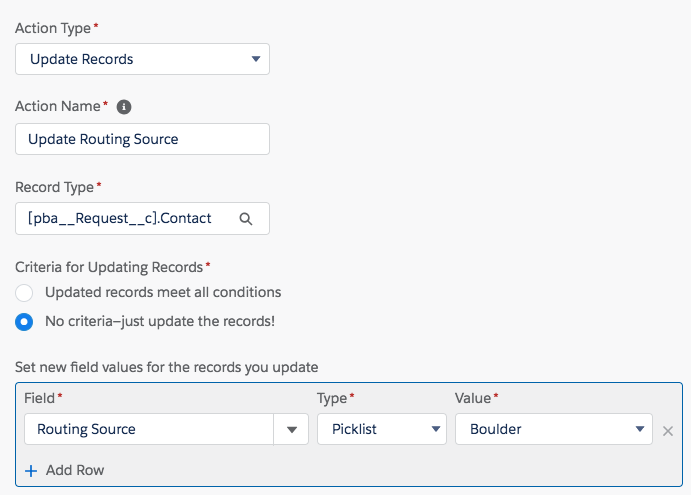
- Click Save.
- Click Add Criteria.

- On the right side of the screen, fill out the fields according to the image below.
Note: Like before, update this criteria to match your local business region.

- Click Save.
- Click Add Action next to the Web Leads criteria we just created above.

- On the right side of the screen, fill out the fields according to the image below.
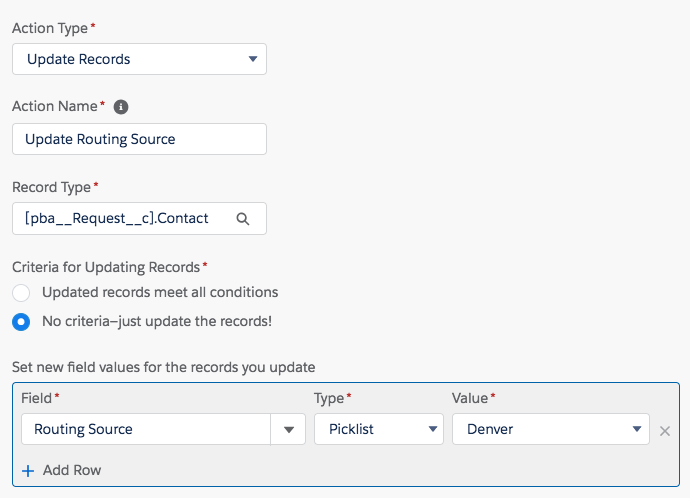
- Click Save.
- Click Add Criteria.

- On the right side of the screen, fill out the fields according to the image below.

- Click Save.
- Click Add Action next to the Web Leads criteria we just created above.

- On the right side of the screen, fill out the fields according to the image below.
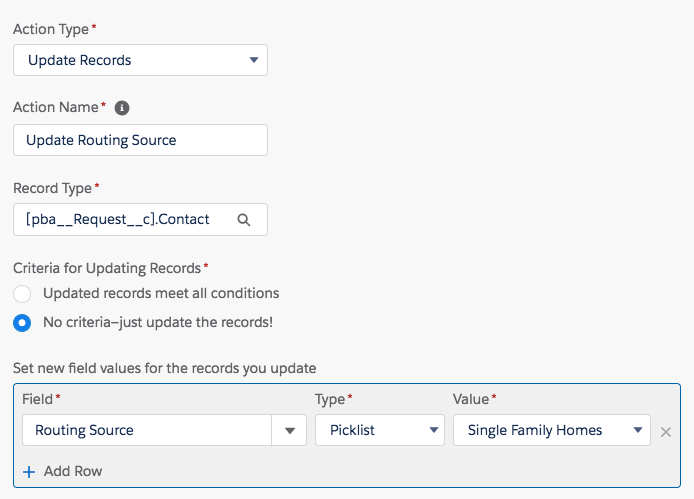
- Click Save.
- Click Add Criteria.

- On the right side of the screen, fill out the fields according to the image below.
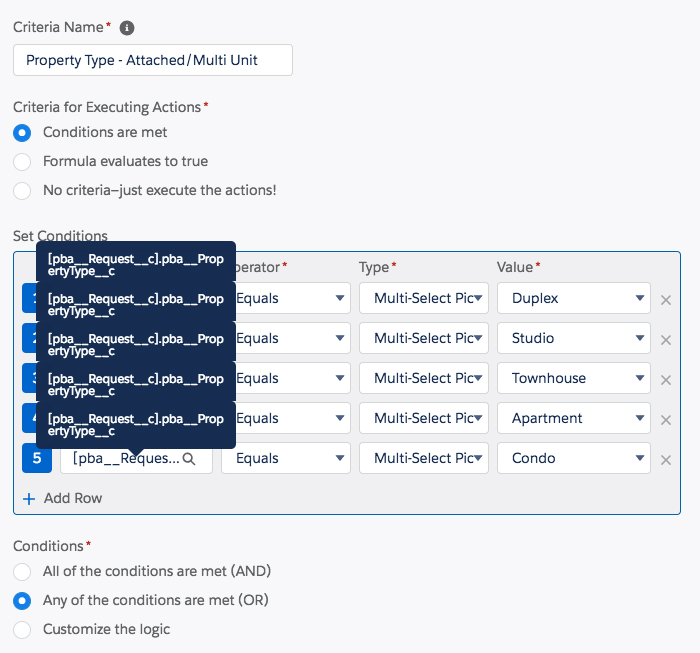
- Click Save.
- Click Add Action next to the Web Leads criteria we just created above.

- On the right side of the screen, fill out the fields according to the image below.
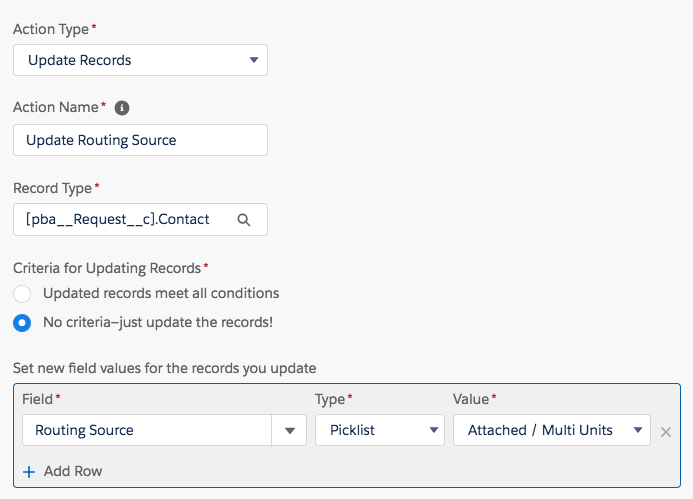
- Click Save.
Done! This process is ready to be activated.
- Click Activate in the top right corner.
- Click Confirm when prompted.

Enable Propertybase Mailservice
The final step before using Lead Routing is to enable Propertybase Mailservice. This is a "behind the scenes" service that enables the notification portion of Lead Routing to function correctly.
- Click here to enable Propertybase Mailservices.
Congrats! You have completed the back-end configuration steps for Lead Routing.
Note: Click the "Feature Overview" tab (top of this page) to finish Lead Routing setup.



Comments
0 comments
Article is closed for comments.