Adding, Removing and Renaming Tabs Follow
In this article we will walkthrough the process of adding or removing tabs from the main navigation in Propertybase.
Missing a Propertybase tab? Use this article to find the original object and change the name back to the original.
Add, Remove and Reorder Tabs
Let's start by locating the settings area for tabs. From there, you'll be able to make changes.
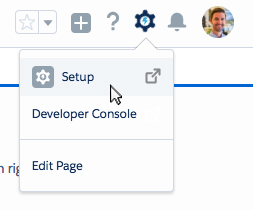
- Click the gear icon in the top right of the screen, then click Setup.
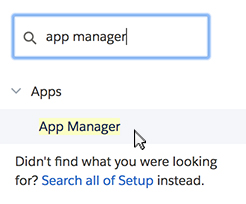
- Type 'app manager' in the quickfind search, then click App Manager.
Next we need to select the application that we want to manage. Propertybase accounts have three main applications: PB Admin, PB Agent and PB Manager. Each application has separate settings and thus separate tab configurations. To locate one of these, find the name of the application in the App Name column and make sure in the App Type column it says 'Lightning'. An important difference is that the App Type should be 'Lightning' and not 'Lightning (Managed)'. In this example, we will edit tab settings for PB Agent.
- Locate the PB Agent application, click the arrow on the right and then click Edit.

- In the popup window, click Select Items.

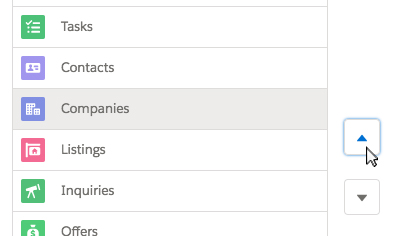
To add or remove tabs, select an object in the list (these are tabs) and use the arrows in the middle of the two columns. Use the top/right arrow to add objects and the bottom/left to remove objects. In the image below, we are adding Companies to our selected application.

You can change the order of tabs by using the up/down arrows on the right side of the window. In the image below, we have moved the Companies tab up so that it is next to Contacts.
Done! You have successfuly added, removed or reordered tabs in your account.
Rename Tabs
Note: We do not recommend changing tab names. This is because we write our help articles based on the default Propertybase configuration and following along can become difficult when names change. However, if you decide to rename objects please make physical or mental note of what the default name is.
The processes for renaming tabs is different than adding or removing, but still very simple. Follow the steps below to edit tab names.
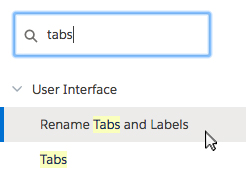
- Type 'tabs' in the quickfind search, then click Rename Tabs and Labels.
- Click Edit next to the tab you want to rename.
Note: You can optionally click 'Reset' to revert a tab back to its original name. (This does not work with custom object tab names, only default objects.)

- On this page type the Singular and Plural version of the new tab name.
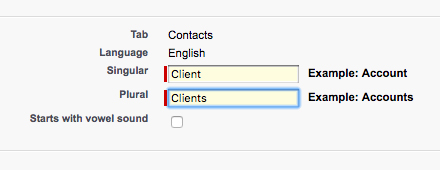
- Click Next.
- On this page update all field labels for the renamed tab.
In the example below we are changing all instances of 'Contact' to 'Client'.

- Click Save.
Done! You have successfully renamed a tab in your account.
| User Permissions Needed | |
|---|---|
| To rename tab and field labels: | “Customize Application” OR “View Setup and Configuration” AND Be designated as a translator |
| To reset renamed tabs: |
“Customize Application”OR “View Setup and Configuration” AND Be designated as a translator |
You can change the display labels of tabs, objects, fields, and other related user interface labels so they better reflect your organization's business requirements. When you rename a label, such as changing the “Accounts” label to “Companies,” the new label appears on all user pages, in Connect for Outlook, and in Connect Offline. With rare exception, all pages in the Setup area use the default, original labels.
- Click Setup | Customize | Tab Names and Labels | Rename Tabs and Labels.
- Select your default language from the Select Language drop-down list at the top of the page.
- Click Edit next to the tab you want to rename. Optionally, click Reset to change the name of your renamed tab to its original name. Note: You cannot reset custom object tab names.
- Enter the singular and plural forms of the new tab label. Also, if applicable for the language, select the Starts with a vowel sound checkbox for labels that start with a vowel. This ensures that the proper article (such as “a” or “an”) is used. Then click Next.
A renamed tab or object cannot use the name of another standard tab, custom object, or custom tab. - Enter the standard field labels and other user interface labels to be used for the selected tab or object. Be sure to enter both a singular and plural form for each label that requires it. Also, select the Starts with a vowel sound checkbox for labels that start with a vowel.
Note - Some standard fields, such as Created By and Last Modified By, are purposely omitted from renaming because they track system information. - Click Save.
- Repeat this procedure to translate labels into all other languages used in your organization.
Tip
After renaming a tab or object, rename any custom reports, dashboards, profiles, custom fields, and list views that contain the original name. You can modify labels using the translation workbench. To rename a standard report, click Save As from the report wizard and save it to a report folder designed for your new name.
Other tab customization options include the following:
Individual users can control which tabs and related lists display for their own logins. For more information, see Customizing Your Display.
In addition to the standard tabs provided by Propertybase, users can create entirely new custom tabs depending on their Edition. For more information, see Defining Custom Tabs.
In Enterprise, Unlimited, and Developer Edition organizations, you can override the tab home page that is displayed when a user clicks a standard or custom object tab. For more information, see Overriding Standard Buttons and Tab Home Pages.


Comments
0 comments
Article is closed for comments.