Using Teams and Offices Follow
Using Teams and Offices
Propertybase has added new Objects for Team and Office. These Objects have within them, Team Members and Office Members. This will allow Offices and Teams within Offices to be linked together for ease of use. The new Objects will sync with integrated websites and allow users to enter new Teams and Offices along with their respective members (Team Members and Office Members) directly into your Propertybase CRM!
Any Teams and/or Offices previously entered into the Websites will be migrated into Propertybase CRM. From here on this information will be maintained exclusively in Propertybase CRM. As soon as the migration is done, Teams and Offices and their Members must be edited only in Propertybase CRM!
This feature is currently released as Beta for all customers with a Propertybase Website. If you want to test it out prior to the official release please contact your support agent and we will activate it for you.
When you download Propertybase version 1.598 or higher these new Objects will be available (Currently in Beta phase). Need help updating to the newest version? You can follow the steps here!
Configuring Teams and Offices
Ready to get started with Teams and Offices?
Let's get started!:
First, you’ll need to go to the gear icon in the top right and click on Setup.
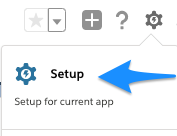
This will allow you to navigate into the Object Manager in the top left-hand side.

Once you’re in the Object Manager, you’ll need to search for the User object in the search section.
Next, select User from the list and click on User Profile Page Layouts.
Here, you’ll click on User Profile Layouts on the left-hand side.
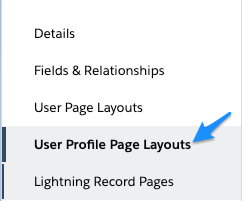
Once you're here you can select Related Lists:
Next, you'll drag and drop Office Members and Team Members

down to the Related Lists:

Next, you will go into the Wrench Icon above Office Members and configure it to only have:
- Office
- Office Administrator
- Office Manager
- Primary Manager

Next, you'll go into the Wrench Icon for the Team Members and add only:
- Teams

Now you can save this using the Quick Save button in the top bar.
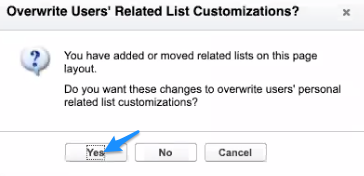
Please select Yes when you receive the Overwrite User's Related List Customization Warning:
Now, when you go to your Users, you'll see the two new related lists of Office Members and Team Members:

Using the drop-down arrows to the right of either related list above, you can select New and create a new Office or Team Member. Here you can set the members:
- User OR Team (Do you want a User or a Team to be part of the Office?)
- Office
- Position:
- Primary Manager
- Office Manager
- Office Administrator
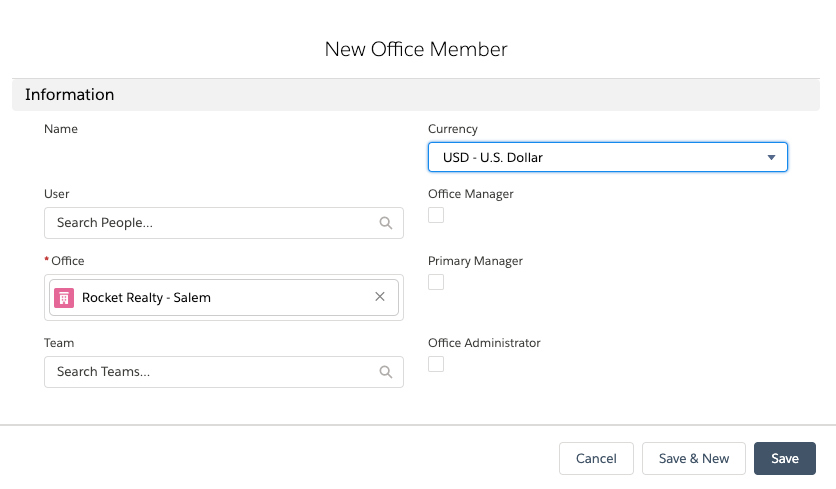
Once this is saved you will see the changes in the User:

With these new Objects setup, Teams can also be a part of an Office!
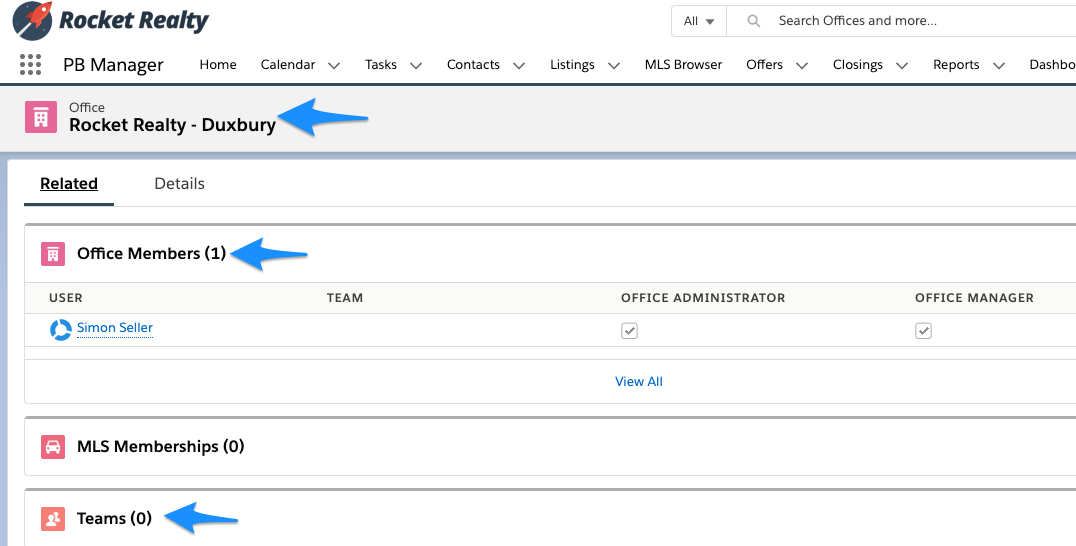
Below you'll see the Office information with the Office Members in the Related List that shows the Teams and Agents in that Office. In the Related List of "Teams", you can see the Teams that have selected this office as their primary office.
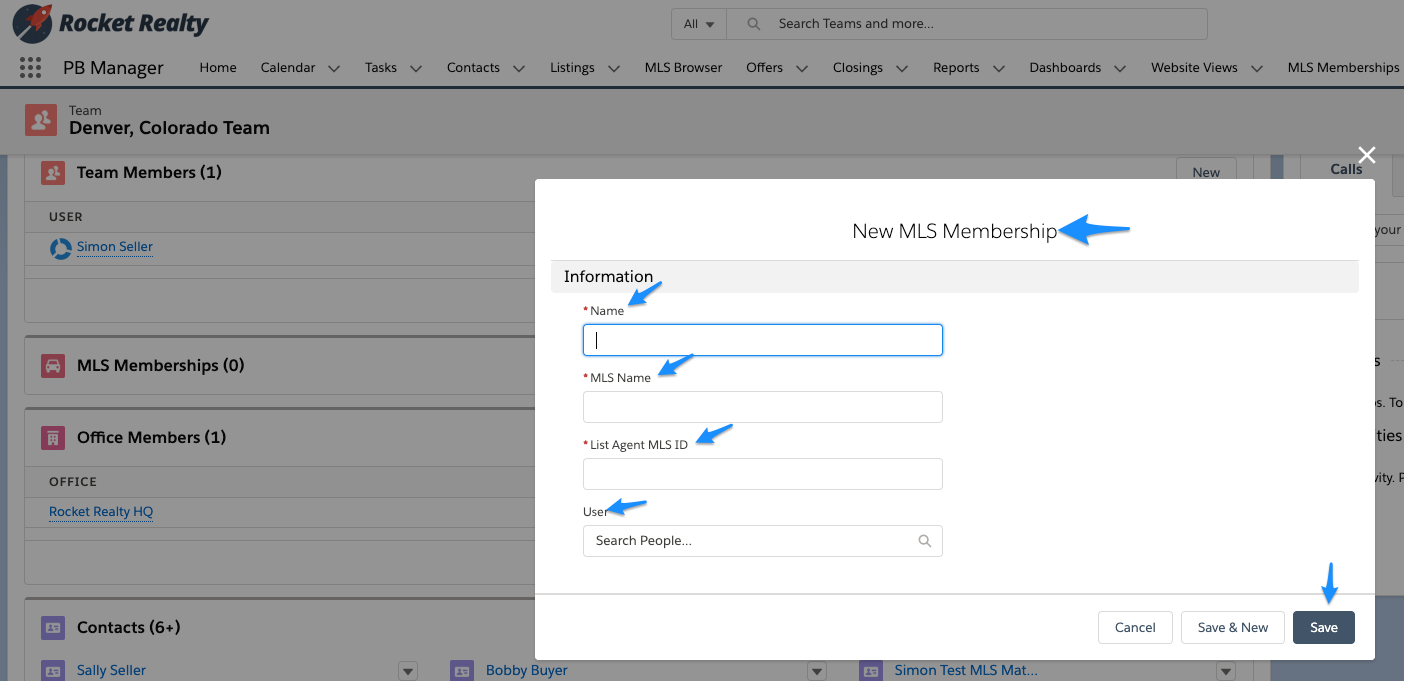
To add MLS ID's, please add them as MLS Memberships (also above). MLS IDs for Teams and Offices should include the Team OR Office in the lookup field (not the User) and the correct MLS Name. The MLS ID should be put into the field: List Agent MLS ID.
It is important to note that if a Team is deleted from Offices or Teams it will remove all team relationships for the Team being deleted.
Office/Team Overview:
Access all Offices and Teams via App Launcher:

On the list view, you can get to an overview of all teams and all offices

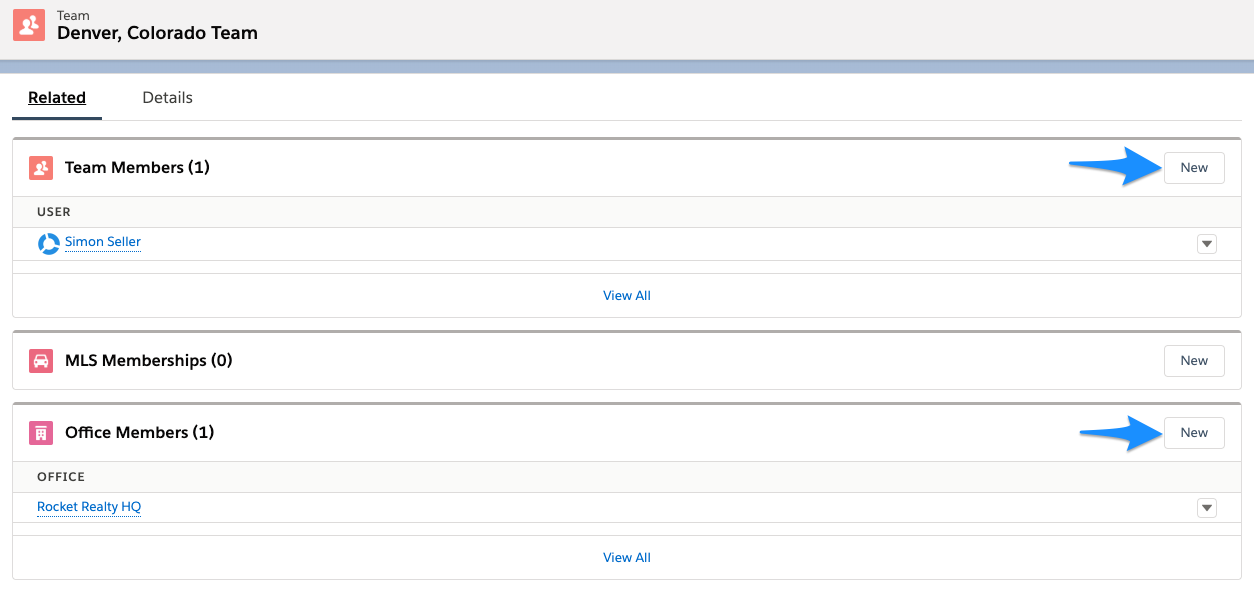
You can see all details of a Team and Office here:

You can also add new Office and Team Members here:
Behavior and Logic
Initial Setup
Field Mapping:
Upon initial setup of Teams and Offices, all existing teams and offices on your Website will be migrated into your Propertybase Org based on Field Mapping. Teams and Offices that contain Agents/Users that are not synced correctly between PB CRM and the Website will not be migrated.
You can use the following worksheet for Field Mapping for Teams and Offices: https://docs.google.com/spreadsheets/d/1nl4PpLQ-GygPLp30Re9_hUxiY49A53jr5-8mFvLdKaA/edit#gid=0
*Please note the tabs at the bottom of the worksheet to toggle between Teams and Offices.
In order to Sync your Users, you'll click on the "Sync Users to Website" button and an auto-sync of Teams and Offices will start the sync to the Website. Please note *The sync is automated and runs every 10 minutes (same as with Users)
Things to note:
- A Team needs to have at least one User.
- An Agent should only be part of ONE team
Lead Routing for Website Leads
General facts about lead routing:
- Leads can only be assigned to Users (Agents) that are synced between CRM and Website without errors.
- If an agent or team is selected when the Lead is entered on the website, the lead will be routed to that Agent/Team in Propertybase.
- The Contact Owner in Propertybase and Assigned Agent on the Website for Contacts/Leads are synced. ie: when the Owner or Agent changes in one system, it is changed in the other system as well.
Below you'll see the sync paths:
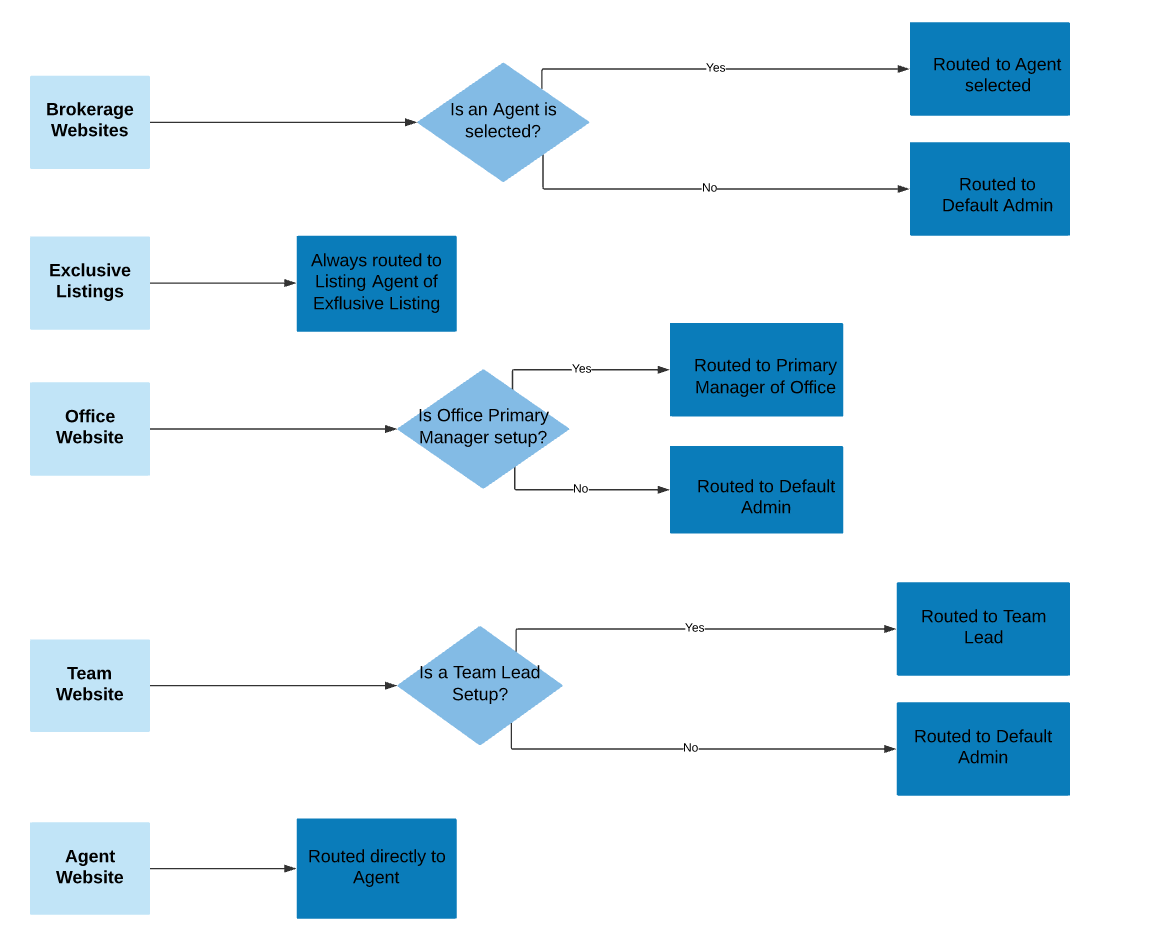
Propertybase Lead Router can be used to route Office and Team leads inside PB CRM:
- To route Office Leads, set a Primary Manager. All contacts where the fields Lead Source is Website, Office (Lookup) is the respective Office and Contact Owner is the appointed Primary Manager can be routed to a Lead Routing Team via one of the available Distributors.
- To route Office Leads, set a Team Lead. All contacts where the fields Lead Source is Website, Team (Lookup) is the respective Team and Contact Owner is the appointed Team Lead can be routed to a Lead Routing Team via one of the available Distributors.
Adding or removing Agents
If Propertybase CRM users are added to Teams or Offices via Team Member/Office Member on the Website, they will be added to the Team/Office
If Propertybase CRM users are deactivated or removed from a Team or Office via a Team or Office Member, they are removed from the Team.
Adding a Team to an Office
Teams can also be added to Offices by creating an Office Member record that links the Team to the Office. You can do this by going to Offices, select the Office you'd like to add a member to, click on Related in the top-left and then click on the New button to add the respective Team Member and link them to a team:

MLS IDs
Add MLS IDs for Teams and Offices via MLS Membership record. Fill out the fields MLS Name and List Agent MLS ID as well as the Office OR Team lookup field:
Logs and Errors
Logs and errors that can occur when Offices and Teams or their members are synced or imported initially can be viewed in the Control Center section Website Integration.
Sharing Rules
For an initial overview on sharing rules in Propertybase please visit this article
For more information about sharing rules, in general, you can also reference the following article.
The first thing you need to do is add a new public group that contains all team or office members:
Go to Setup and search for Public Groups. Then click on New, Enter a Label and Name and select all members of your team or office, then click save.

Afterward, search for Sharing Settings under Setup, then go to Edit. Now, you need to change the default sharing settings of your contact to Private for both Default Internal Access and Default External Access, then click Save.
This may take a while, depending on the number of records in your Org.
On the same page, under Manage sharing settings for select Contacts.

Click on New. Here you can define the Name of the sharing rule. You can base it on the record owner (a member of the team or office for example) and select which records are to be shared.
In this case, the records that are owned by members of the team/office. Then you can define who to share them with, in this case again the members of the team/office.
Finally, you can define if it should be read-only (makes sense for one office) or read/write (makes sense for a team), then click Save.

Once you do this for all offices and teams, you are all set!
FAQs
Q: My team and/or office has not synced over. What should I do?
A: Please double-check if all team and office members are synced correctly between Website and CRM and contact PB Support.
Q: I have not received any leads. Why?
A: Please check the logs for errors. These can be found in the Control Center section, then go to Website Integration, then select Logs and check if there are any errors. If you are using Lead Router, please check the settings.
Q: My Team does not show up on the website.
A: Please check the Fields Display Bio and Lead Management on the Team


Comments
0 comments
Article is closed for comments.