Website Listings Sync Follow
Those familiar with Propertybase Websites, know about the powerful features they make available to your brokerage. Did you know that one of those features includes the ability to push listings to your Website? Website listing Sync gives you the ability to create listings within Propertybase and push them to your website with the click of a button. These coming soon, pre-listings or pocket listings can live on your website alongside the rest of your MLS database. In this article, we cover the steps required to get started with pockets listings and how to push them to your website.
Note: You must have a Propertybase Website to use pocket listings. No website? No worries. Simply contact your Account Executive or Propertybase Support for more information.
Required Configuration
To get started with pocket listings, you must first add one component and one field to the listing page layout. The field allows the current listing to be syndicated (sent to your website) and the component gives you the ability to syndicate the current listing. To get started, follow the steps below.
- Click the Listings tab at the top of the screen and select any Listing.

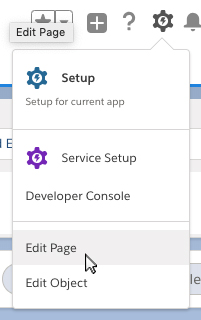
- Click the gear icon in the top right corner of the screen, then click Edit Page.
- As shown in the image below, drag a Visualforce component from the left side of the screen and release it below the Map component.
Note: You can put this component anywhere you would like (somewhere else on the page, within a custom tab, etc.) This component contains the button that pushes the current listing to your website.

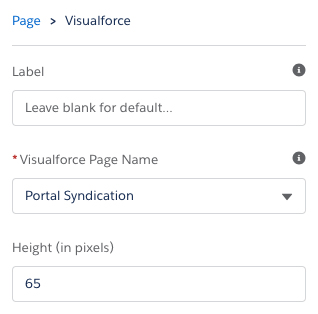
- On the right side of the screen, update the Visualforce setting to match those shown below.
Note: If you want to give this component a label, you can do so in these settings. Likewise, if you would like the component to be taller or shorter, you can set that in the height field.
- Once you are satisfied with the placement and appearance of this component, click Save in the top right corner. Once the page has saved, click Back.

You should now see the Portal Syndication component on the Listing page layout. This will allow you to syndicate your listings to your Propertybase website. However, we still need to add a field to the page in order to do so. Continue by following the steps below.
- Click the gear icon in the top right corner of the screen, then click Edit Object.

- Click Page Layouts on the left side of the screen.

- In the list of page layouts, click Sale.

From this page you can add, remove or modify the fields that are displayed when viewing listings with the listing type of sale. It's on this page that we will add the first required field.
- Drag "System Allowed for Portals" from the top of the screen to the "Basic Information" section below.

- Click Save in the top left corner.

You may want to do the same on the Rent record type unless your brokerage does not deal with Rentals.
You should now see the "System Allowed for Portals" field on the Listing page layout. With this box checked, it means the current listing is "allowed" to be sent to your website. However, without a connection to your website, Propertybase won't know where to send your listing.
Click the "Connecting to Your Website" tab at the top of the page to learn more.
Required Fields
The ability to customize and configure Propertybase to fit your exact business needs makes it extremely powerful. However, when working with Listing and MLS data there are specific fields and naming conventions that must be used. Make sure your Listing fields match the requirements below to ensure your Listings upload successfully.
Non-US customers: please review the table at the bottom of this page.
Location Fields
Listings must include the following location fields. Additionally, the values for these fields must match the Propertybase Websites naming conventions found in the CSV file attached to the bottom of this article. Alternatively, click here.
- Address (street name and street number)
- City/Town
- Country (in two digit format i.e. US for United States)
- State Name (in two digit format i.e. CO for Colorado)
- Price
- Property Type
- Status
- Zip/Postal Code
Listings Outside the US
If your brokerage is located outside of the United States it's likely that you locate your Listings differently than the fields listed above. In order to use the location fields that work best for you, while satisfying the requirements for listing sync, simply rename the default Propertybase fields as necessary using the table below.
How do I use the table below?
- Using Column A, locate the country that your brokerage does business in.
- Locate the fields listed in Column B on your Listing record page.
- Rename those fields to their corresponding values in Column C.
| (A) Country | (B) Default Value | (C) New Value |
| United States (Default Values) |
|
|
| Costa Rica |
|
|
| France |
|
|
| Italy |
|
|
| Spain |
|
|
| Bahamas |
|
|
| Montenegro |
|
|
| Ireland |
|
|
| Cayman Islands |
|
|
| Saint Kitts and Nevis |
|
|
| England |
|
|
| Scotland |
|
|
| Wales |
|
|
| Northern Ireland |
|
|
| Australia |
|
|
|
Panama |
|
|
Note: For all non-US customers, your website will automatically convert imperial values to metric and adjust the labels accordingly. (E.g. "Lot Size (Square Feet)" converted to "Lot Size (Square Meters)".
Once your Listing fields match those shown above, click the "Connect Your Website" tab at the top of this page.
Connecting to Your Website
If you haven't completed the steps in the "Required Configuration" tab on this page, do so now. Otherwise, continue reading below to learn about how to establish a connection between Propertybase and your website.
Note: If you do not see a Portal Mapping Tile in Control Center you may need to add the following setting: portal_mapping_active = true (value must be exact/all lowercase.) Unsure how to add settings? Click here.
- Click the App Launcher in the top left corner of the screen, then click Control Center.
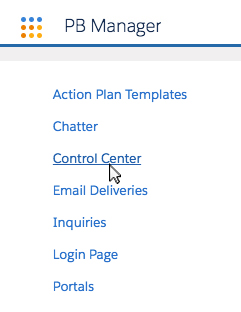
- From the Control Center, click Portal Mapping.

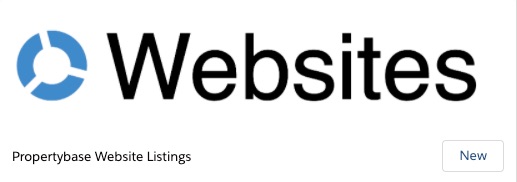
- Click New on Propertybase Websites.
Next, you will see a window asking for portal credentials. Within this window, enter a title for the new connection. Next, enter the email address you would like to receive notifications at. Once you've filled in the first two fields, it's time to enter your Boston Logic API Key and website domain. Click the boxes below for instructions on how to find that information.
How do I find my API key?
To find your API Key, log into your Boston Logic account and follow the steps below.
- Click your profile image at the top of the screen, then click Settings.

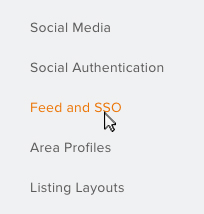
- Click Feed and SSO on the left side of the screen.
- Scroll down until you see Inbound Listings API Settings.
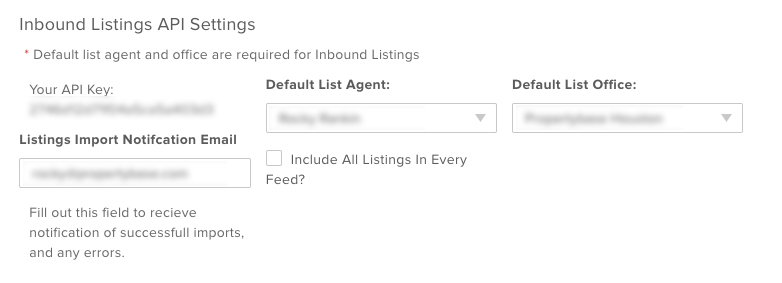
In this section you will see your API Key. Additionally, this is where you can set your default List Agent, Default List Office as well as an email address that will receive notifications for inbound listings.
Note: You MUST set a Listing Notification Email, default List Agent and List Office. Propertybase cannot communicate with your Boston Logic account without this information.
- Once you've made changes to these settings, click Save Settings at the top of the screen.

How do I find my website domain?
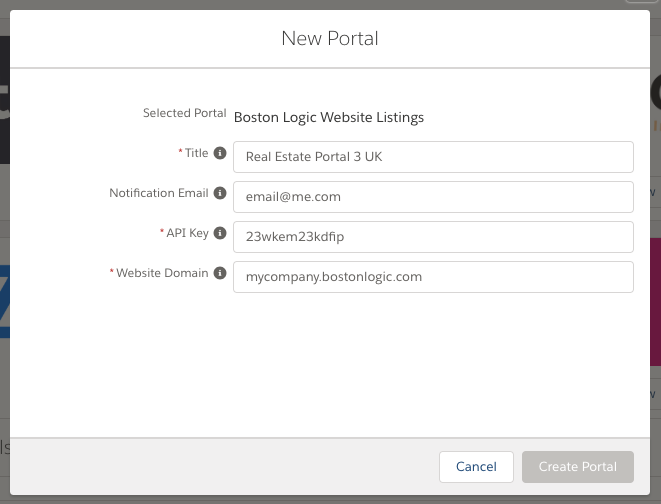
- Once you have filled out all the required fields, click Create Portal.

On the following screen, you will see a long list of fields. These fields are all of the Listing fields in Propertybase, as well as all the Listing fields in Boston Logic. In order to successfully import Listings to your Propertybase website, you need to make sure these fields are "mapped" to each other.
Thankfully, Propertybase has provided you with default mappings to get started.
- Click Load Default Values.

- Next, review the list of fields and make sure that all required fields are mapped to a Propertybase field. To map a field, click the "plus" icon next to it and select a Propertybase field.

Note: Required fields are marked by a red asterisk. Additionally, if you have any required fields that are not mapped, Propertybase will not let you activate a portal until they are mapped.
- Once you've mapped all required fields, click Activate at the top of the screen.

Nice work! You just activated a connection between your CRM and your website. To learn more about sending individual Listing to your Propertybase website, click the "Publishing Your Listing" tab at the top of this page.
Publishing Your Listing
If you haven't completed the steps in the "Required Configuration" and "Connect to Your Website" tabs on this page, do so now. Otherwise, follow the steps below to send Listings from Propertybase to your website.
- Click the Listings tab at the top of the screen.

- Next, click the Listing that you want to publish.

- Scroll down until you see the Portal Syndication component, next click the Publish button to send the current Listing to your website.

Done! You should now see your Propertybase listing on your website.
How do I know my Listing published successfully?
Frequently Asked Questions
I completed all required configuration, but my listing still does not appear on my website. Why?
Scenario #1: In order for a listing to be published to your website, it must have at least one image associated with it in Propertybase and that image must be available to portals.
Click here to learn more about manage Listing images and media.
Images can be added to a Listing by opening the Listing in Propertybase and clicking the "Images & Media" tab. Once uploaded, the checkbox next to "Appears On Portal Feeds" must be checked.
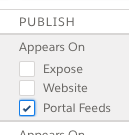
Click here to learn more about managing listing images & media.
Scenario #2: You have unmapped required fields. If you map one of the "Agent", "Colisting Agent" or "Sale Agent" fields, the rest of the fields in each respective group become required. For example: If you map the field "Agent Email Address", then the following fields become required "Agent First Name", "Agent Last Name", "Agent MLS ID", "Agent Middle Name", etc. Currently, Propertybase does not notify the user of this requirement.
Are pocket listings available globally?
No. Currently pocket listings are only available in select countries. Click the box below to see a list of all supported countries, as well as their country "code".
Click here to see a list of all countries currently supported.
- US: United States
- BS: Bahamas
- KY: Cayman Islands
- CR: Costa Rica
- FR: France
- IE: Ireland
- IT: Italy
- ME: Montenegro
- KN: Saint Kitts and Nevis
- EN: England
- WL: Wales
- SW: Scotland
- NT: Northern Ireland
- AU: Australia


Comments
0 comments
Article is closed for comments.