Updating to 1.398 (from 1.366 or lower) Follow
Note: If you are on Propertybase version 1.367 or higher, refer to this article instead.
Warning: We always recommend testing changes and updates in a Sandbox environment before deploying to production. Settings and triggers in newer versions of Propertybase can break custom triggers, integrations, and workflows. Our support team may not be able to fix customizations made by our clients over time that are broken once this update is deployed.
In summer 2015 Propertybase released a new version with many exciting new features. Some of the features are the new Listing Browser, Contact Browser and Activity Browser which we call the new Browser tab.
You can check out more information about the Browsers in the article here:
There are several other cool new features which you can check out in the articles below:
Your ORG can be updated if you have a "Propertybase V3" package installed. If the Version number is higher than "1.367" then you already have the latest version of Propertybase. Click here to identify your Propertybase Version.
Depending on the Propertybase version that your ORG has installed there may be several configurations to change. Please read carefully and do everything step-by-step. You will only need to go through this upgrade process once. Future upgrades will be much quicker and require less steps. If you are not sure with something please do not hesitate to submit a support ticket!
Before you start: Please make sure that you have granted access to Propertybase support for 30 days.
1. Turn on the new Salesforce Setup User Interface
The Propertybase Help Center articles will use this new interface for screenshots and videos in the future so it will be much easier for you to follow.
Go to Setup > Customize > User Interface
- Remove: Enable Salesforce Notification Banner
- Remove: Show Quick Create
- Add: Enable Enhanced Profile User Interface
- Add: Enable Improved Setup User Interface
2. 3rd Partly Application Cleanup
We recommend using this as an opportunity to clean up non required 3rd party applications.
You need to uninstall the Propertybase package called User Adoption:(Depending on your ORG creation date, this package may or may not have been installed at all)
Go to Setup > Installed Packages > Click "uninstall" next to the
- User Adoption package
You may remove the following additional packages if you are not using them. The below packages came with your ORG by default: Go to Setup > Installed Packages > Click "uninstall" next to the following
- Salesforce for Social Media
- VerticalResponse for AppExchange
- Appirio Cloud Sync
Note: You can choose if you want to delete them directly or keep a copy. If you have never used it, just delete. If there are dependencies and Salesforce can not delete it, please do not hesitate to open a ticket so we can assist you.
3. Activate all critical Salesforce Updates
Go to Setup ->Build -> Critical Update and activate all of them.
4. Check your Contact and Listing Browsers
This is just relevant if you are on a Propertybase Version between 1.333 and 1.366!
The new browsers can not open your saved lists and filters. If you have used them intensively (means more then 10 saved filters) please submit a ticket and we´ll support you. Otherwise please just make a screenshot of your criteria as you can create them new in a few moments.
5. Install the latest Propertybase Package
Now the big moment is here! You can install the new Propertybase version!
Paste this link to install Version 1.398.8
/packaging/installPackage.apexp?p0=04t0B000000QvKG
into the URL field in you browser after the end of the base url (notice the slash is not present): 
The "na11" may be different depending on your location or if your domain is custom, it will be mydomain.salesforce.com.
Once the new package is shown you need to make some important clicks which will save you a lot of work later!
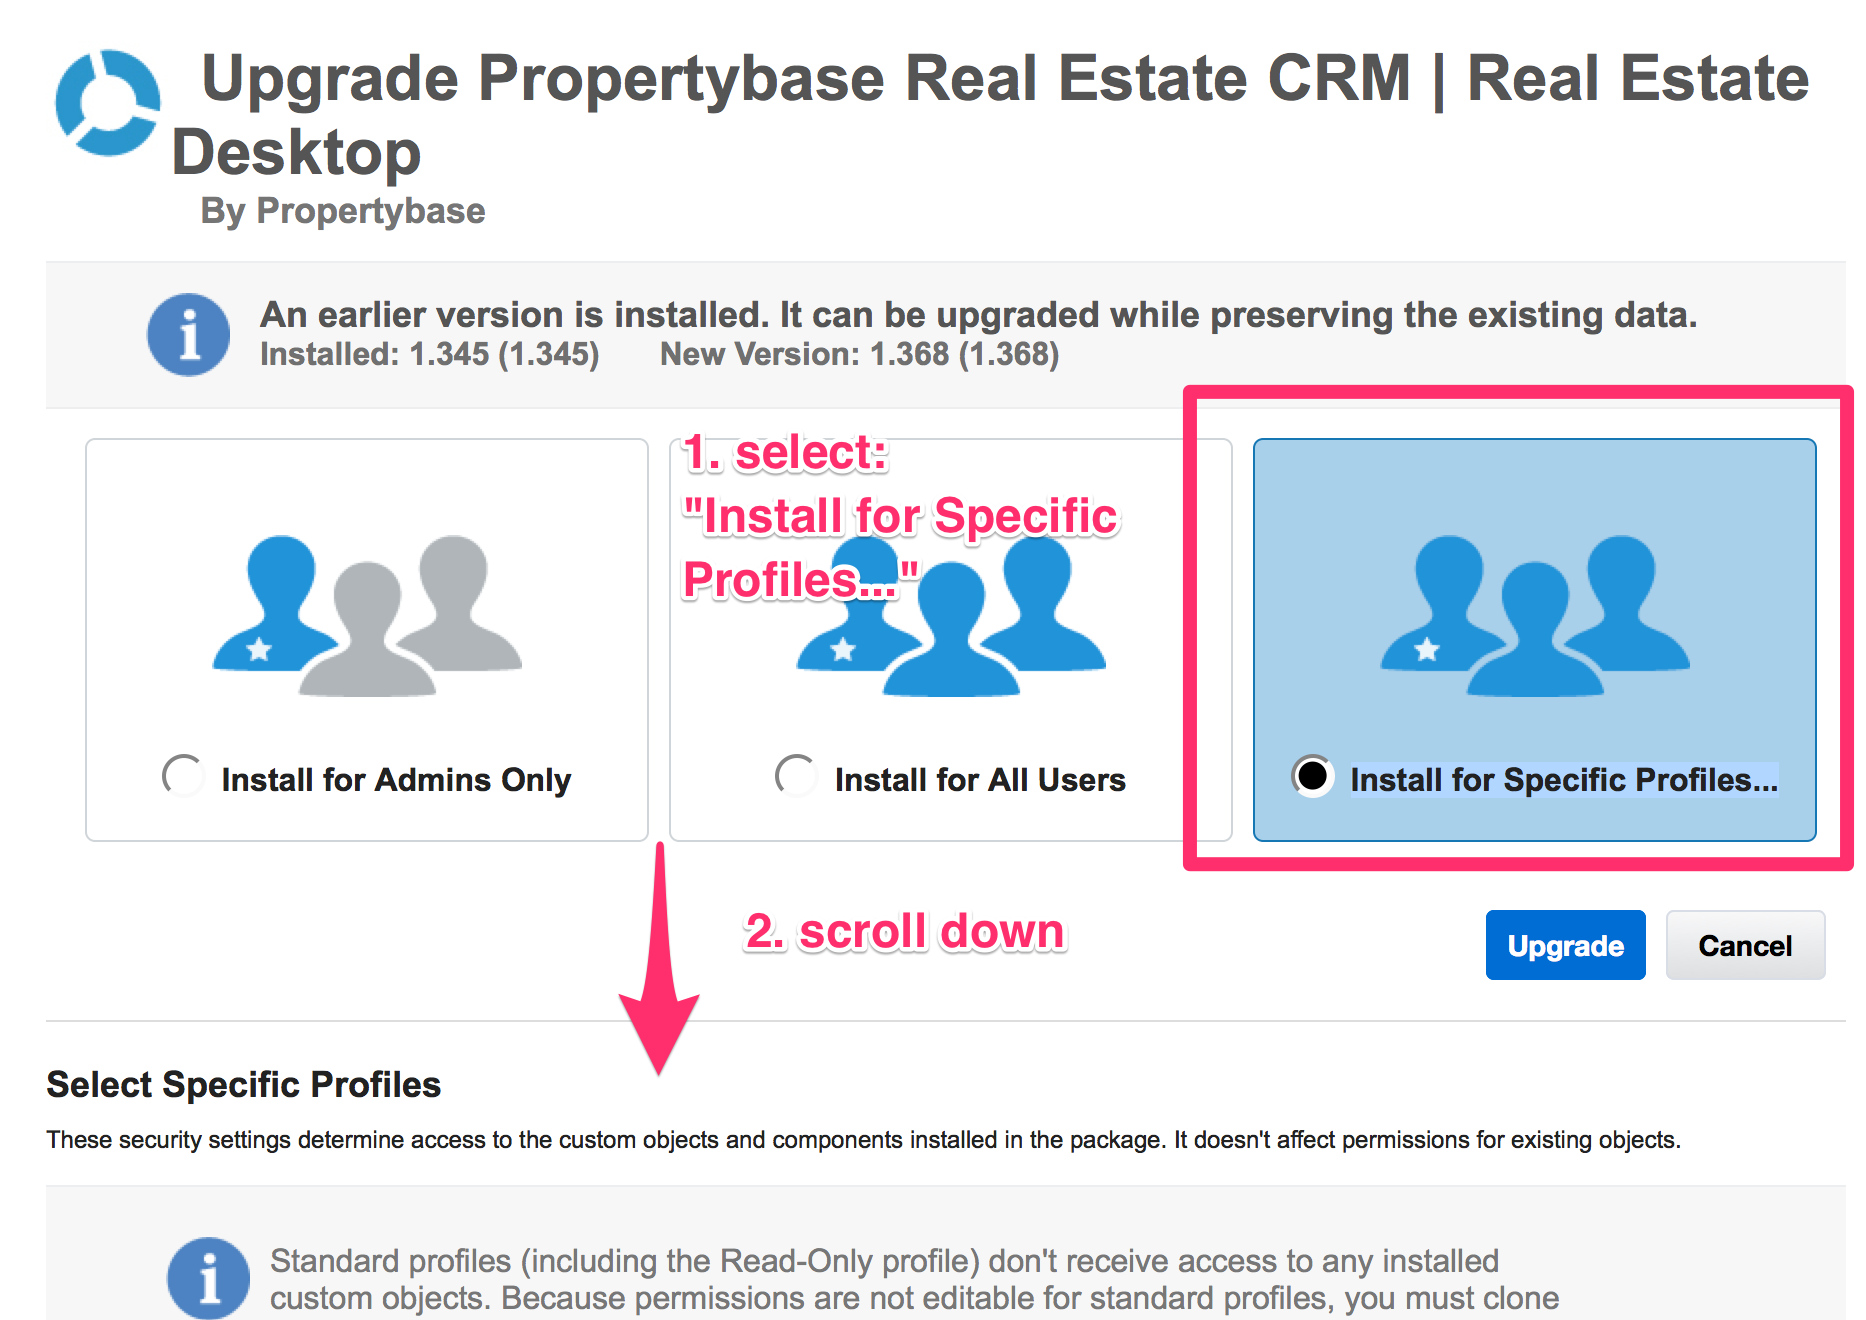
Please select the "Access levels" as explained in the screenshot below:
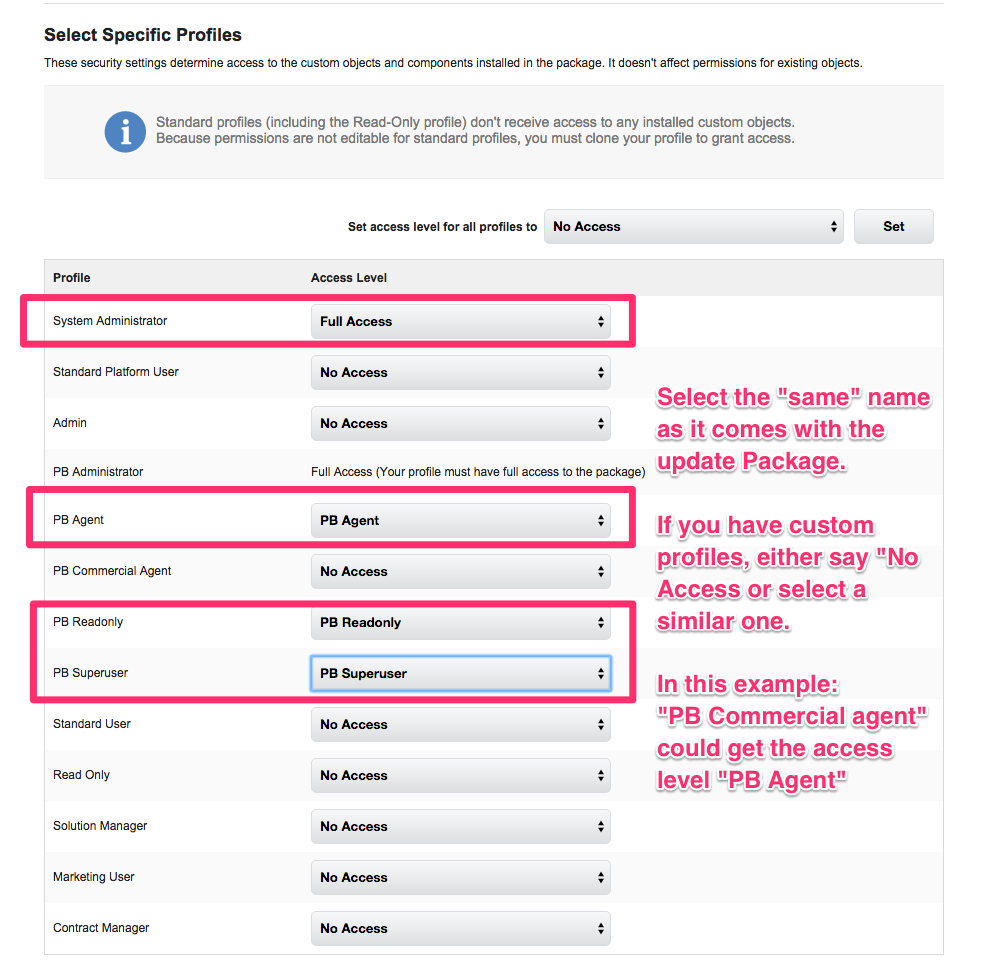
If you are on a commercial version you will see "PB Broker" on the left side rather than PB Agent, never the less map PB Agent to it.
Now you can scroll up again and press "Upgrade".
This page will load for a while, and tell you that it will take some time. Then you´ll be informed by email when it´s finished. When you have received the email you can continue.
6. Adjust all used Profiles
Even if you do not have any custom profiles, you need to double-check and adjust all profiles which are assigned to users in your ORG. (This includes the "PB Agent", "PB Superuser" and "PB Admin")
The following settings need to be done for every in Profile: Go to Setup/Manage Users/Profiles
Visual Force Pages
- Add all 'pba.' visual force clases except 'pba.AccountMassTransfer' and 'pba.ContactMassTransferRecords' for PB Agent (Broker) / PB Readonly
Apex Classes
- Add all 'pba.' apex classes to the profiles.
Object Permissions
Go to Setup > Manage Users >Profiles, select the Profile and then go to Object Settings
The following "Bold" settings are required to be changed in order for the upgrade to perform properly:
- Accounts (Companies)
The Record Types "Company" and "SystemInternal" must be selected.
Select "Company" as Default Record Type. - ActionContents (Please make sure edit access for all fields)
- PB Agent/Broker: Read, Create, Edit
- PB Superuser: Read, Create, Edit, Delete, View All, Modify All
- PB Administrator: Read, Edit, Create, Delete, View All, Modify All (Select all permissions) - Actions
- PB Agent/Broker: Read, Create, Edit
- PB Superuser: Read, Create, Edit, Delete, View All, Modify All
- PB Administrator: Read, Create, Edit, Delete, View All, Modify All - Browser Lists
- PB Agent/Broker: Read, Create, Edit, Delete
- Browsers
- For all Profiles select the Tab Settings option: Default On in Tab Settings. - Contact Browser
- For all Profiles select the Tab Settings option: Tab Hidden in Tab Settings. - Contacts
- For all Profiles the Records Types "Individual Client" and "Company Contact" must be selected.
For all Profiles select "Individual Client" as Default Record Type. - Events
- For all Profiles in Field Permissions, make sure that "Read/Visible" is selected for the field "Type".
- For all Profiles in Commercial ORGs make sure to select the Record Type: Showing - Listing Browser
- For all Profiles select the Tab Settings option: Tab Hidden - Portal Listing Responses
- PB Agent/Broker: Read, Create, Edit
- PB Superuser: Read, Create, Edit, Delete, View All, Modify All
- PB Administrator: Read, Edit, Create, Delete, View All, Modify All (Select all permissions) - Property Browser
- For all Profiles select the option: Tab Hidden in Tab Settings - Request Browser
- For all Profiles elect the option: Tab Hidden in Tab Settings
- Settings:
- PB Agent/PB Broker: Read
- For all Profiles select the option: Tab Hidden in Tab Settings. - SObject Work Queue
- PB Agent/PB Broker: Read
- PB Superuser: Read
- PB Administrator: Read, Create, Edit, Delete, View All, Modify All (set all permissions) - SystemLogs:
- PB Agents/Brokers: Read
- PB Superuser: Read
- PB Administrator: Edit, Create, Delete, View All, Modify All - SystemStructs
- PB Agent/PB Broker: Read, Create, Edit, Delete
- PB Superuser: Read, Create, Edit, Delete
- PB Administrator: Read, Create, Edit, Delete, View All, Modify All (set all permission) - Tasks
- For all Profiles in Field Permissions, make sure that "Read/Visible" is selected for the field "Type". - Templates
- PB Agents/Brokers: Read; Then select the option: Tab Hidden in Tab Settings.
- PB Superuser
- PB Administrator: Edit, Create, Delete, View All, Modify All
- For all Profiles select the option: "Default On" in Tab Settings.
The following settings are optional, but will ensure the best user experience if modified:
- About Action Plans -> Tab Hidden
- Action Plan Tab (with visual force page) -> Default Off
- Action Plan (normal SF page) -> Tab Hidden
- Action Plan Template -> Tab Hidden
- Action Plan Tab (with visual force page) -> Default Off
- Action Plan (normal SF page) -> Tab Hidden
- Activity Manager -> Tab Hidden
- Appirio Cloud Sync Tab -> Tab Hidden
- App Launcher Tab -> Tab Hidden
- Campaigns -> Tab Hidden
- Content -> Tab Hidden
- Contracts -> Tab Hidden
- Conversations -> Tab Hidden
- Facebook Pages -> Tab Hidden
- Facebook Users -> Tab Hidden
- Favorites -> Tab Hidden
- Files -> Tab Hidden
- Google Adwords -> Tab Hidden
- Groups -> Tab Hidden
- Help -> Tab Hidden
- Import Template -> Tab Hidden
- Leads -> Tab Hidden
- People -> Tab Hidden
- Price Books-> Tab Hidden
- Profile -> Tab Hidden
- Profile Feed -> Tab Hidden
- Profile Overview -> Tab Hidden
- Propertybasebase Social -> Tab Hidden
- Social Agent -> Tab Hidden
- Social Setup -> Tab Hidden
- Subscriptions -> Tab Hidden
- Task and Calendar -> Tab Hidden
- Twitter Accounts -> Tab Hidden
- Twitter Searches -> Tab Hidden
- VR Email -> Tab Hidden
- VR Postcard -> Tab Hidden
- VR Statistics -> Tab Hidden
Do you have a sites users for the weblistings and/or web-to-prospect? Please make sure that it has access to "SObject Work Queue", "SystemLog" and the "System Structs" objects.
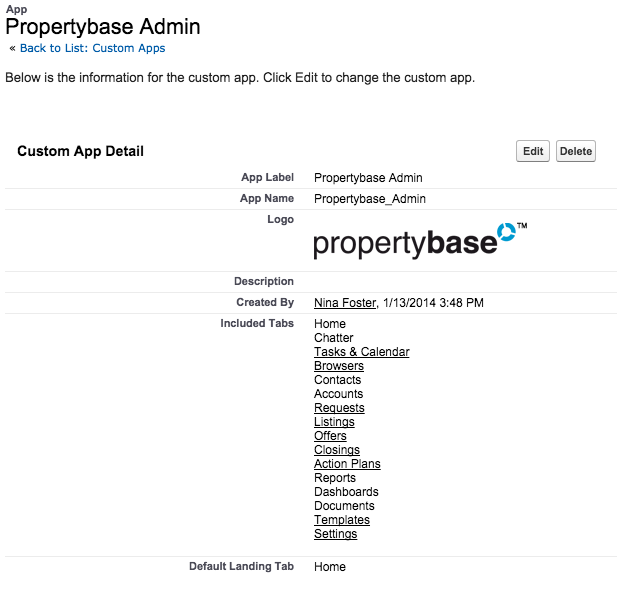
7. Clean up your Apps
To make sure that all you users can work with the new browsers, we recommend you the following configuration. You can find those under Setup ->Build -> Create -> Apps
When you adjust an App, please make sure to set the Checkbox "Overwrite Users' Personal..." to make sure, that all Users have the same configuration later!

After completing the last step with each individual "App" they should look as follows:
Propertybase Agent

Propertybase Manager

Propertybase Admin
8. Adjust Type on "Action" objects
With the new version Propertybase has a new Activity Management tool which is currently in Beta status. This allows you to connect a contact with several listings within one event/task. This is helpful when creating a showing or tour with a client you can now associate multiple listings.
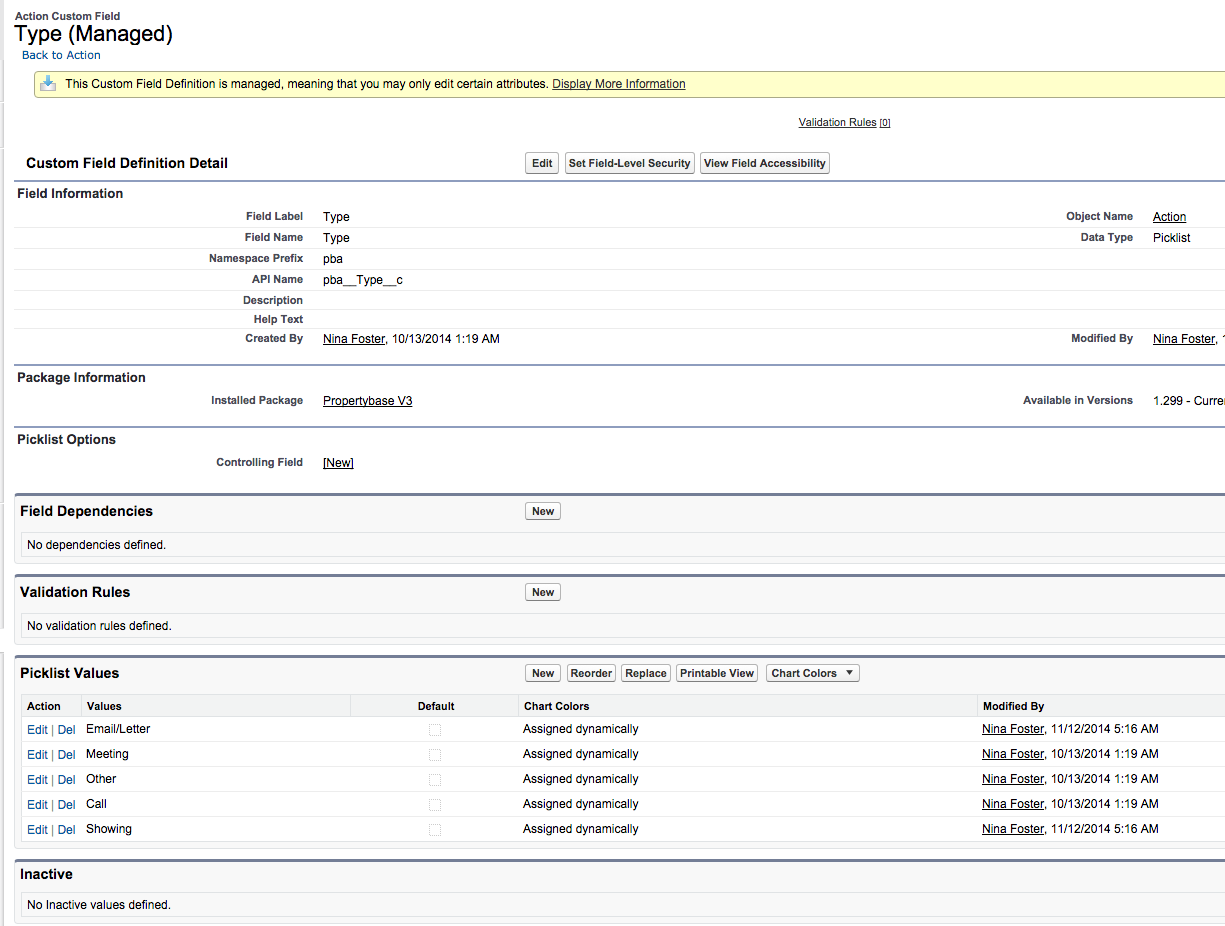
You need to make sure that all Picklist Values have been added and displayed for the Type field for your Events AND Tasks.
You must have a minimum of these fields on each of the Type fields:
| Email/Letter |
| Meeting |
| Other |
| Call |
| Showing |
To verify the "Type" field on the Tasks go to: Setup > Build > Customize > Activities > Task fields > click on "Type"
To verify the "Type" field on the Events go to: Setup > Build > Customize > Activities > Event fields > click on "Type"
The values you find there must be added under the Action object. Setup > Build > Create > Objects >Action > Then locate the "Type" field. Click the field label name. Then scroll down to find the picklist values.
9. Add required settings
Please read here how to add settings.
With the new version you just need a few settings as most things are working with the default:
Name & Key: spa_fields_whitelist
Value:
{
"pba__listing__c": [
"pba__Property__c"
],
"User": [
"defaultcurrencyisocode"
],
"pba__Property__c": [
"pba__Main_Website_Image__c"
]
}
Name & Key: loewy_config
Value:
{
"listing_page_layout": [
"Name",
"pba__ListingPrice_pb__c",
"pba__Address_pb__c",
"pba__PostalCode_pb__c",
"pba__City_pb__c",
"pba__TotalArea_pb__c",
"pba__YearBuilt_pb__c" ],
"opt_out_fields": { "email": "HasOptedOutOfEmail" }
}
Name & Key: forms_configuration
Value:
{
 "objects": [{
 "objectName": "contact",
 "sidebarComponents": [{
 "type": "duplicateCheck",
 "searchFields": [{
 "field": "name"
 },{
 "type": "email"
 }, {
 "type": "phone"
 }]
 }],
 "enabledRelations": [{
 "objectName": "task",
 "relationshipName": "WhoId",
 "addByDefault": false
 }, {
 "objectName": "event",
 "relationshipName": "WhoId",
 "addByDefault": false
 }, {
 "objectName": "pba__Request__c",
 "relationshipName": "pba__Contact__c",
 "addByDefault": false
 }]
 }, {
 "objectName": "pba__Listing__c",
 "enabledRelations": [{
 "objectName": "task",
 "relationshipName": "WhatId",
 "addByDefault": false
 }, {
 "objectName": "event",
 "relationshipName": "WhatId",
 "addByDefault": false
 }]
 }, {
 "objectName": "pba__Property__c",
 "enabledRelations": [{
 "objectName": "task",
 "relationshipName": "WhatId",
 "addByDefault": false
 }, {
 "objectName": "event",
 "relationshipName": "WhatId",
 "addByDefault": false
 }]
 }, {
 "objectName": "pba__Request__c",
 "enabledRelations": [{
 "objectName": "task",
 "relationshipName": "WhatId",
 "addByDefault": false
 }, {
 "objectName": "event",
 "relationshipName": "WhatId",
 "addByDefault": false
 }]
 }]
}
To use our new send wizard you will need a personalized token. Please request your Loewy_token with a ticket to support@propertybase.com (do not forget to provide us your ORG ID) and we´ll send it to you. To test it out while waiting for your token, you can use this setting. Be aware it will not send emails out.
Name & Key: loewy_token
Value: 9UGO4ES2G0tb_SXpRnBnIQ
Remove the following setting if it exists in your org: propertyMedia_uploadEndpoint
If the following settings are active in your org, replace them with the ones in bold.
- fieldsNotToSync_ListingToProperty -> listingToPropertySync_blacklist
- fieldsNotToSync_PropertyToListing -> propertyToListingSync_blacklist
The formatting of the setting value will need to be modified in a JSON format as follows (explained here):
[
"Example__c",
"Example2__c"
]
10. Set Sharing for new Objects -> Organisation Wide Defaults
Go to Setup > Security Controls > Sharing Settings > The click the Edit button next to the label Organisational wide defaults. Set the Default Internal Access of the following objects:
- Template = Public Read Write
- Browser List = Private
11. If the Related List for "Favorites" is in on the page layouts of Contacts, Listings or Requests (Requirement if you are commrecial), you will need to replace:
Column "***" with "Client Rating"
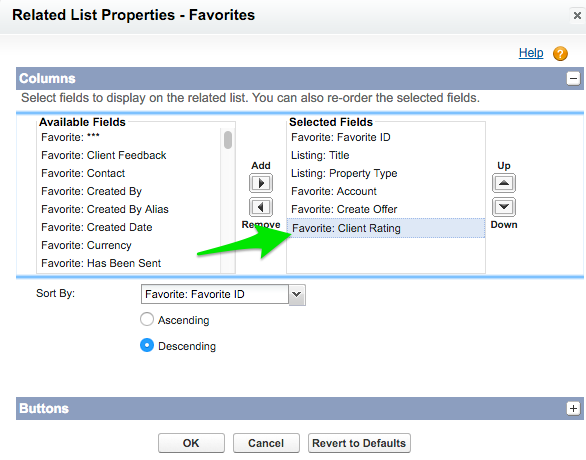
12. Adjust Compact layouts for Companies, Contacts, Closings, Favorites, Listings, Offers, Properties
Compact layouts are used in "new forms" and "Browser Details" to display a record’s key fields at a glance. If you are not used to it, please find further information here.
13. If you have custom individual record types for contacts
Important!! If you have custom record types on the Contact object the following setting will need to be added. Goto the + button at the top right of the Propertybase tab bar and than click on the "Settings" option.
You will need to create a new setting with the following details.
Name: contact_individualRecordTypes
Key: contact_individualRecordTypes
Value:
[Record_Type_API_Name_2"
"Record_Type_API_Name_1",
"
]
Note: Record_Type_API_Name is the API name of the custom record type you created.
14. Make sure you do not have custom fields with identical API Name
Depending on which version of Propertybase you are coming from, the ORG may contain fields, which are duplicated after the upgrade. The upgrade introduces new packaged fields that will ensure that our code works properly. The old field names (API) will need to be modified in order to prevent any errors from occurring.
For example on the objects Listings or Properties you may find the following fields and need to modify the API name as follows:
| Field Label | Field Name (API) | New Modified API Name |
| Floor | Floor__c | Floor_custom__c |
| Year Build | Year_Built__c | Year_Built_custom__c |
| Status | Status__c | Status_custom__c |
Make sure those fields are updated if they are use for website integrations or exposé etc. as it will break the integration if you do not change the name on the website as well. On the Request object it might be e.g. "Status__c" hence "Status_custom__c".
*Note: The API name prefix is ignored. For example: if you have a field with API name pba_Comments__c and also a field called Comments__c they are considered a duplicate as the prefix 'pba' is not considered.
15. Adjust your sites user for weblistings, web-to-prospect
If you are using propertybase webservices, please make sure that you adjust the record types for accounts and contacts as described here in section 4.
Finished! Now you can work!


Comments
0 comments
Please sign in to leave a comment.