Editing Picklist Values Follow
Need help editing picklist values? You're in the right place! To edit the values in a picklist, simply navigate to any record that contains a picklist and follow the instructions below.
In this example, we will be editing the values for the Contact Type picklist located on default Contact records.
In Propertybase you have the functionality to add, remove and edit picklists.
Adding a New Item
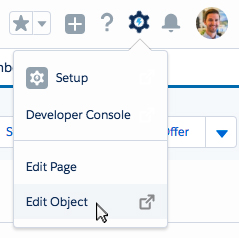
- From any Contact, click the gear icon and then click Edit Object.
- On the left side of the screen, click Fields & Relationships.
- Next scroll down and click Contact Type.

Voilà! From here you can edit, delete, reorder and add new picklist values.
Creating New Values
When creating a new picklist value, in this example, we will add a new Picklist value titled "Call In" to the 'Lead Source' field on the Contact object. Locate the field and click the field name (not the action 'Edit'). The picklist values are at the bottom of the page. You can create a new value by clicking New. 
Attention: Add the new value and make sure you mark the record type checkboxes to add the value to that page layout. Any checkbox left unmarked will not contain the new value. Here we have chosen to add the value 'Call In'.

Now save the new value.
Multiple values at one time -Multi-select picklists in Lightning no longer require you to add them to the Selected column. You can now hold either the CTRL and click or hold the SHIFT and click. Any options highlighted in Blue are now selected.
How to Fix Missing Values
Forget to add a picklist value to a record type? See below for instructions on how to resolve this minor issue.
Option 1 - Update Record Types
- Using the Object Manager, navigate to the object that you created the new picklist value on. (Continuing our example from above that would be the Contact object.)
- Click Record Types on the left side of the screen.
- Next, select the record type that you would like to add the picklist value to.
- On the following screen click Edit next to the picklist that contains the newly created value.

- Select the picklist value that you would like to add and click the top arrow.
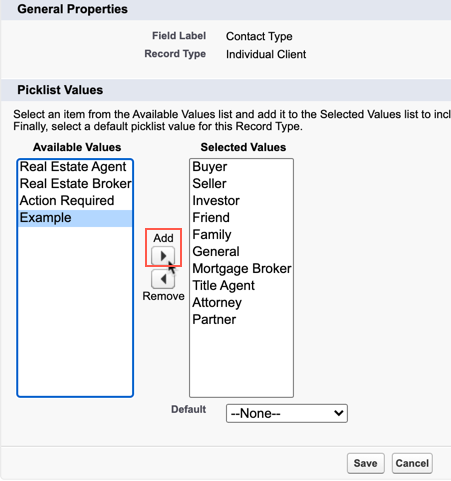
- Click Save.
Done! You should now see the picklist value on the record page.
Option 2 - Recreate, Delete and Replace
Optionally you can simply delete the value and replace all records with a new one (one with the proper record types.) First, start by creating a new picklist value with the correct record types selected. Once completed, click the Del button next to the old value.

Next, you will be prompted to select which value should replace the deleted one. On this screen, select the value you created in the previous step.

Done! All records will be updated using the newest value.
Set a Default Value
- Using the Object Manager, navigate to the object where you want to set the default picklist value for a specific record type. (Continuing our example from above that would be the Contact object.)
- Click Record Types on the left side of the screen.
- Next, select the record type that you would like to set the default value for.
- On the following screen click Edit next to the picklist field which you want to set the default value for.

- Select the picklist value that you would like to make the default value for this record type at the bottom of the page:
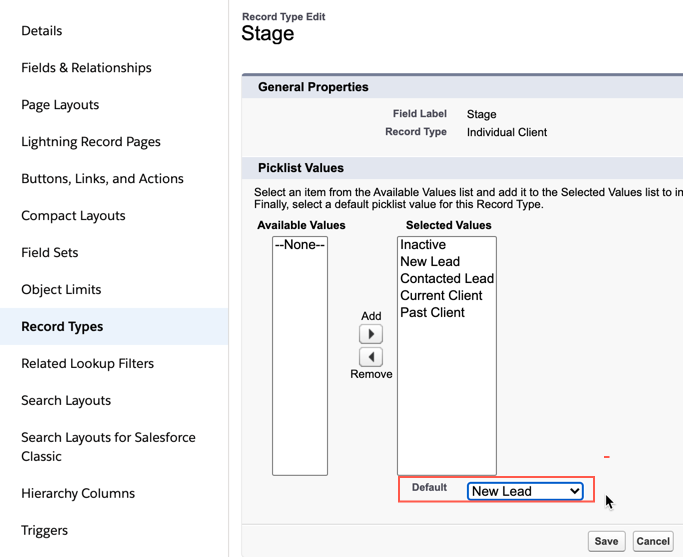
- Click Save.
Done! You should now see the picklist value being set as default when creating a new record.
Global Picklist Values
If you want to work with Global Picklist Values, take the following into consideration:
- Property and listing picklists need to inherit from the same global picklist and support same values.
- The global picklist needs to be assigned to all affected record types.
- The user profile does need to have permissions on all the picklist field.
- Global Picklist Values are always restricted, meaning anything coming from the API must have the exact value or will fail to create the record.
- Requires fewer than 1,000 total active and inactive values.
In Propertybase you have the functionality to add, remove and edit picklists.
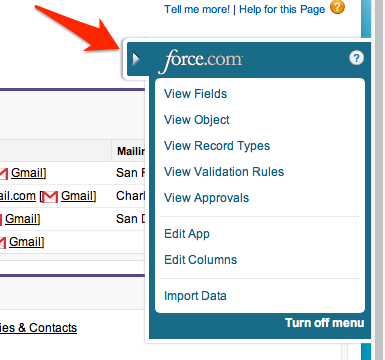
The first step is to find the field you want to edit as the location of the field will differ if it is on a Salesforce Standard object or a Propertybase custom object. You can also use the Force.com Quick Access Menu to View Fields. Jump to Step 2 if you use this.
Standard Object (Contact / Account)
If you want to edit a field that is on a standard object, go to Setup > Build > Customize > Contacts / Accounts > Fields. Select the object you want to edit.

Find the field with the picklist values to be edited. Click the field name to access the properties of the field and edit the picklist values.
Custom Object (Request / Enquiry / Listing / Property / Offer)
To edit a custom object such as Request, Listing, Property or Offer, you must go to Setup > search 'Objects' in the quick find box > under Create, click Objects.

Select the object which has the field you want to edit.
Find the field you want to edit the picklist values and click on the name of the field to access the properties of the field.
In this example, we will add a new Picklist value titled "Call In" to the 'Lead Source' field on the Contact object.
Locate the field and click the field name (not the action 'Edit'). The picklist values are at the bottom of the page.
You can create a new value by clicking New.

Attention: Add the new value and make sure you mark the record type checkboxes to add the value to that page layout. Any checkbox left unmarked will not contain the new value. Here we have chosen to add the value 'Call In'.

Now save the new value.
Missing a value?
When adding the picklist value you forgot to make it visible to the record type of the record you are viewing.
There are 2 possible ways to resolve this :
Method 1
Step 1 - Go to the force.com pull out menu from the offending record and select the View Record Type. This will enable you to fix the picklist values visibility for the record type you are viewing.

or
Go to the record types for the object and add the picklist value to each record type.
In our example, let us assume we forgot to add the "Call In" to the record type on the Lead Source field on the Contacts object. Go to Setup | Customize | Contacts | Record Type
Once in the Object settings, scroll down to the Record Type section. You will need to go into each available record type and make sure that the values of the picklist are available. To continue this example in the Contact object select: Individual Client
Step 2 - On the next screen, you will see the Picklists Available for Editing section. Since we edited the 'Lead Source' field, we need to edit this picklist.

After selecting Edit, you will see a list of the available values to add to the picklist.
Select "Call In" and move it from the Available Values list to the Selected Values list by clicking the Add button.
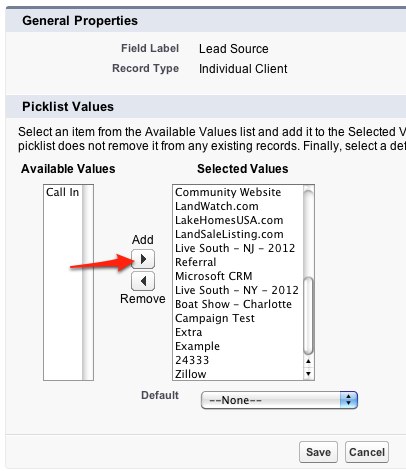
Save and your picklist is updated.
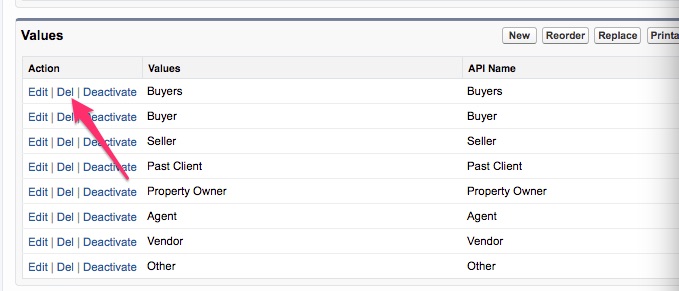
Method 2 - You can delete the value and recreate or replace it making sure you selected the Record Types. This is easy if you only have one value if you have multiple use the other methods.
Example if I want to delete the Buyers value and replace it with Buyer. Hit the Del link and the next page it will give you the option to replace it with other values in your list.

Global Picklist Values
If you want to work with Global Picklist Values, take this into consideration:
- Property and listing picklists need to inherit from the same global picklist and support same values
- The global picklist needs to be assigned to all affected record types
- The User profile does need to have permissions on all the picklist field
- Requires fewer than 1,000 total active and inactive values.


Comments
0 comments
Article is closed for comments.