Tracking Conversion Times with Contact Stages Follow
In Propertybase version 1.466 we've add a new configuration that tracks conversion time between contact stages. With this powerful new configuration you can track how long it takes to go from new lead to working, working to active, etc. This article will walk through adding this configuration to Propertybase.
Note: Propertybase accounts created 10/5/17 or later have this configuration preinstalled.
Not on version 1.466? Click here to update.
Estimated completion time: 60-90 minutes.
Check Stage Values
Before we begin, we need to make sure our Contact object has the correct stage values.
- First, open any Contact record.
- Next click the gear icon at the top of the page, then click Edit Object.
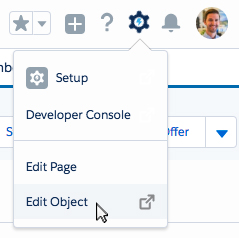
- Click Fields & Relationships in the left menu.
- Scroll down and click Stage.
The image below shows the default stage values and API Names. If your values are different, modify them so they match the data below. Make sure "New Lead" is set as the default value.
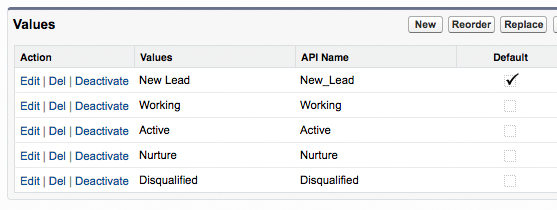
Note: You may need to clear your Propertybase cache for the new stage values to appear.
Create Custom Fields
With the correct stage values set, it's time to create custom fields that will record the time spent between them.
- Click Fields & Relationships in the left menu.
- Click New in the top right corner.

- Scroll down and select Date/Time.

- At the bottom of the page, click Next.
- Enter "Disqualified Stage Time Stamp" for Field Label.
- Enter "Disqualified_Stage_Time_Stamp" for Field Name.
- Click Next.
- Click Next. (Leave field-level security defaults checked.)
- Click Save & New. (Leave page layout defaults checked.)
Continue creating custom date/time fields using the data below:
| Field Label | Field Name |
| Nurture Stage Time Stamp | Nurture_Stage_Time_Stamp |
| Active Stage Time Stamp | Active_Stage_Time_Stamp |
| Working Stage Time Stamp | Working_Stage_Time_Stamp |
| New Lead Stage Time Stamp | New_Lead_Stage_Time_Stamp |
Add Workflow Rules
- Click Home to go to Setup.

- Type "workflow" in Quick Find and then click Workflow Rules.
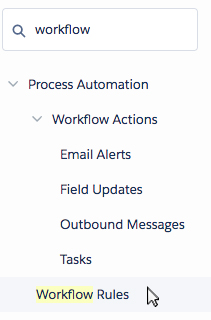
Note: If prompted with a "Understanding Workflow" screen, click Continue.
- Click New Rule.

- For Object, select Contact.

- Click Next.
- Enter "Disqualified Stage Time Stamp" for Rule Name.

- Leave Evaluation Criteria at its default value.
- Add a "Contact: Stage" field with operator "equals" and value "Disqualified".

- Click Save & Next.
- Click Add Workflow Action then select New Field Update.
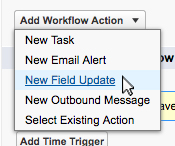
- Click Save.
- Click Done.
- Click Activate.

- Click Workflow Rules in the left side bar.
Continue creating workflow rules, using data from the tables below, untill all rules and actions have been created.
Workflow Rules
| Rule Name | Evaluation Criteria | Field | Operator | Value |
| Disqualified Stage Time Stamp | created, and any time it's edited to subsequently meet criteria (default) | Contact: Stage | equals | Disqualified |
| Nurture Stage Time Stamp | created, and any time it's edited to subsequently meet criteria (default) | Contact: Stage | equals | Nurture |
| Active Stage Time Stamp | created, and any time it's edited to subsequently meet criteria (default) | Contact: Stage | equals | Active |
| Working Stage Time Stamp | created, and any time it's edited to subsequently meet criteria (default) | Contact: Stage | equals | Working |
| New Lead Stage Time Stamp | created, and any time it's edited to subsequently meet criteria (default) | Contact: Stage | equals | New Lead |
Workflow Actions
| Name | Unique Name (Use Default) | Field to Update (Custom Field) | New Field Value Formula |
| Update Disqualified Stage Time Stamp | Update_Disqualified_Stage_Time_Stamp | Disqualified Stage Time Stamp | Now() |
| Update Nurture Stage Time Stamp | Update_Nurture_Stage_Time_Stamp | Nurture Stage Time Stamp | Now() |
| Update Active Stage Time Stamp | Update_Active_Stage_Time_Stamp | Active Stage Time Stamp | Now() |
| Update Working Stage Time Stamp | Update_Working_Stage_Time_Stamp | Working Stage Time Stamp | Now() |
| Update New Lead Stage Time Stamp | Update_New_Lead_Stage_Time_Stamp | New Lead Stage Time Stamp | Now() |
Create Formula Fields
We've created custom fields and setup workflow rules to record stage changes. Now we need to create custom formula fields to calculate time between stages and then convert that time to hours and minutes.
1. Create Formula Fields to Calculate Time Between
Next we are going to create custom formula fields. These will take the time data stored in our time/date fields and calculate the actual time spent between stages.
- Click Object Manager at the top of the screen.

- Scroll down and click Contact.
- Click Fields & Relationships in the left menu.
- Click New in the top right corner.

- Scroll down and select Formula.

- Click Next.
- Enter "Conversion: New Lead to Working" for Field Label.
- Enter "Conversion_New_Lead_to_Working" for Field Name.
- Select Text as Formula Return Type.
- Click Next.
- Enter the Forumula Text for "Conversion: New Lead to Working" from the table below.
- Click Next.
- Click Next. (Leave field-level security defaults checked.)
- Click Save & New. (Leave page layout defaults checked.)
Continue creating custom formula fields using the data below:
| Field Label | Field Name | Formula Return Type | Formula Text |
| Conversion: Active to Nurture | Conversion_Active_to_Nurture | Text |
			IF(ISBLANK(Nurture_Stage_Time_Stamp__c) = FALSE,
			TEXT(
			FLOOR(Nurture_Stage_Time_Stamp__c - Active_Stage_Time_Stamp__c)
			) & " Days " &
			TEXT(
			FLOOR(MOD((Nurture_Stage_Time_Stamp__c - Active_Stage_Time_Stamp__c)*24,24))
			) &" Hours " &
			TEXT(
			ROUND(MOD((Nurture_Stage_Time_Stamp__c - Active_Stage_Time_Stamp__c)*1440,60),0)
			) &" Minutes ", "")
|
| Conversion: New Lead to Active | Conversion_New_Lead_to_Active | Text |
			IF(ISBLANK(Active_Stage_Time_Stamp__c) = FALSE,
			TEXT(
			FLOOR(Active_Stage_Time_Stamp__c - New_Lead_Stage_Time_Stamp__c)
			) & " Days " &
			TEXT(
			FLOOR(MOD((Active_Stage_Time_Stamp__c - New_Lead_Stage_Time_Stamp__c)*24,24))
			) &" Hours " &
			TEXT(
			ROUND(MOD((Active_Stage_Time_Stamp__c - New_Lead_Stage_Time_Stamp__c)*1440,60),0)
			) &" Minutes ", "")
|
| Conversion: New Lead to Disqualified | Conversion_New_Lead_to_Disqualified | Text |
			IF(ISBLANK(Disqualified_Stage_Time_Stamp__c) = FALSE,
			TEXT(
			FLOOR(Disqualified_Stage_Time_Stamp__c - New_Lead_Stage_Time_Stamp__c)
			) & " Days " &
			TEXT(
			FLOOR(MOD((Disqualified_Stage_Time_Stamp__c - New_Lead_Stage_Time_Stamp__c)*24,24))
			) &" Hours " &
			TEXT(
			ROUND(MOD((Disqualified_Stage_Time_Stamp__c - New_Lead_Stage_Time_Stamp__c)*1440,60),0)
			) &" Minutes ", "")
|
| Conversion: New Lead to Working | Conversion_New_Lead_to_Working | Text |
			IF(ISBLANK(Working_Stage_Time_Stamp__c) = FALSE,
			TEXT(
			FLOOR(Working_Stage_Time_Stamp__c - New_Lead_Stage_Time_Stamp__c)
			) & " Days " &
			TEXT(
			FLOOR(MOD((Working_Stage_Time_Stamp__c - New_Lead_Stage_Time_Stamp__c)*24,24))
			) &" Hours " &
			TEXT(
			ROUND(MOD((Working_Stage_Time_Stamp__c - New_Lead_Stage_Time_Stamp__c)*1440,60),0)
			) &" Minutes ", "")
|
| Conversion: Working to Active | Conversion_Working_to_Active | Text |
			IF(ISBLANK(Active_Stage_Time_Stamp__c) = FALSE,
			TEXT(
			FLOOR(Active_Stage_Time_Stamp__c - Working_Stage_Time_Stamp__c)
			) & " Days " &
			TEXT(
			FLOOR(MOD((Active_Stage_Time_Stamp__c - Working_Stage_Time_Stamp__c)*24,24))
			) &" Hours " &
			TEXT(
			ROUND(MOD((Active_Stage_Time_Stamp__c - Working_Stage_Time_Stamp__c)*1440,60),0)
			) &" Minutes ", "")
|
Now that we've created our formula fields, we need to add them to the Individual Contact Page Layout.
- Click Page Layouts in the left menu.
- Click Individual Contact.
- Create a New Section below Additional Information called Conversion Times.
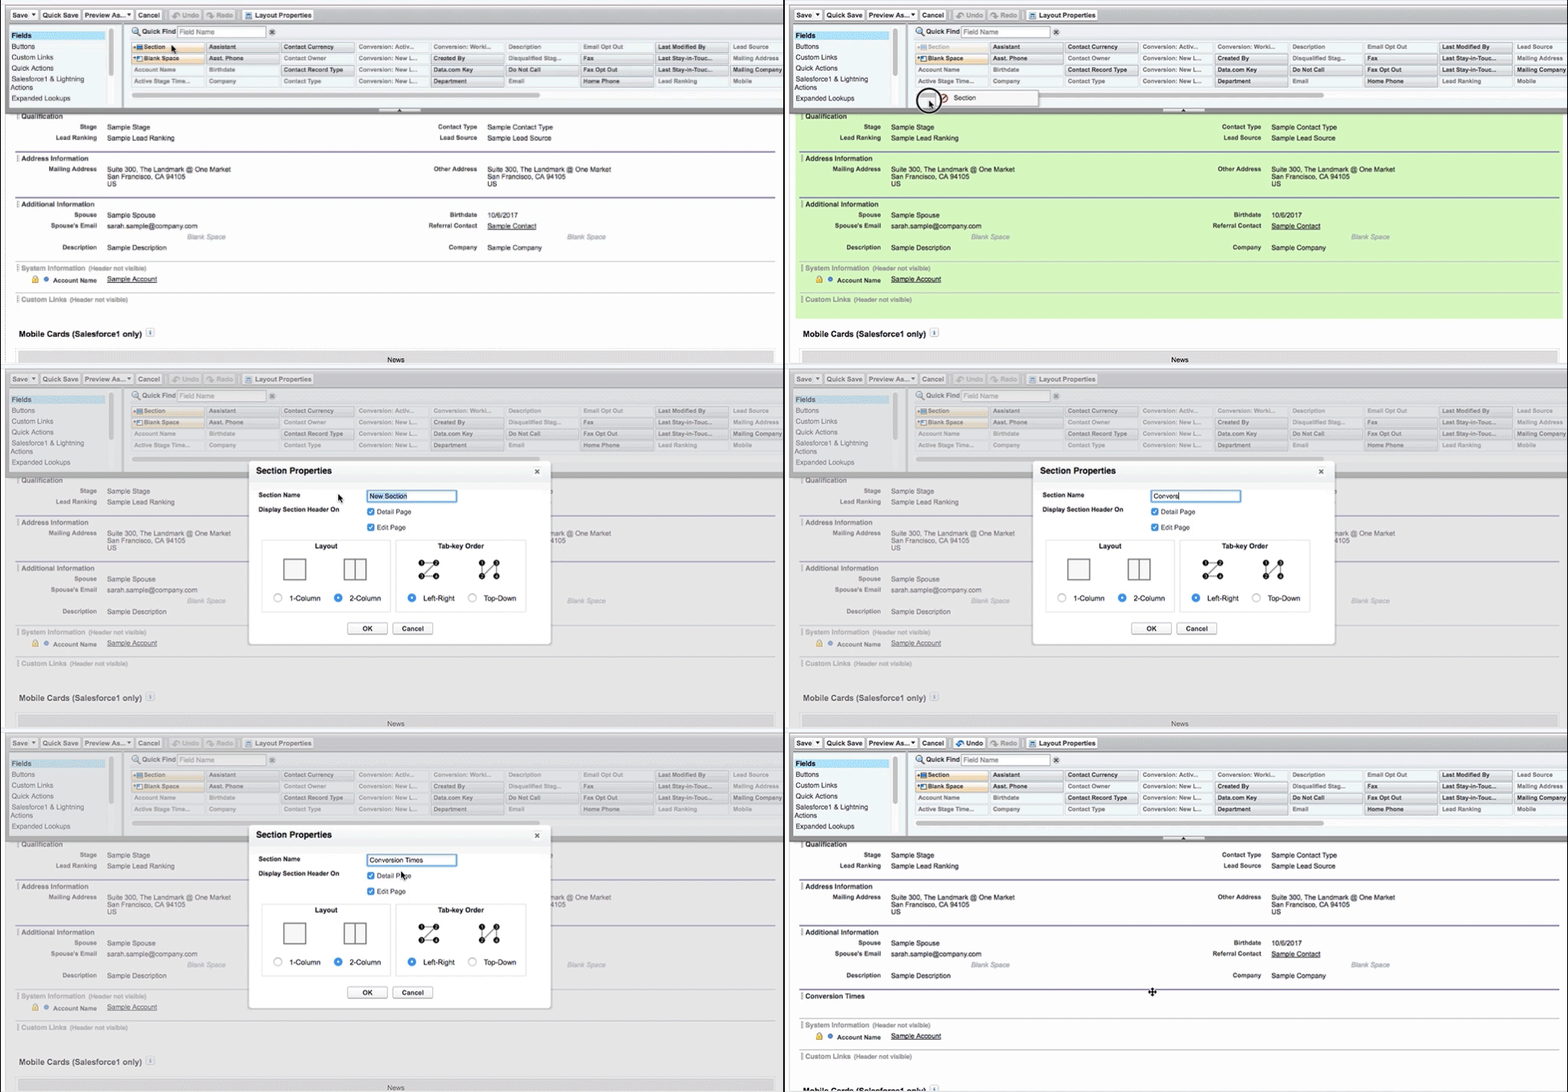
- Drag the custom date/time fields to the new section and organize them to match the configuration below.

- Click Save.
2. Create Formula Fields to Convert to Hours & Minutes
Now we need to create custom fields that will convert time between stages to hours and minutes.
- Click Fields & Relationships in the left menu.
- Click New in the top right corner.

- Scroll down and select Formula.

- Click Next.
- Enter "Conversion: Working to Active (Hrs)" for Field Label.
- Enter "Conversion_Working_to_Active_Hrs" for Field Name.
- Select "Number" for Formula Return Type.
- Select "0" for Decimal Places.
- Click Next.
- Enter the Forumula Text for "Conversion: Working to Active (Hrs)" from the table below.
- Click Next.
- Click Next. (Leave field-level security defaults checked.)
- Uncheck "Add Field" to deselect both Individual and Company Page Layouts.
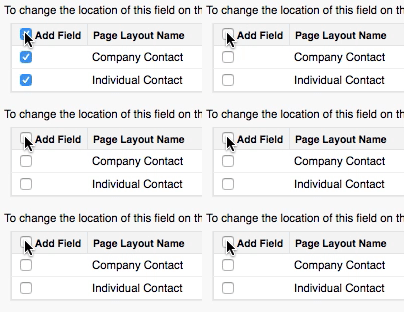
- Click Save & New.
Continue creating custom formula fields using the data below:
| Field Label | Field Name | Formula Return Type | Decimal Places | Formula Text |
| Conversion: Working to Active (Hrs) | Conversion_Working_to_Active_Hrs | Number | 0 | (Active_Stage_Time_Stamp__c - Working_Stage_Time_Stamp__c )*24 |
| Conversion: Working to Active (Mins) | Conversion_Working_to_Active_Mins | Number | 0 | (Active_Stage_Time_Stamp__c - Working_Stage_Time_Stamp__c )*24*60 |
| Conversion: Active to Nurture (Hrs) | Conversion_Active_to_Nurture_Hrs | Number | 0 | (Nurture_Stage_Time_Stamp__c - Active_Stage_Time_Stamp__c )*24 |
| Conversion: Active to Nurture (Mins) | Conversion_Active_to_Nurture_Mins | Number | 0 | (Nurture_Stage_Time_Stamp__c - Active_Stage_Time_Stamp__c )*24*60 |
| Conversion: New Lead to Active (Hrs) | Conversion_New_Lead_to_Active_Hrs | Number | 0 | (Active_Stage_Time_Stamp__c - New_Lead_Stage_Time_Stamp__c)*24 |
| Conversion: New Lead to Active (Mins) | Conversion_New_Lead_to_Active_Mins | Number | 0 | (Active_Stage_Time_Stamp__c - New_Lead_Stage_Time_Stamp__c)*24*60 |
| Conversion: New Lead to Disq. (Hrs) | Conversion_New_Lead_to_Disq_Hrs | Number | 0 | (Disqualified_Stage_Time_Stamp__c - New_Lead_Stage_Time_Stamp__c )*24 |
| Conversion: New Lead to Disq. (Mins) | Conversion_New_Lead_to_Disq_Mins | Number | 0 | (Disqualified_Stage_Time_Stamp__c - New_Lead_Stage_Time_Stamp__c )*24*60 |
| Conversion: New Lead to Working (Hrs) | Conversion_New_Lead_to_Working_Hrs | Number | 0 | (Working_Stage_Time_Stamp__c - New_Lead_Stage_Time_Stamp__c )*24 |
| Conversion: New Lead to Working (Mins) | Conversion_New_Lead_to_Working_Mins | Number | 0 | (Working_Stage_Time_Stamp__c - New_Lead_Stage_Time_Stamp__c )*24*60 |
- Open any Contact record and you should now see conversion time tracking in the Details tab.

Note: If you don't see data, you need to change the stage value on that record. You can change stage values using the contact path. If you don't have the contact path, click here to learn how to add it.
Congratulations! You have successfully added conversion time tracking to the Contact object.


Comments
0 comments
Article is closed for comments.