Portal Field Mapping Follow
This article give deeper insight into Portal Syndication to specific portals and their mappings. Please read this article on Portal Syndication first to understand how to work with the tool.
Note: If you are on the most current version, you will find "Portal Mapping" in Control Center. If you don't see it, please update Propertybase to the most current version. Update now.
If it is unclear how "Field Mapping" works in general, please review the article Portal Syndication
The general steps for all portals that you can setup via Control Center>Portal Mapping:
- Choose and create the new portal by adding your access settings (credentials) and setting a "Notification Email" (important!) so you can complete the setup (if you don't have them yet, but in placeholder information to continue setup). You can come back to "Settings" on the portal you're creating later again to update information.
- Prepare the mapping: Use "Load Default Values" initially to get a base-mapping, but update what is not according to the fields you use or need as you work on the mapping.
So go through each option to check if something is mapped
- if there is something mapped whether it is the correct information (field/picklist value you are using!)
- if nothing is mapped, consider whether you want to share information.
Not everything is mandatory, but some mappings will make other information required. You will only see that though, when you start adding listings to the feed.
Recommendation: start with the basics. You can come back later at any time and add more mappings. - After the mapping is (mostly) ready, activate the portal and add an "active" listing - one listing, that is! - by publishing that listing to it from "Portal Syndication" on the listings.
- Check "notification email" for error messages. Find a solution to the error:
- either missing mapping->fix mapping or
- missing value on listing->fix listing
Create validation rules or default values to avoid this from happening in the future.
Repeat until no errors come back for the listing you added (repeat - see next two steps). - Add another listing. Resolve errors.
- Repeat until there are no more errors.
- Once you are no longer or hardly receiving error messages, add all listings you will want to publish or had published on that portal already.
- Change the portal setting to point to the portal's "production" (set "use sandbox"/"use test environment" to "false")
- Tell the portal's support that you want to switch to sending your listings from Propertybase.
They will remind that you must have all listings in the feed as the previous connection and listings will be removed. Decide with the portal when the switch will be performed. - Continue to monitor "notification emails" after go-live. You may have still missed something or not created a Validation Rule for something, but users still may forget to add certain information.
Every error you receive should let you consider whether you can prevent this from happening again by reviewing step 4 above.
If you don't understand the error message in a "Notification Email", forward the message to support@propertybase.com, make sure you granted access and we will review and let you know what the portal configuration requires. - Review the FAQ below.
Each portal has some of their own specifics when it comes to mapping. Makes sure to review the portal specific information we share below. Please also review the FAQ.
- Idealista
- Rightmove
- Rightmove Overseas
- Boomin
- On The Market OTM
- Zoopla/Zoopla Overseas
- LonRes
- General FAQ
- Publishing Listings
- Autopublishing
Idealista
Note: If you previously had listings on Idealista and are switching from another feed to this real-time feed, please make sure you prepare & add all listings you currently have on Idealista to the real-time feed prior to switching. Idealista permits only one active feed. Please reach out to Idealista when you are planning to switch. Read "Sandbox" below.
Configuring the Setting:
- Country should be filled with Spain, Portugal or Italy. Nothing else will work.
- Customer Code is the customer's Idealista code (ilc….). It must have 43 characters incl. "ilc"
- The contact phone number needs to provide the international prefix (such as '34') and the phone number following the international format (without 0 for most countries)
Notification Email
Enter one or multiple (comma-separated) email addresses that should receive error messages in case a listing can't be publish (e.g. due to missing information or other unclarities. If you don't understand the error message right away, forward it to support@propertybase.com. We will help you find the cause and by that you will understand to read the error messages better in the future.
Sandbox
Idealista does not offer a Sandbox to test in or preview. But you can use this setting to prepare your listings (add them) and clean up errors before you connect. Once connected, all old feeds will no longer work! Setting the value to true or leaving it empty will block publishing. Set it to "false" when you are ready.
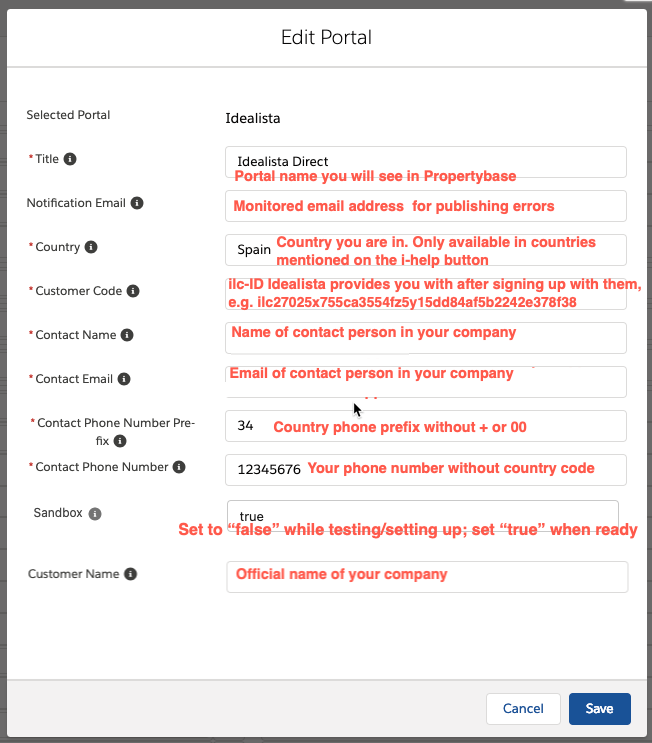
Portal field mapping:
- Address Country: must be a picklist field. Please create one and either set the default to your country or if you have listings in more than one country (e.g. Andorra & Spain) update the country text field with a process builder rule field update formula and exchange the fields on your page layouts. Why? you might be using this field in other contexts already (other portals, website, pdf) and the picklist will guarantee you are using the correct value (no mistyping).
- Address Floor value has to be either a number between -2 and 60 (0 not allowed) or “bj” for Lower floor, “en” for Mezzanine, “ss” for Semi Basement, “st” for Basement. Please add a validation rule to ensure or use a picklist with those values. If you use another field to define "Floor", you should consider translating it with a process builder rule field update as well, so you don't have to adjust other systems.
In order to achieve this, it depends a bit on the type of field you are using and the content. If you are using a picklist field to define the floor (e.g. floor_one__c), you can use a secondary formula text field (create it, e.g. name it "floor for Idealista" ) with a formula like this:IF
(TEXT(floor_one__c) = 'Ground floor', 'bj',
IF
(TEXT(floor_one__c) = 'Principal', 'bj',
IF
(TEXT(floor_one__c) = 'Mezzanine', 'en',
IF
(TEXT(floor_one__c)='Semi Basement', 'ss',
IF
(TEXT(floor_one__c) ='Basement -1', 'st',
IF
(TEXT(floor_one__c)= 'Basement -2', '-1',
IF
(TEXT(floor_one__c)= 'Basement -3', '-2', TEXT(floor_one__c))))))))Or you can use the existing pba_espfields__Floor__c picklist field. Yet, you need to translate the full values to the abbreviated versions Idealista requires:
IF
(TEXT(pba_espfields__Floor__c) = 'Ground floor', 'bj',
IF
(TEXT(pba_espfields__Floor__c) = 'Principal', 'bj',
IF
(TEXT(pba_espfields__Floor__c) = 'Mezzanine', 'en',
IF
(TEXT(pba_espfields__Floor__c)='Semi Basement', 'ss',
IF
(TEXT(pba_espfields__Floor__c) ='Basement -1', 'st',
IF
(TEXT(pba_espfields__Floor__c)= 'Basement -2', '-1',
IF
(TEXT(pba_espfields__Floor__c)= 'Basement -3', '-2', TEXT(pba_espfields__Floor__c))))))))
If you are using a text field to define the floor the unit is on, you will need a more complex translation and it is highly difficult as a typo will render it unusable. Ideally you will use it the other way around translating Idealista to your text field you have in place. In that case, you will need a process builder rule field update with a similar formula as above.
Alternatively, if you don't have existing data, you could also simply create a picklist field for "Floor" that contains the correct values. This text field contains the needed values. Note the content in brackets needs to be added to the API value after creating the values: https://propertybase.zendesk.com/hc/article_attachments/360024646991/floors_idealista_values.txt
It should look similar to this then: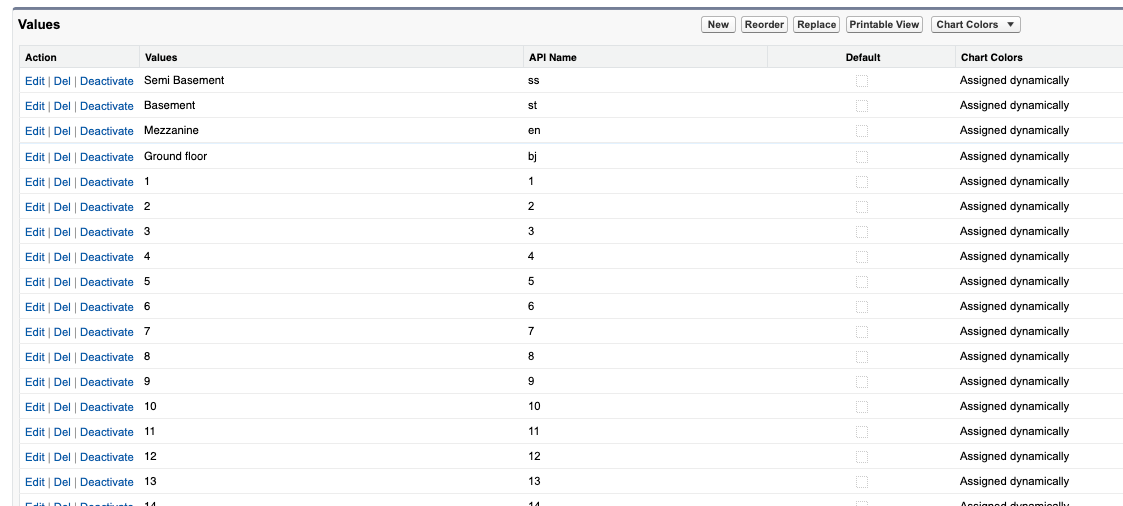
- Postal Code Error message: The property ‘#/propertyAddress/addressPostalCode’ value “2800 – 260” did not match the regex ‘^[0-9]{5}$|^AD[0-9]{3}$|^[0-9]{4}(-[0-9]{3})?$’
This means you need to provide a valid postal code that looks like one of these:
AD123
12345
1234-123
Long-run help: Please add a validation rule that checks that a valid postal code was added to the listing. Have a look at this article for validation rule ideas.
- Street and Street Number: The portal expect street and number to be transferred separately. Propertybase uses with "Address" (pba__Address_pb__c) a text area field that contains both out of the box. Hence we built a logic that separates the values from the address field for you, so you can simply map "Address" to both "Street" and "Street Number".

Note: our logic will only work with "regular" street addresses that start or end with a number. If you have very inconsistent addresses, you will need to use separated fields for Street (e.g. pba__Street_pb__c) and Street Number (e.g. pba_espfields_Street_Number__c). That could entail migrating all data from address to those fields (export/import) and then using an automation rule to continue updating "Address" as you likely are using that field in other integrations, reports, templates, and so on.
There are two mandatory reference numbers to be mapped?! What do I map?
propertyCode is used internally by Idealista and not visible to portal visitors.
Please map the Listing Record ID to this.
propertyReference can be visible to portal visitors and also allows you to have Front Desk capture the listing the visitor was looking at (creating a Linked Listing), hence it should be relating to your unique-per-listing "Broker's Listing ID" (or other readable unique reference number field you use).
- map Broker's Listing ID (your readable unique reference number) to propertyReference
- map Listing Record ID to propertyCode
Address visibility is a recommended, yet optional mapping. If you don't have a picklist field for this already, create it and map it e.g. like this:

Note: the address visibility will only work, if you use a separated street and street number (house/building number) field. If you are using the "Address" text block field, you will need to either
- split up the address found in there to a street and street number field or
- use street and street number moving forward and update "Address" by concatenating street and street number field to it.
You can do both with Process Builder. The latter is easier.
Why do you need to do this: you might already be using Address in other integrations (pdf or email templates; other portals,...) and you want to ensure that this continuous to work.
Property Type
These are the property types that Idealista supports per country:
| flat |
Available in all countries
|
| house |
Available in all countries
|
| house_andar_moradia |
Available only in Portugal
|
| house_independent |
Available in all countries
|
| house_semidetached |
Available in all countries
|
| house_terraced |
Available in all countries
|
| house_villa |
Available in all countries
|
| rustic |
Available in all countries
|
| rustic_house |
Available in all countries
|
| rustic_village |
Available in all countries
|
| rustic_castle |
Available in all countries
|
| rustic_palace |
Available in Spain & Portugal only
|
| rustic_baita |
Available only in Italy
|
| rustic_rural |
Available only in Spain
|
| rustic_casalecascina |
Available only in Italy
|
| rustic_caseron |
Available only in Spain
|
| rustic_cortijo |
Available only in Spain
|
| rustic_masia |
Available only in Spain
|
| rustic_masseria |
Available only in Italy
|
| rustic_moinho |
Available only in Portugal
|
| rustic_montealentejano |
Available only in Portugal
|
| rustic_quinta |
Available only in Portugal
|
| rustic_solar |
Available only in Portugal
|
| rustic_terrera |
Available only in Spain
|
| rustic_torre |
Available only in Spain
|
| rustic_trullo |
Available only in Italy
|
Developments
- The “New Development” checkbox is used to determine if the listing is part of a new development, the customer needs an active subscription to post new developments on Idealista
- The first listing information found is chosen to build the new development information and the list of listings in a new development
- The default visibility for the new development is 'Idealista'
Image Tags
- Idealista only permits certain image tags. If something else is used than values in the following list, the tag will be empty (not shown). Allowed Image Tags are (only with this spelling; copy list to picklist "tags" on PropertyMedia if you like):
bathroom
bedroom
communalareas
corridor
details
energycertificate
facade
garage
garden
gateway
hall
kitchen
land
living
mates
plan
pool
reception
room
storage
terrace
unknown
views
waitingroom
Idealista will not accept any other image tags. If others or none are used, we hand over "unknown". You can translate these English values in your "Translation Workbench" if required.
Rightmove
Note: This section explains mapping for a Rightmove portal feed used for UK listings. You can also use these instructions to setup Rightmove Overseas for listings not in the UK, but you need to use the "New Portal" tile on "Rightmove Overseas" in Control Center. The setup is similar, there may be some detail mappings that are not required or available to Overseas listings (and vice versa).
Setup
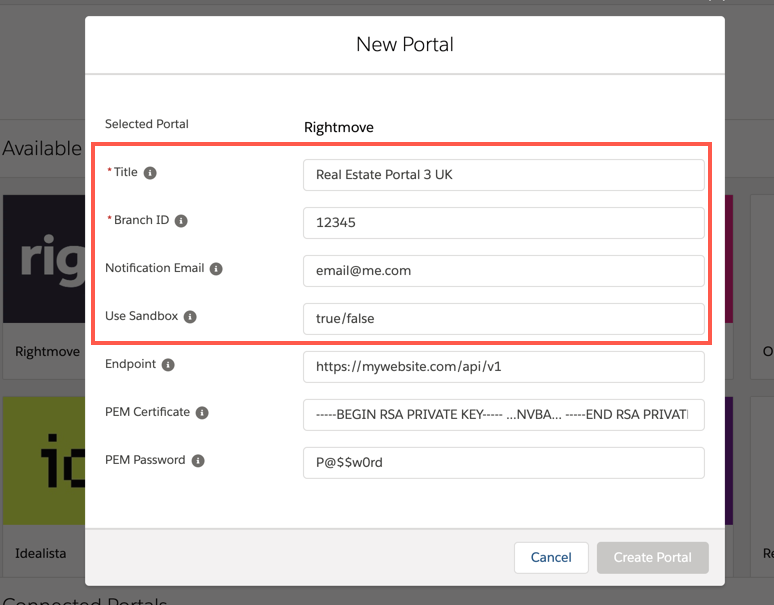
- Create a new Rightmove Connection by clicking on "New" in the corresponding tile
- Fill in the required information:
- Title: Give the portal a name you desire. This will be what you will see on listing's "Portal Syndication" section
- Branch ID: Add your Branch ID provided by Rightmove
- Notification Email: Enter an email where you want to receive error message (e.g. couldn't be published due to missing information)
- Use Sandbox: by default this field uses "false" if you leave it empty. Set it to "true" once you are ready to send it to Rightmove productive environment. Testing is normally not required anymore and requires you to reach out to Rightmove Support to have them direct it to their testing environment if needed. Otherwise you can start directly with testing as our service captures invalid listings before they even reach Rightmove.
- The following fields you may ignore unless you are using this feed specification to feed your own website. Then you will know what to do here.
Q: Why is there no "Sold" status on feed to map against "Status"?
A: Rightmove assume that when a property is exchanged/completed/sold (i.e. after under offer and soldSTC) that the listing gets deleted from the feed.
Energy Certificate
Rightmove allows for an image tagged with EPC to be shown in a certain position on the listing when published. Of course you can add the EPC info as well to the description if you want to be fully certain that the information is there.
Brochures
PDFs added to the feed will automatically be identified as brochures. No tagging required - as a matter of fact, a tag "Brochure" will not add a document file to Rightmove as such. It must be a PDF.
Tagging images
These values as tags (without quotation marks) will allow the portal to identify them as such and place them in the corresponding location in the listing on their site:
"EPC" (Energy Certificate)
"Floorplan"
"Virtual Tour"
If you don't have these values, you can add these strings to the "Tags" picklist field on the PropertyMedia object in Setup > Object Manager
Notification Email
Enter one or multiple (comma-separated) email addresses that should receive error messages in case a listing can't be publish (e.g. due to missing information or other unclarities. If you don't understand the error message right away, forward it to support@propertybase.com. We will help you find the cause and by that you will understand to read the error messages better in the future.
We have this Rightmove basic sample mapping. Please right-click and save or open in new tab. Do note, if you use this to setup your mapping, please check for additional fields and values you may be using and add them. Do load our default mapping values first:

Rightmove Overseas
Large parts of Rightmove Overseas mapping is identical to the Rightmove mapping above. You must use Rightmove Overseas, though, if you are trying to publish listings outside the UK on their portal. Hence it will not require certain local legally binding information, yet, other information like the Country Code will be mandatory.
Setup
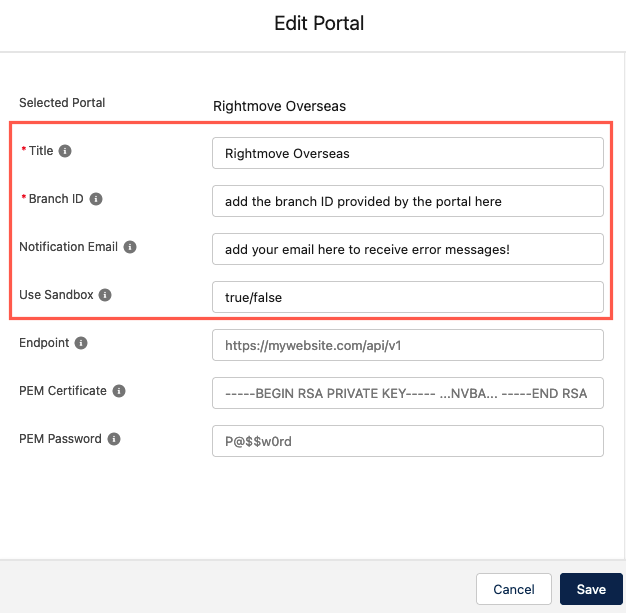
- Create a new Rightmove Overseas connection by clicking on "New" in the corresponding tile
- Fill in the required information:
- Title: Give the portal a name you desire. This will be what you will see on listing's "Portal Syndication" section
- Branch ID: Add your Branch ID provided by Rightmove
- Notification Email: Enter an email where you want to receive error message (e.g. couldn't be published due to missing information)
- Use Sandbox: by default this field uses "false" if you leave it empty. Set it to "true" once you are ready to send it to Rightmove productive environment. Testing is normally not required anymore and requires you to reach out to Rightmove Support to have them direct it to their testing environment if needed. Otherwise you can start directly with testing as our service captures invalid listings before they even reach Rightmove.
- The remaining fields on this page you may ignore unless you are using this feed specification to feed your own website. Then you will know what to do here.
Q: Country Code is required. But I only publish listings within in my current country?
A: Create a process builder rule to update the field with your default country code value to make sure the mandatory content is always given, run this when a listing is created. You can find a list with the two and three character country codes here:
https://en.wikipedia.org/wiki/List_of_ISO_3166_country_codes
Q: I have a price that is showing in GBP on Rightmove Overseas, but we use a different currency. How do we update it?
A: Since Rightmove Overseas does not convert the price but only takes the number and displays this in GPB, you need to create a conversion of the price yourself: Create a second price field e.g. "Price in GPB" and map that to the Price information to the RM Overseas Portal Mapping in Control Center.
You could use a formula field or an automation using a conversion formula to automatically calculate the converted price. Whether you update the conversion rate manually regularly or whether you implement a third party connection to a currency exchange rate API is up to you.
Note: if you want to see the field on your listings without your currency abbreviation, create this "price" field with the type "Number" NOT "Currency" as the latter will always show it with your currency as opposed to just a number with a label of your choice. This only has impact on your ORG, not what is sent to Rightmove as only the number value is sent in both cases.
Q: I have fields that I already use but they can't be mapped to Rightmove Overseas as they are of a different type. What do I do?
A: Please consider creating hidden helper fields that match up with the portal's field type requirement. Of course you can display these on the page layout and manually have them filled in, but if you are already using other fields that hold that information, too, consider using field-update automations to transfer the information from the existing fields to the portal required field. An example would be a multi-select picklist with features that you may already have and are using actively while the portal requires a boolean (checkbox) for each feature: create an automation that understands which values were chosen (or unselected) to update the corresponding boolean field you created for this.
Q: Does Rightmove Overseas support Video Tours, Floorplans and Brochures?
A: They support these in a specific way:
Please make sure you tagged floor plan images with "Floorplan".
PDF you upload to Media Manager and share with the portal feeds will be sent as brochures.
When it comes to Virtual Tours, please tag the video file you upload with "Virtual Tour".
See image tagging here: Changing available tags for images
Q: The location I am sending is not recognized by Rightmove. What do I need to send?
A: Rightmove has a list (table) of locations and some with specific spelling for Rightmove Overseas they need you to send in order to put your listings in the correct regional categories. You can request the list from them as they may have the most current version of said list. We also have this list World Gazetteer - All Regions.zip but it may be outdated by the time you work on this (Uploaded June 2022). The zip file must be unzipped and the CSV file viewed with a spreadsheet application.
Boomin
Connection to boomin.com can be established using the Rightmove portal setup:
- Please create a new portal in Control Center>Portal Syndication based on Rightmove
- Name it recognizably "Boomin" or following your own naming convention
- Provide access credentials and endpoint (see more info below)
- Map your fields as done for Rightmove or map as per requirement.
If you still have to reach out to Boomin-Support for access credentials, you can already begin setting up the portal within Propertybase. Simply use placeholders for the mandatory fields in your portal settings. Update the information once you have the correct access credentials.
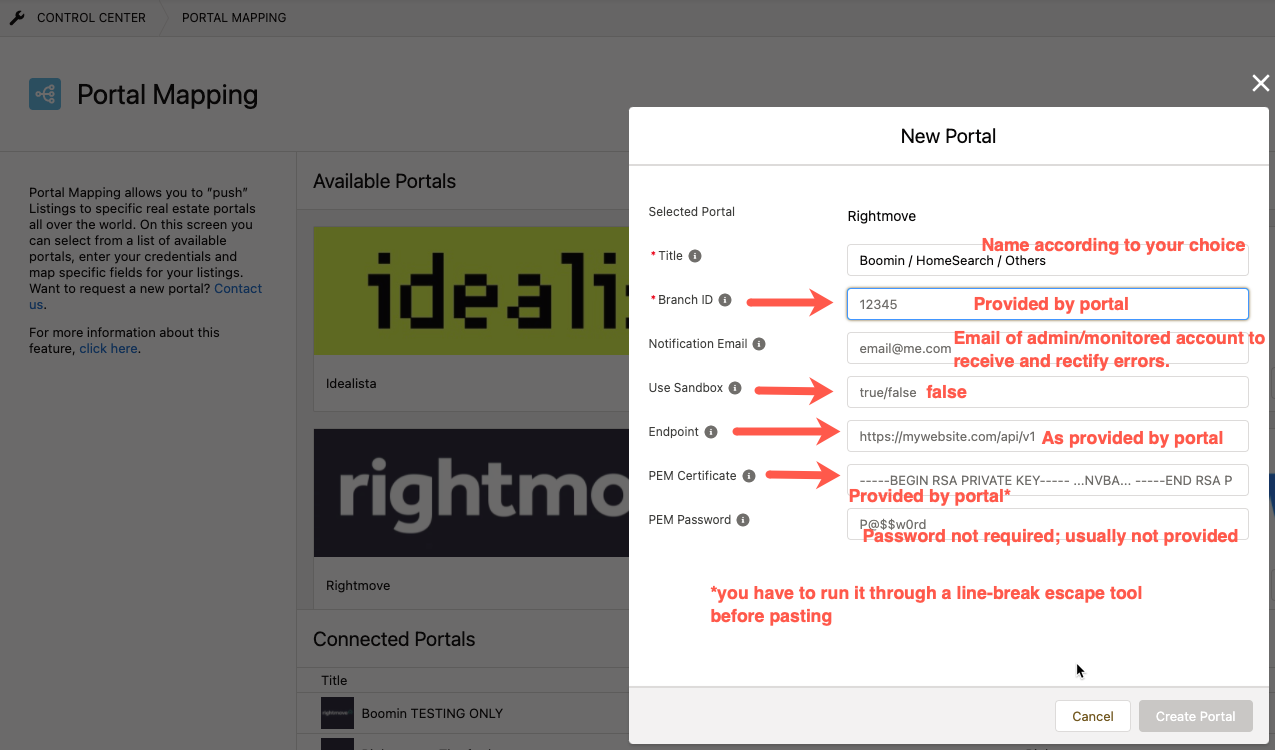
In order to establish a successful connection, you need to ensure a few things in your portal settings:
Branch ID: Make sure you also have a “Branch ID” (provided by portal; use place-holder prior)
Notification Email: Enter an email where you want to receive error message (e.g. listing couldn't be published due to missing information). This should be the admin setting this up initially, it should definitely be a monitored account. You can add multiple recipient emails comma-separated.
Use Sandbox: must be set to “false”
Endpoint: Make sure you added the correct Endpoint URL as provided by the portal. It looks somewhat like this https://feed.boominexample.co.uk/v1/property/ (Do not take it from here or ensure you update it later;using a non-existant endpoint will return corresponding error emails, but only if a listing already was without error)
PEM Certificate: Key and crt-file need to be put together in one file and line-break escapes added. To achieve this and add the escapes, you can copy and paste the key and then the certificate right behind it to this tool https://www.browserling.com/tools/add-slashes
Then paste the entire key+certificate text to the PEM Certificate field in the portal settings.
The result should look somewhat like this with lots of single "\n" added
(THIS IS NOT YOUR CERTIFICATE; YOU CANNOT USE THIS; YOURS IS MUCH LARGER):
-----BEGIN RSA PRIVATE KEY-----\nMIIEogIBAAKCAQEAtNXgAGEmFE+3FPvRF48vhfYCz6gR4oa2uU1mCOk6xjXDAXB4\nQBBJ6WO68p6uQLXMocuVspPqrWkDaXGUTtBqrl4CbpcKuCp9AU+Xsn2GTj7/XbV/\nJaLf4rtUuT4DGOGXE823GmbEzJN9t9JQcSl7wfrey9rPD+cjLPVEDuGSzU2kmgeN\n2lbGT2KGyfbkDnPz6U6XfzwpP2J/gvg5l5qJJQ2TkwpLXtrC6gZFwtLGITocalRM\ne85D6+VIs+Hp1Xh+2eyFMpSv2t20Ekx+elozQWQHpncifXUEvYNUcJMKnTY5Ijbu\nYsgPdkDF8v7feBBtavG0xcRwMDS4HmY3lxTBqQIDAQABAoIBAG5m4MH6ja/61vCV\nqJr0jPQBNMgoePrOegH5ceDg20QlkG9xhci+aehsgVfVI4N/U\nxJzShubUUx0QeNOghuxmeCIHXZRjFOabXTPkt93kbiuj649gFmp5lJJXj46wbf76cS4JvPVpcQXWteMioKi2O\nEjZNxpxhRBFRyTDONzCqZf6fwF2wlaJQYeUgTNMCgYASKzUm3x33CZcXKBDTR3R7\nF/x3VqfCuXsZRsBpjmH8G2YpLcbwUYqPQLQSr1cbRe2QKGYCo9qB+xanbho5lZGZ\nj1n/uVYBx0viAN3fvWb65Lfyt0EZp0bym7PoDEhqHf584gAhXvcetF6fTW5ZbZXH\n2lkpi1poNrcTphEJ9+42uwKBgCpuh2xoPub+6modIFc0IO4MD1NQ4zE36++9ax2p\nrxalFRsUW5dy6sxalT0z3sw2/+ECaBNIKmai6LvpGydBT1wSjhGjETydw6/Kzr4i\nkiHMzHiXkOxG9YonMXlUtht5DI5qhKahQZAToD74ZeNLRhm8zkhjjRZ486NLIMuW\n9fh7AoGAOtrJTnSrXpcI4DxWncwNUGTMCj7+TGcyD7RutCz5t2DqUiuIJ/olgFqx\nmWL4VrvhToHNiOsKiZ1LrnlIOP2whLBvL2Lg0ZXljgt/KJijkcujwVXSkyOuPteK\nhcaSkRCF6vuzHQTz4qAOQk7MvKJtYxYQtGPKPsNVhGLmOjnrADI=\n-----END RSA PRIVATE KEY-----\n-----BEGIN CERTIFICATE-----\nMIIEDDCCAvSgAwIBAgIUbBKvoEjjbJKboHow1EzdfI1jKJowDQYJKoZIhvcNAQEL\nBQAwgZoxCzAJBgNVBAYTAkdCMRYwFAYDVQQIEw1XZXN0IE1pZGxhbmRzMRMwEQYD\nVQQHEwpCaXJtaW5naGFtMQ8wDQYDVQQKEwZCb29taW4xKTAnBgNVBAsTIFBsYXRm\nb3JtIFRlYW0gVHJhaW5pbmcgSXNzdWVyIENBMSIwIAYDVQQDExlCb29taW4gVHJh\naW5pbmcgSXNzdWVyIENBMB4XDTIxMDUyNzE0MzYwMFoXDTIzMDUyNzE0MzYwMFow\nbjELMAkGA1UEBhMCR0IxFjAUBgNVBAgTDVdlc3QgTWlkbGFuZHMxEzARBgNVBAcT\nCkJpcm1pbmdoYW0xFTATBgNVBAoTDHByb3BlcnR5YmFzZTEbMBkGA1UECxMSQm9v\nbWluIEludGVncmF0aW9uMIIBIjAnKoZIhvcNAQELBQADggEBAET+w2KiOFKXX0MX2lTQYC6/6Vsx/fZbRLBtqdJE2rs3\nuEzrYd/GlxZ1g7+5iWYCQjgTKt6WvGrzcxvdISZno8O6AEih52mn01LPDtg+T9r8\navSME87i5MFk98hCiOek62KYIWQcTebKMA9uARxSyAVAdLe97qwJohVX3lBcIQzV\nzkwADQ4FvJGu0VnfzEq1I/Mr670w+0vhG9CmNGtWY4vbUEmqYqv4khlgFVA0cIAg\nPaBiFCX9vKQLH4Atpjirm9PtiB50Yts1PdvAuoMNbpiibjBJR3uc7WltCZH27dG2\nJFwROOZn7UgslRdyPe9syeqwJYCAXMG2ajX2NVyMszs=\n-----END CERTIFICATE-----
Note: you must copy/paste the certificate the portal shares to the tool above yourself as otherwise the formatting may have changed/added/removed line breaks. So, add private key and certificate to the linked tool and copy it from there to your portal setting in Propertybase.
As per the field mapping, try using the "Load Default" field mapping, but please review the mapped fields and update to the ones you are using. Also take a look at the notes on the Rightmove mapping above and follow them as it goes according to their specifications.
As we receive feedback from you, we will add it to the FAQ here or further below. Please do look at the current FAQ below, too, to learn about reducing the number of errors gradually and eventually publishing without errors.
On The Market
To setup On The Market (OTM), please use the corresponding tile in Control Center > Portal Mapping. The initial steps will be the same as for Rightmove above.
To facilitate the mapping progress, we share this OTM basic sample mapping below you can use to get started. Please right-click that image and save or open in new tab.
The setup is the same as Rightmove (using the same portal specification) so review the rules and notes from Rightmove above, too.
Do note, if you use this to setup your mapping, please check for additional fields and values you may be using and add them. Do load our default mapping values first:

Previewing Feed:
Q: Does On The Market offer a Sandbox to test what it will look like?
A: There is none, but if you ask they can publish it to a preview area
The preview site is accessible via https://expert.onthemarket.com/. There you can access your property list and select 'Preview' under the active provide drop down.
Q: I am trying to connect to On The Market Overseas. Can I use this connection?
A: No, as Rightmove uses a different specification for their Rightmove Overseas connection, so does OTM Overseas. It is based on the same configuration as Rightmove Overseas, but we have yet to implement the connection specific to On The Market Overseas. Should you desire using this, don't hesitate to put in a feature request for it sending it to support@propertybase.com
Notification Email
Enter one or multiple (comma-separated) email addresses that should receive error messages in case a listing can't be publish (e.g. due to missing information or other unclarities. If you don't understand the error message right away, forward it to support@propertybase.com. We will help you find the cause and by that you will understand to read the error messages better in the future.
Zoopla
Reach out to us when you start setting up Zoopla and if you have questions.
Initial "Settings" screen
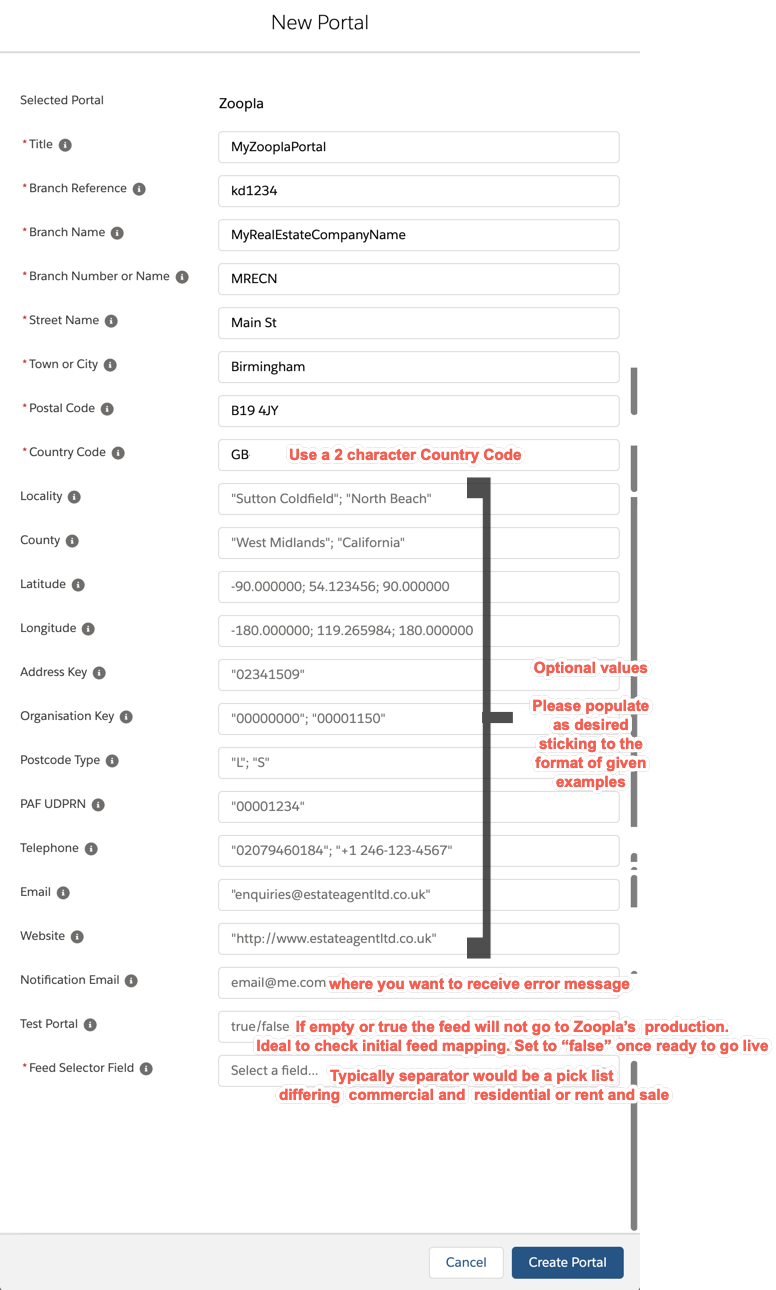
Notification Email
Enter one or multiple (comma-separated) email addresses that should receive error messages in case a listing can't be publish (e.g. due to missing information or other unclarities. If you don't understand the error message right away, forward it to support@propertybase.com. We will help you find the cause and by that you will understand to read the error messages better in the future.
Feed Selector Field
Some portals differentiate between commercial & residential feed type (could also be other types if a portal has several different feed types). This field allows you to define what type of feed you are creating. Select e.g. "Listing Type" (Rent/Sale) as the selector field.
Q: Propertyname or Number vs. Street which one should I use, what should I map, they're both mandatory?
A: At least one of them has to be given. We have to make both mandatory to ensure that something is mapped and handed over (at least one of the fields has to be populated). You could simply map "street" to "street" if you sure you always have a street populated and create a hidden field for the Property Number or Name mapped to the corresponding feed mapping just to get around the limitation that both have to be provided. Either way, one of the two fields needs to send content and if you are sure you will always only use one, then there you go. Otherwise, you will need a field for both and map them both.
Q: They want the postcode split in two?
A: Just map your postcode field to both lines, we will split it up for you.
Postcodes need to be upper-case!
Use this validation rule to ensure they are entered correctly.
NOT(CONTAINS(pba__PostalCode_pb__c,UPPER(pba__PostalCode_pb__c)))Please apply this validation rule to your postcode field, so replace the field name with yours in the code above.
Floor Levels: Needs picklist field for ground, basement, penthouse and number field from 1 upwards.
Units as in Square Feet or Square Meters:
Zoopla requires you to define what unit you are delivering a number value. So e.g. "Price per Unit Area (Price)" or any kind of "Area External/Internal Maximum/Minimum Value" will all require you to define in a similarly named picklist mapping what unit you are delivering it in. If you don't have that, create a picklist field with your definition. Should you only use one, default the picklist value. Make sure to set the value for existing listing (work with "inline edit" on a list view or import a field update with data loader). Then map the field to the portal for each unit section you chose. Alternatively, you can decide not to handover such values at all by unmapping fields that require a unit.
Tagging images
"EPC" (Energy Certificate)
"Floorplan" is for floor plan images that will be placed in a certain location by the portal
"Virtual Tour" is for Video Tours hosted on a video platform like YouTube or vimeo,...
Zoopla allows for an image tagged with EPC to be shown in a certain position on the listing when published. Of course you can add the EPC info as well to the description if you want to be fully certain that the information is there. The same applies to Virtual Tour and Floorplan.
Q: I receive error messages, but I don't understand them?
Forward the message to Propertybase Support. We will tell you what it means. Gradually, you will learn to understand them, too, as they will start repeating.
Q: There are fields in the mapping I don't know what to map to. What should I do?
Rule is: if you don't have a field/content for it, skip it. We made everything mandatory that are basic essentials to be able to publish. Everything else is optional and up to you.
Q: I don't have a field with the mandatory content asked for. What should I do?
A: In most cases you will simply have to create a field for it. This can be a field you manually fill or create a process builder rule to update the field content based on something known to the system, or you use a formula field and pull in the information from other fields.
Q: I am considering connecting to Zoopla Overseas. Can I use this connection?
A: Yes, Zoopla is using the same specification and hence the same configuration for both, their UK based listing feeds as well as the international "overseas" connection. Please set it up based on the above criteria. Some UK specific information you will be able to skip while others are mandatory for both.
LonRes
Once you have created a portal connection, set feed values, enabled the correct feeds and mapped all required fields it's time to activate!
Configuring the Setting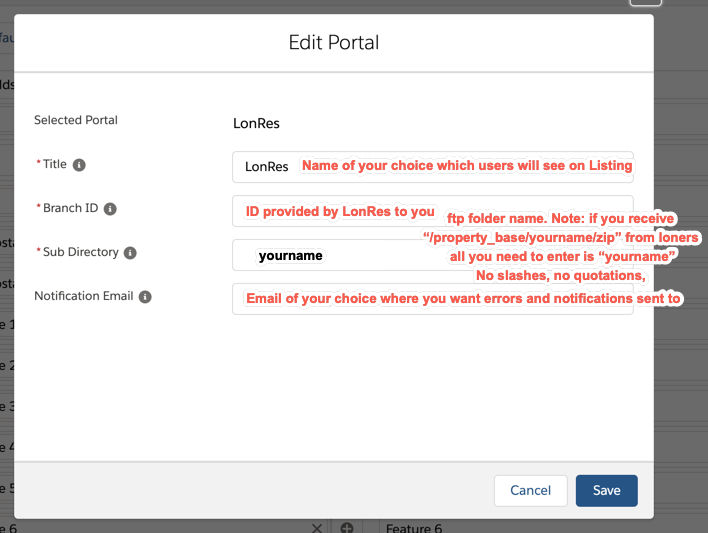
Notification Email
Enter one or multiple (comma-separated) email addresses that should receive error messages in case a listing can't be publish (e.g. due to missing information or other unclarities. If you don't understand the error message right away, forward it to support@propertybase.com. We will help you find the cause and by that you will understand to read the error messages better in the future.
Q: I get this error message "....[Listing invalid] [key not found: "PROP_SUB_ID"]"
A: The listing it mentions in the error message is using a Property Type that you have not mapped to the portal feed yet (or it is not using one at all). Please ensure that the Property Types (or Sub Types) you use are mapped to the portal feed.
General FAQ
Q: How often is my listing published?
It completely depends on the portals. We have "real-time" connections so every "Save" on the listing will update the portal. But we also support portals, who just update once a night. Most portals covered here are real-time connections and will reflect your changes in just minutes.
Q: My pictures are not shown on the portal?
Make sure that you have check the "Portal Feed" checkbox next to the picture in the listing media manager. Touch the listing (click "edit", then "save") after adding or changing images.
Q: I want to tag pictures/videos/URLs but don't see the tag I need like "Virtual Tour" or "Floorplan"?
You can add tags to a field called "Tags" on the Property Media object in Setup. If you don't understand how to get there, follow the steps in this article: Changing available tags for images
Remember, tags that are supported by portals need to be exactly spelled as mentioned in our articles to be recognized by the corresponding portal. Typical values are "360 Tour", "Virtual Tour", "EPC". Please look at the mapping information related to the portal to find out exactly or ask us at Support.
Q: What do I enter into "Notification Email" in the portal's settings?
The email addresses added to this field (one or multiple comma-separated) will be notified with error messages in case a listing can't be publish (e.g. due to missing information or other unclarities). If you don't understand the error message right away, forward it to support@propertybase.com. We will help you find the cause and by that you will understand to read the error messages better in the future. We will also gradually collect common error messages in this article.
Q: I keep getting the same error messages on missing information over and over. How can I stop this?
A: Please create validation rules that check whether all mandatory information has been added by the time the listing becomes active (so on status change to "active" run the validation rule). You can find some examples and ideas in this article.
Q: Country Code is required. But I only publish listings within in my current country?
A: Create a process builder rule to update the field with your default value e.g. GB to make sure the mandatory content is always given, run this when a listing is created.
Q: There are fields/values requested in the mapping I don't know what to map to. What should I do?
A: Rule is: if you don't have a field/content for it, skip it. We made everything mandatory that are basic essentials to be able to publish. Everything else is optional and up to you. Of course, it can happen that you unknowingly create a relational dependency: sometimes when you add a mapping or a mapped field has a value, a portal might expect other information from another field or mapping e.g. some portals require to define rent frequency if a rent price is handed over.
Q: I don't have a field with the mandatory content asked for. What should I do?
A: In most cases you will simply have to create a field for it. This can be a field you manually fill or create a process builder rule to update the field content based on something known to the system, or you use a formula field and pull in the information from other fields
Testing/Connecting to Test Environment
Some portals allow you to connect to their test environment while you are setting up your feed mapping so you can check how it goes through. If that is the case, you will find e.g. "Test Portal" in the portal's settings. If this is set to "true", the activated feed will try to connect to the portal's test environment (sometimes also called "sandbox" or "staging system"). However, you will need to tell the portal that you would like to connect to their test environment with Propertybase as they will need to do some preparation on their side as well.
Feed Selector Field
Some portals differentiate between commercial & residential feed type (could also be other types if a portal has several different feed types). This field allows you to define what type of feed you are creating. Select e.g. "Listing Type" (Rent/Sale) as the selector field.
Q: I have a question or questions not answered here. Should I ask the portal fo help mapping to their feed?
A: Please always first reach out to us (support@propertybase.com) as we might be able to help you directly. In all other cases, we will tell you then that you need to reach out to the portal and what information they will need from you.
To publish your listings to your desired real estate portal with Portal Syndication, they will need to be prepared first. This only needs to be done for the first Portal you setup.
Preparing Listing Layout to start publishing
1. Edit the Listing Lightning page layout and add a Visualforce component where you want to show it. Select "Portal Syndication" where it says "Visualforce Page Name". If not completed yet, please add the field "SystemAllowedForPortals" to all listing page layouts.
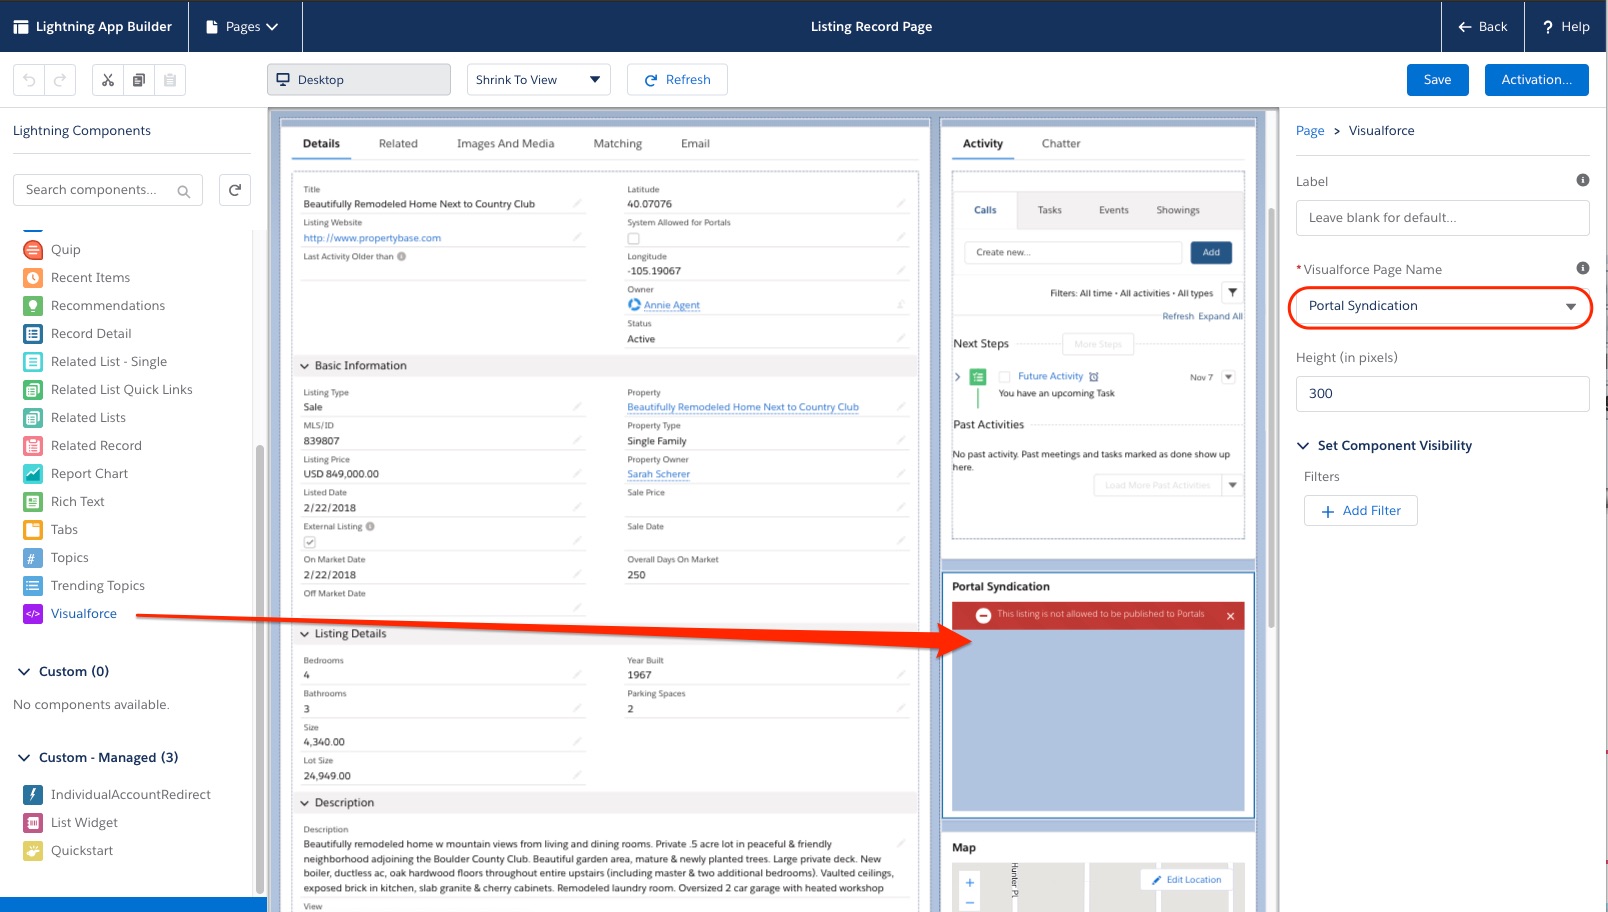
2. Add the related list "Listed on these portals" to all page listing page layouts:

Preparing listings:
1. Make sure to add all details and information relevant for publishing. Your mapping can include visible fields on the listing page layouts or hidden fields you populate with automations (process builder field update) or default values.
2. Upload all relevant images to the media manager of each listings and ensure to add them to the Portal Feed pool so that they will be included when publishing to portals.
3. Every listing record is required to have a unique, never-changing ID (e.g. Broker's Listing ID, MLS ID or the like). The value can be anything as long as it is unique to that listing.
4. Also, it is important that you populate all fields that are required on Portals. Should you receive error messages for missing or wrong values, you should consider creating Validation rules to not forget such fields and to keep data quality at a high standard.
Activate Listings for Publishing
Once your Listings have been prepared you will need to activate them for publishing. To do this click the "Allowed for Portals". Validation rules will trigger to ensure that your listing is ready for publishing. If an error appears, make sure to fill out the required fields.

You can automate this process by connecting it through a Workflow Rule or Process Builder rule to your Status field (ex. Active). This can be done by following the steps in the section below "Process Builder Rule".
Once the listing has been validated simply click the "Publish" or "Add" button to add to your feed.
Propertybase Lightning:
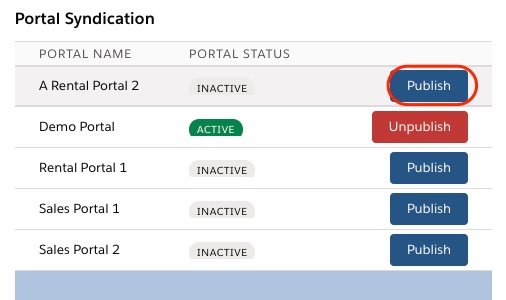
Process Builder Rule "Set Allow on Portals True/False"
1. Go to Setup > Process Builder and click "New"
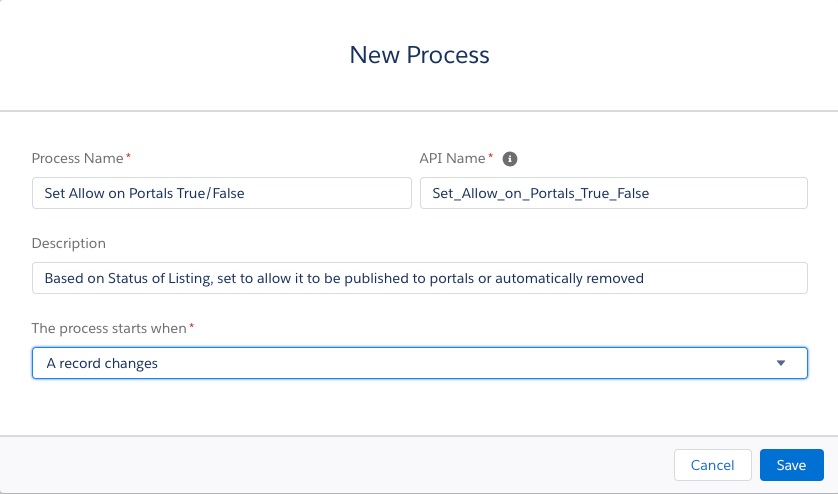
2. Name the new Process e.g. "Set Allow on Portals True/False", give it a description you understand and change to start the process when "A record changes" and click "Save":
3. Choose "Listing" as the Object and make sure it runs whenever the "record is created or edited". Click "Save" to get to the next point.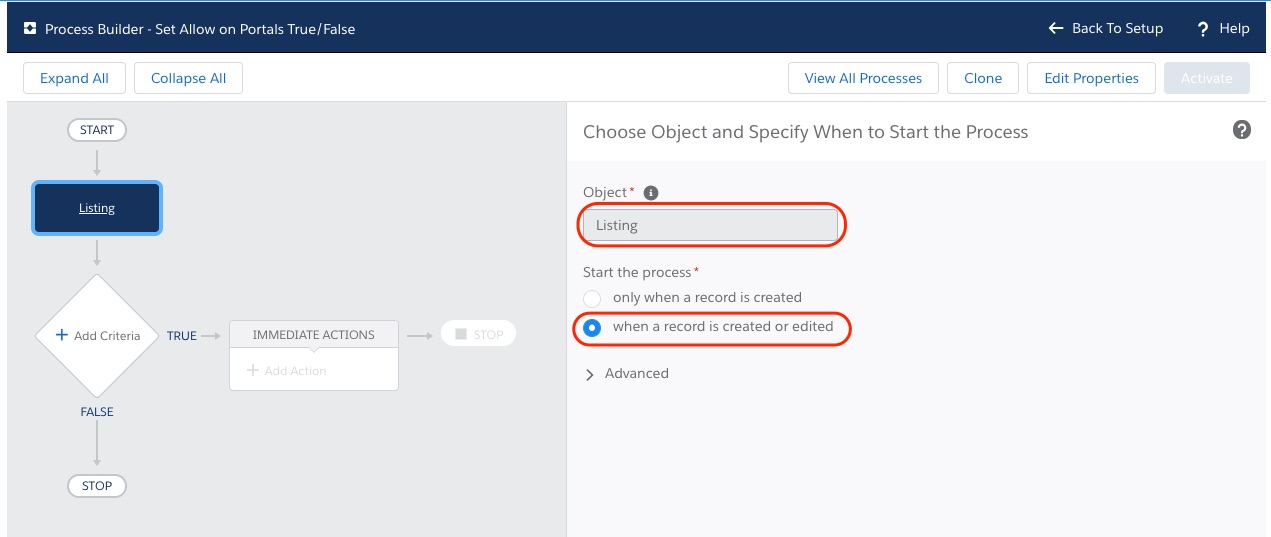
4. Click on "+ Add Criteria" and name it e.g. "Status = Active (for marketing)" and add the conditions to check for: If the field "Status" equals "Active".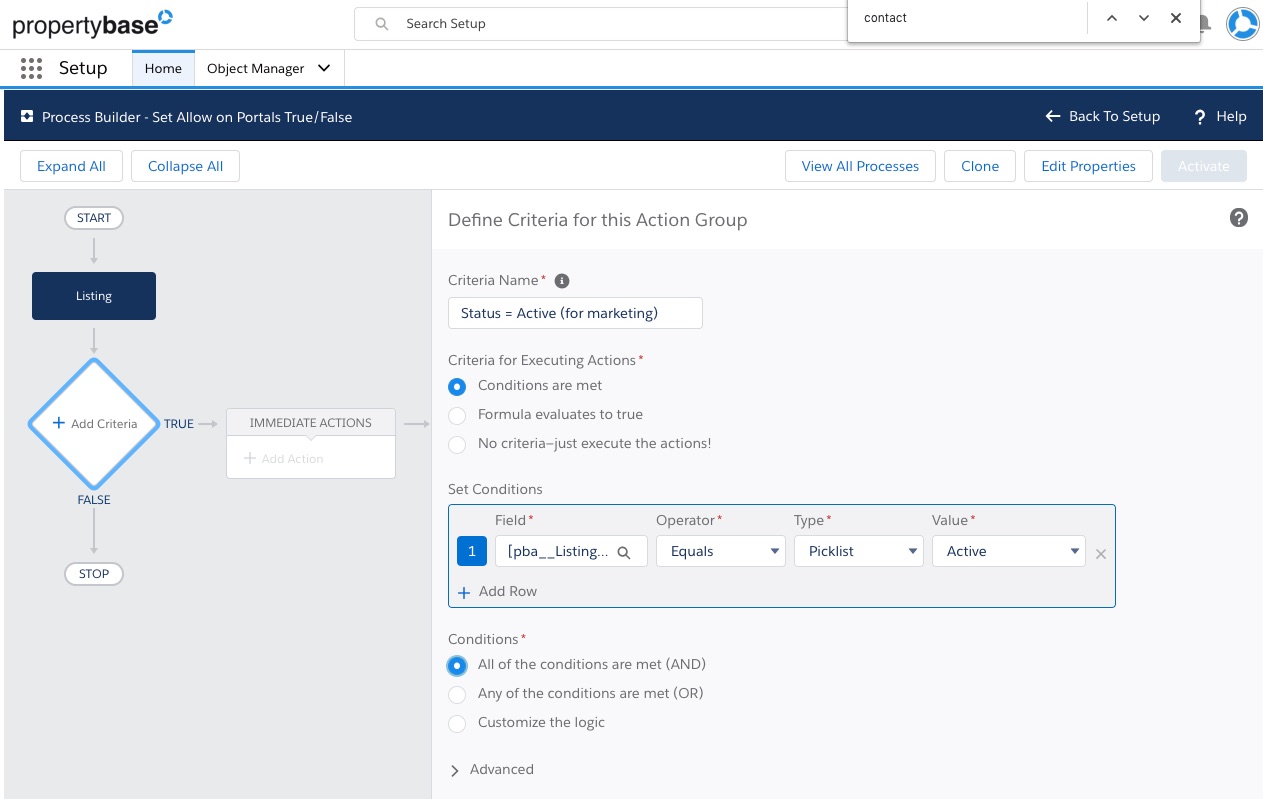
The field selector will open in a layover. Simply type "Status" (or the field you are using for this) to select it from the list in the dropdown. This way of field selection will repeat in the next steps and will not be pointed out again.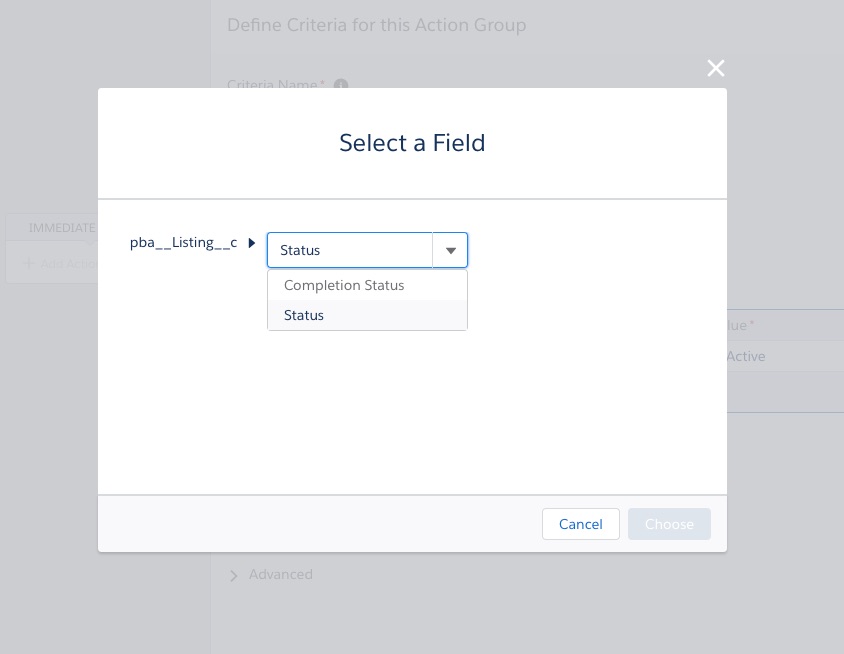
If you have multiple statuses that you want to be able to show the listing on a portal, add more rows for each status you consider "active" and change it to check on each by switching to "Any of the conditions are met (OR)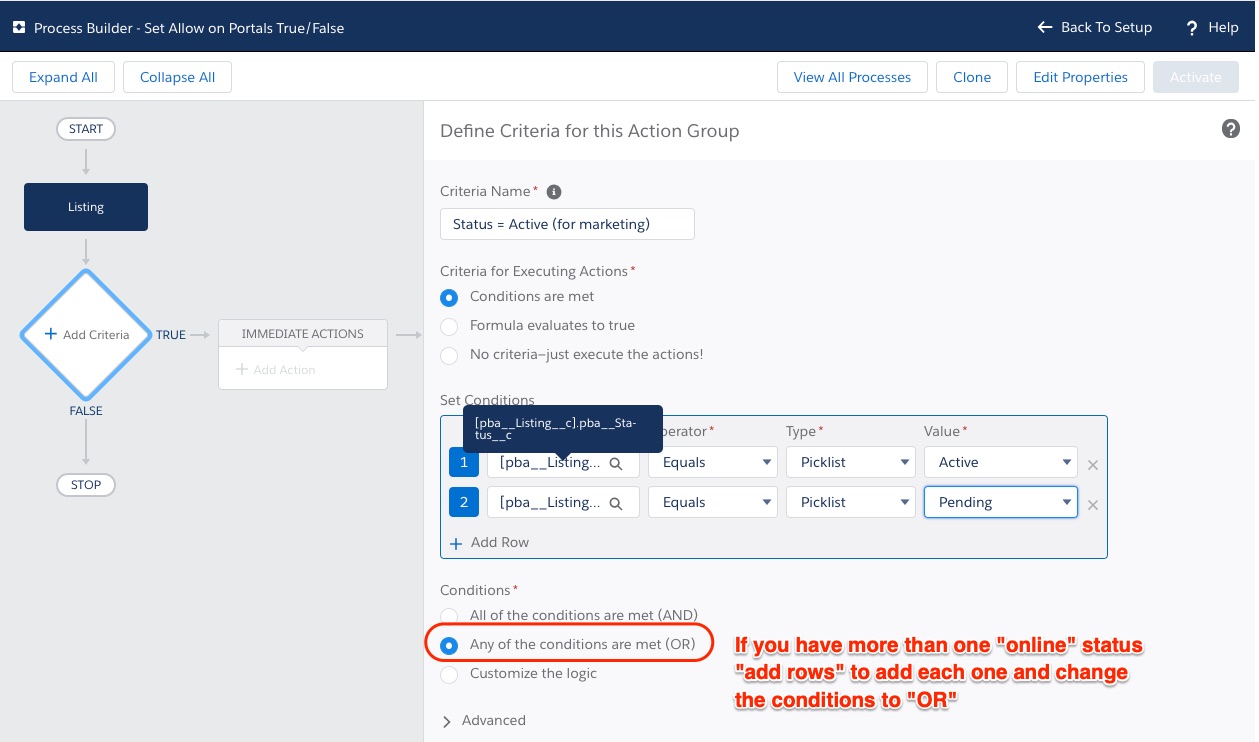
Save the changes to get to "Immediate Actions"
5. Click on "+Add Action" and choose "Update Records", then give it a name e.g. "Set SystemAllowedForPortals to TRUE" and choose the record it should work on.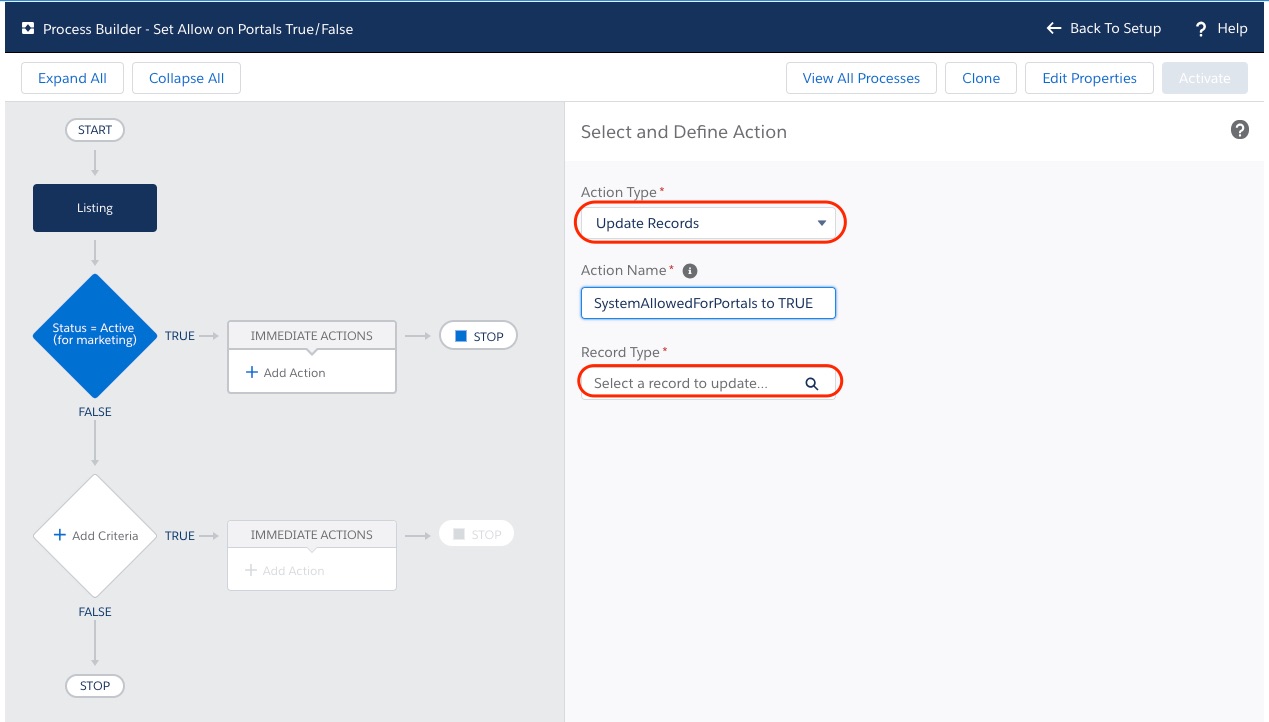
This will offer you to select whether the listing that started the process should be updated or a related record. Choose "Select the pba__Listing__c record that started your process":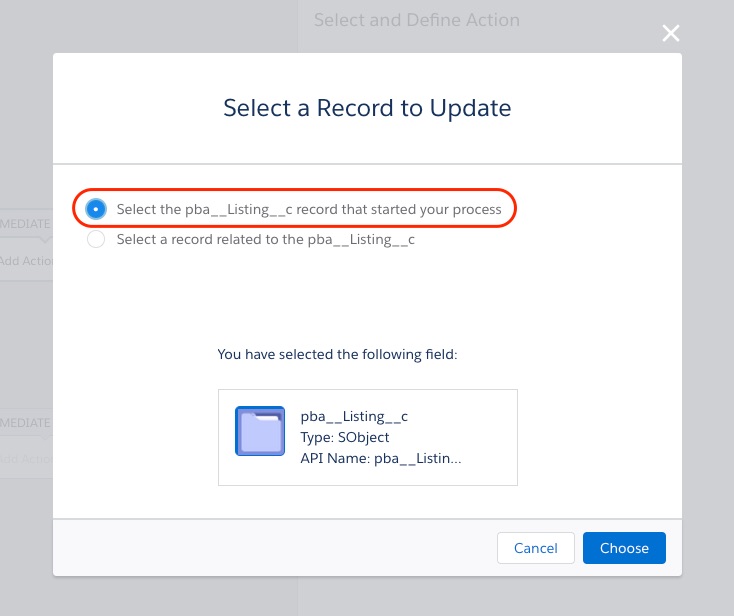
6. Then add the update it should do: select the field "System Allowed for Portals" and set it to "True" and click "Save"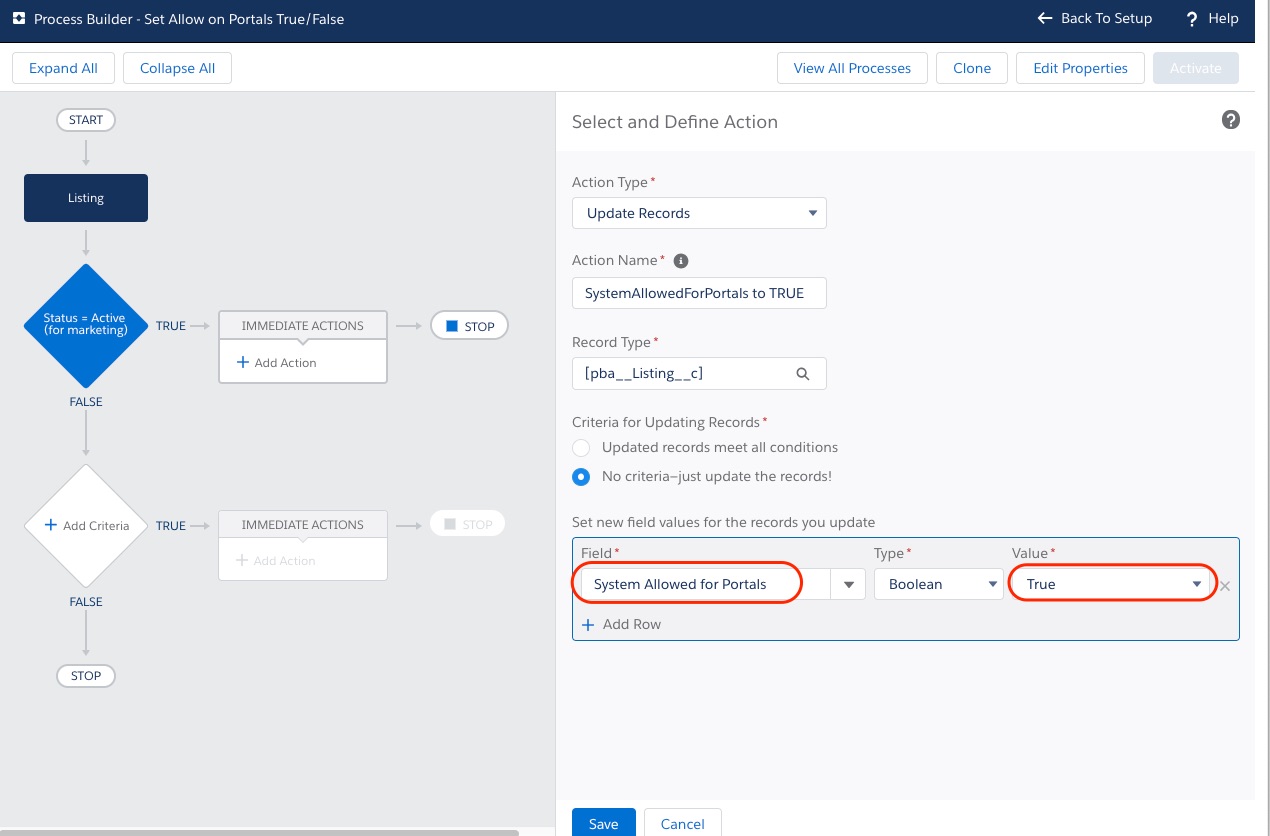
Perfect! You have added the first part to allow listings to go to portals. Now we will add a second "node" to make sure the listings are not allowed to go to portals if the status does not equal an active status. In the same process continue and
7. Click on "+Add criteria" below your first node, name it e.g. "Status ≠ Active (for marketing) and now add the opposite criteria compared to the first one, so when status does not equal Active. If you have multiple "active" statuses add them as well and change the conditions to "OR":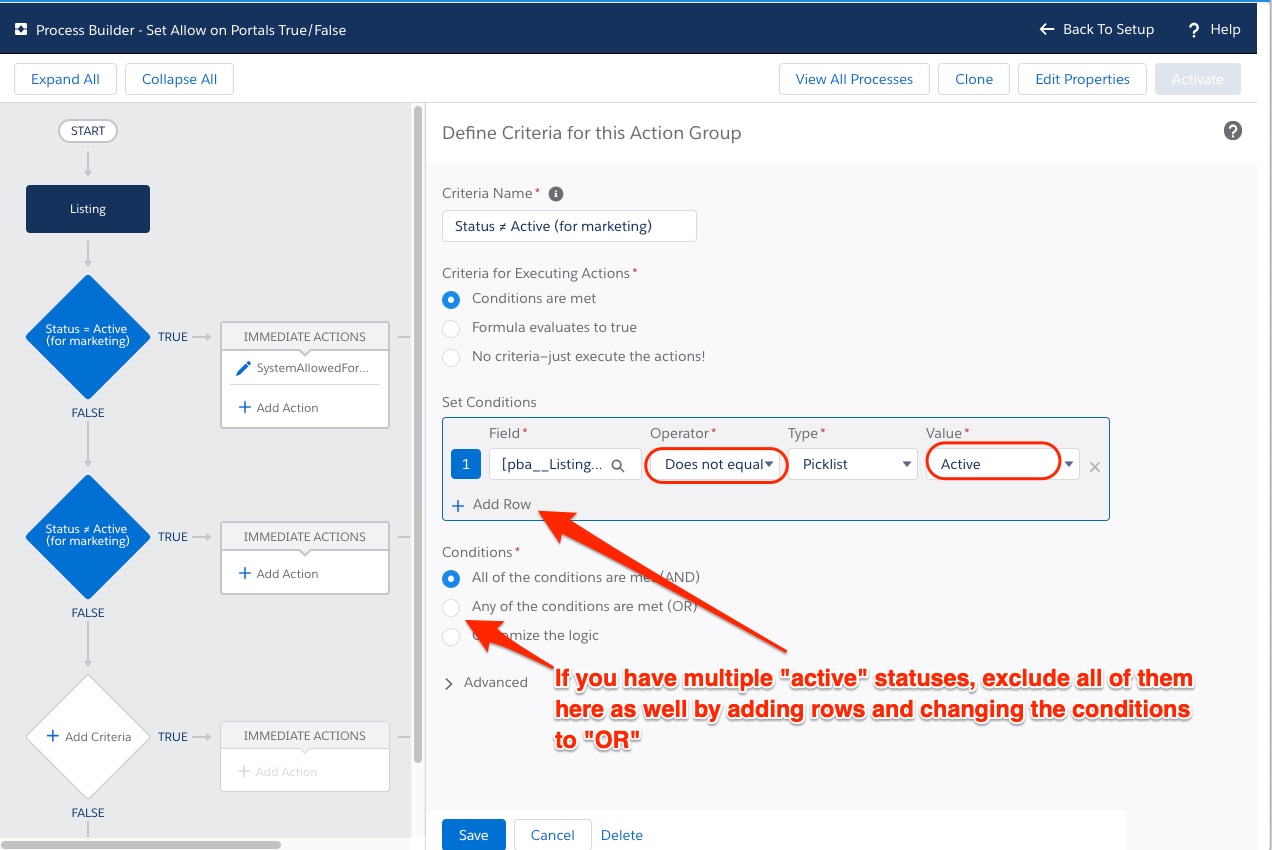
Save the change and
8. Click on "*Add Action" to define the change to "SystemAllowedForPortals" to "False" in this case: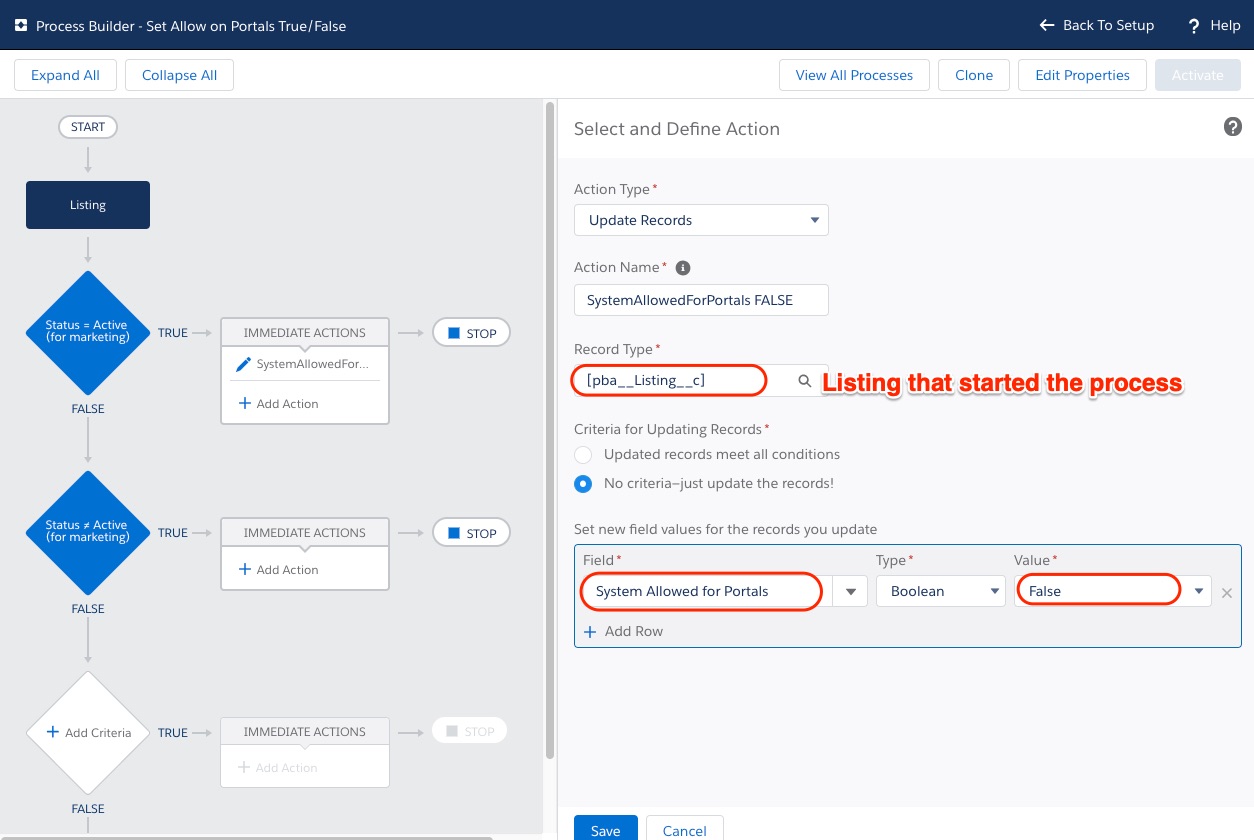
Save the last step as well.
9. Activate the process with the button in the top right corner and confirm activation.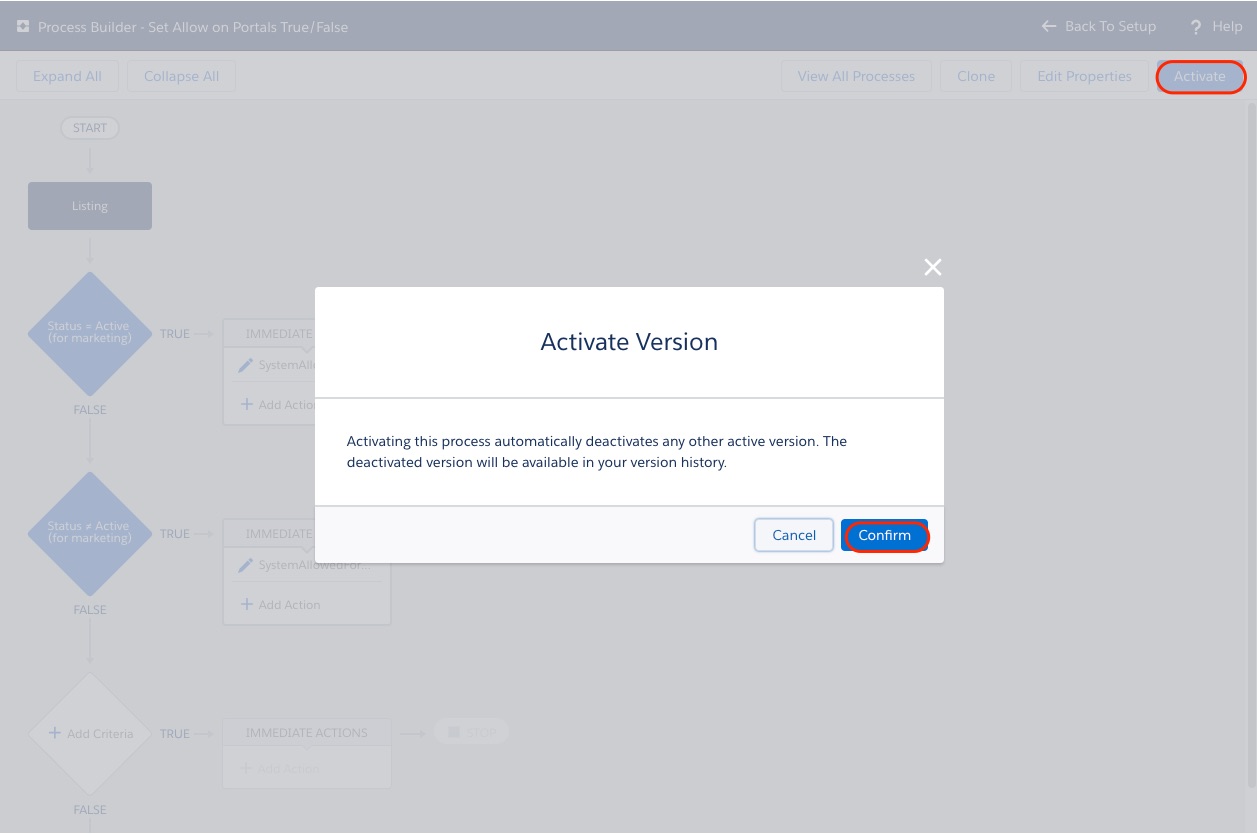
Check your process to work by changing a listing status e.g. to active from any inactive status and vice versa. If you have the SystemAllowedForPortals field on the layout you will see it check and uncheck depending on the status you choose for the listing.
Note: The Visualforce component "Portal Syndication" will only update after a page refresh.
Auto Publish Listings to Portals
New from package version 1.595:
You can now Auto Publish Listings to your Portals! This feature allows users to define criteria for automated publishing of Listings to their configured Portals. In order to add this feature you will need to follow the steps below
Configuration Steps
1. Add the Auto Publish Listing field to the Portal Layout
First, go to the Portal Object in Object Manager:

Next, you will select Page Layouts:
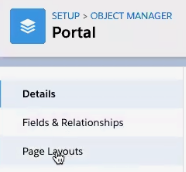
Followed by selecting the Portal Layout:

Here you'll see a new field called Auto Publish Listing:

Drag the Auto Publish Listing button down to the Portal Detail Layout:

Save changes here with Quick Save:

This will enable the checkbox for Auto Publish.
2. Add the Allowed for Auto Publish field to the Listing Layout
You will need to follow these steps again but in the Listing Object:
If you go back to Object Manager and go to the Listing Object and select Page Layouts:
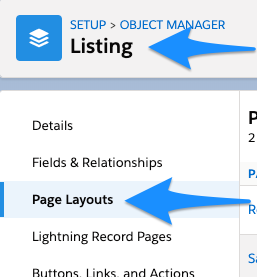
Here you'll need to go into each of your respective layout types and add the Allowed for Auto Publish button as well:

Again, you'll need to drag these down to the layout and save using Quick Save:

Auto Publishing Listings to Portals
In order to start the auto publishing for a portal you'll need the following:
- The checkbox on the Auto Publish Listings on the Portal set to True

- The Field: System Allowed for Portals on the Listing set to True
- The Field: Allowed for Auto Publish on the Listing set to True
All listings that are allowed for portals and are allowed to be published automatically will now be published to all portals that are selected for auto publishing.
Note: When adding multiple listings via the data loader make sure these fields are set if you want to use the feature.
Please note:
Existing, new and updated listings will be published to portals if the above conditions are fulfilled. Changes on the portal (auto publish changed from false to true, etc.) will trigger an auto-publish on all listings that have not yet been published if the conditions are met.
Important note for publishing a high number of listings: The publishing of listings to portals will run asynchronously.
Listings will only be auto-published once only. If they are unpublished manually, they will not be republished automatically.


Comments
0 comments
Please sign in to leave a comment.