Publish Listings via 3rd Party Portal Aggregator Follow
Publishing listings to third party portal aggregators, such as XML2U or 1001portales (no longer supported) allows you the flexibility of marketing your listings to over 200 portals supported worldwide. These companies serve as feed aggregators picking up a generic Propertybase XML feed which they then convert to a compatible format for the destination real estate portals you are subscribed to.
XML2U offer a subscription based solution for which they charge a minimal fee for their services. Before signing up, make sure to have your listings prepared and published to an XML feed in Propertybase so that you can speed the publishing process (feed creation and publishing steps below).
The following provide the steps required in order to prepare your Propertybase Org for publishing to XML2U or other aggregators.
Note: "XML2U" is a generic feed you can also use for other portals or even your website if you have another third-party that picks up the feed and maps the fields against that portal/website for you. The generic feed takes all the fields found on the listing record plus related PropertyMedia in Portal Feed. There is an option to hide/exclude fields from the feed (see below).
- 1. Setup Portal
- 2. Prepare Listing Layout
- 3. Activate Listings for Publishing
- 4. Publish Listings
- 5. Your XML Feed URL
- FAQ
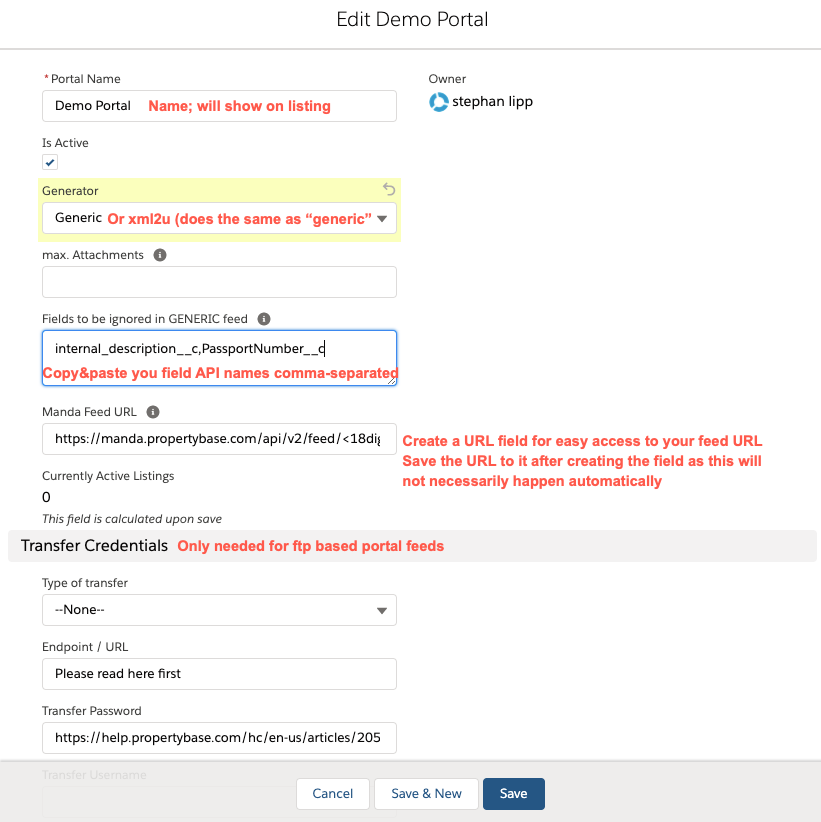
First step is to create a Portal record to ensure that Propertybase knows what type of feed it will create. To do this go
- to the "Portals" object in AppLauncher in Propertybase Lightning
or to the "+" sign at the end of your tab section in Propertybase Classic. - Then select the object "Portal".
- Create a new record and name it "XML2U" or after the portal you plan feeding to or if you are planning multiple feeds with XML2U for different portals, call it according to your Portal(s) name(s)
- Mark the "Is Active" checkbox
- Select the value XML2U or Generic from the "Generator" picklist field
If you can not find the value in the drop down, please add it as picklist value to the field on the portal object as spelled here in the article - Save the new portal record and you are done!
Repeat the steps if you need multiple, separate feeds.
Excluding/Hiding Fields from the Feed
The generic XML feed holds all fields of your listing records when added to it (published). In some cases you might not want to share all fields with confidential information.
Therefore we added ApiNamesIgnored to hide fields from the feed optionally:
This custom Text Area(long) field ApiNamesIgnored__c can be created (should it not already exist in Setup>Object Manager>Portal>Fields and Relationships) on the portal object to hold a comma separated list of listing-related API field names that will then be excluded from the feed:
Once created and added to the page layout, you can add API names of listing fields that should no longer show in a generic XML feed like this ProjectName__c,AdressInternal__c,pba__UnitNumber__c.
Important if you create the field: The API name of the field must be ApiNamesIgnored__c. Its label is your choice. __c is added by your system automatically when you save the new field.
Note: The following is only required if you did not setup any other portal before (in some ORGs this is also preconfigured).
To publish your listings to a real estate portal (thus the "feed"), the listing layout will need to be prepared first. This entails:
1. If you are on Propertybase Lightning (version 1.414 and above):
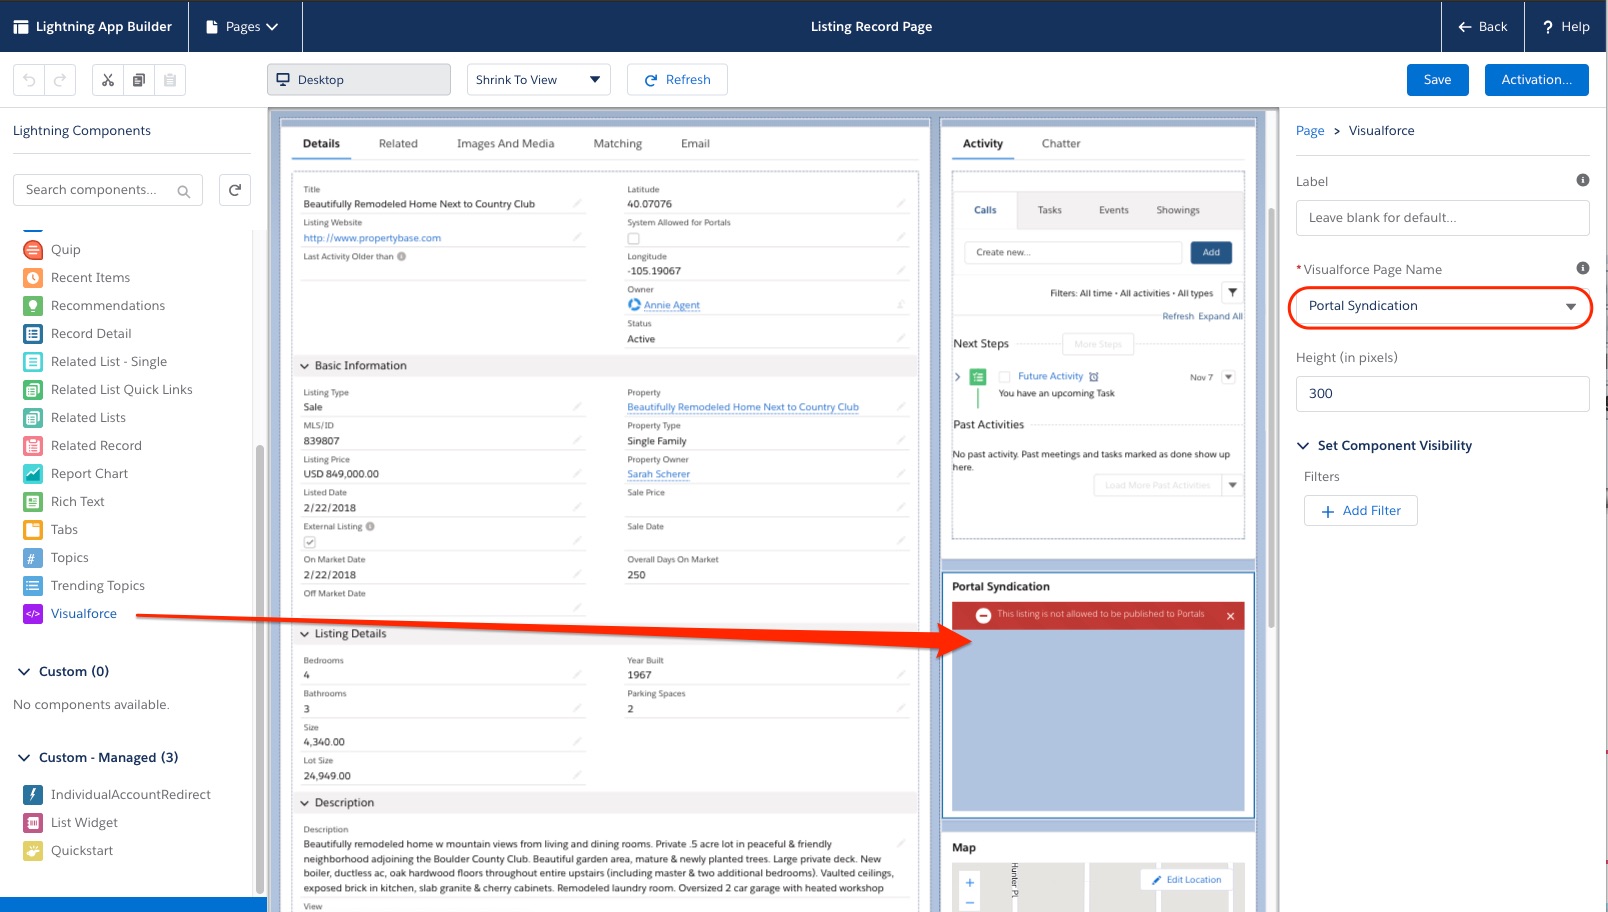
Edit the Listing Lightning page layout and add a Visualforce component where you want to show it. Select "Portal Syndication" where it says "Visualforce Page Name". If not already completed: Add the fields "Broker's Listing ID" and "System Allowed For Portal" to all listing page layouts (e.g. Sale and Rent). Please continue reading at point 3
2. If you are on Propertybase Classic (version 1.398.8 and below):
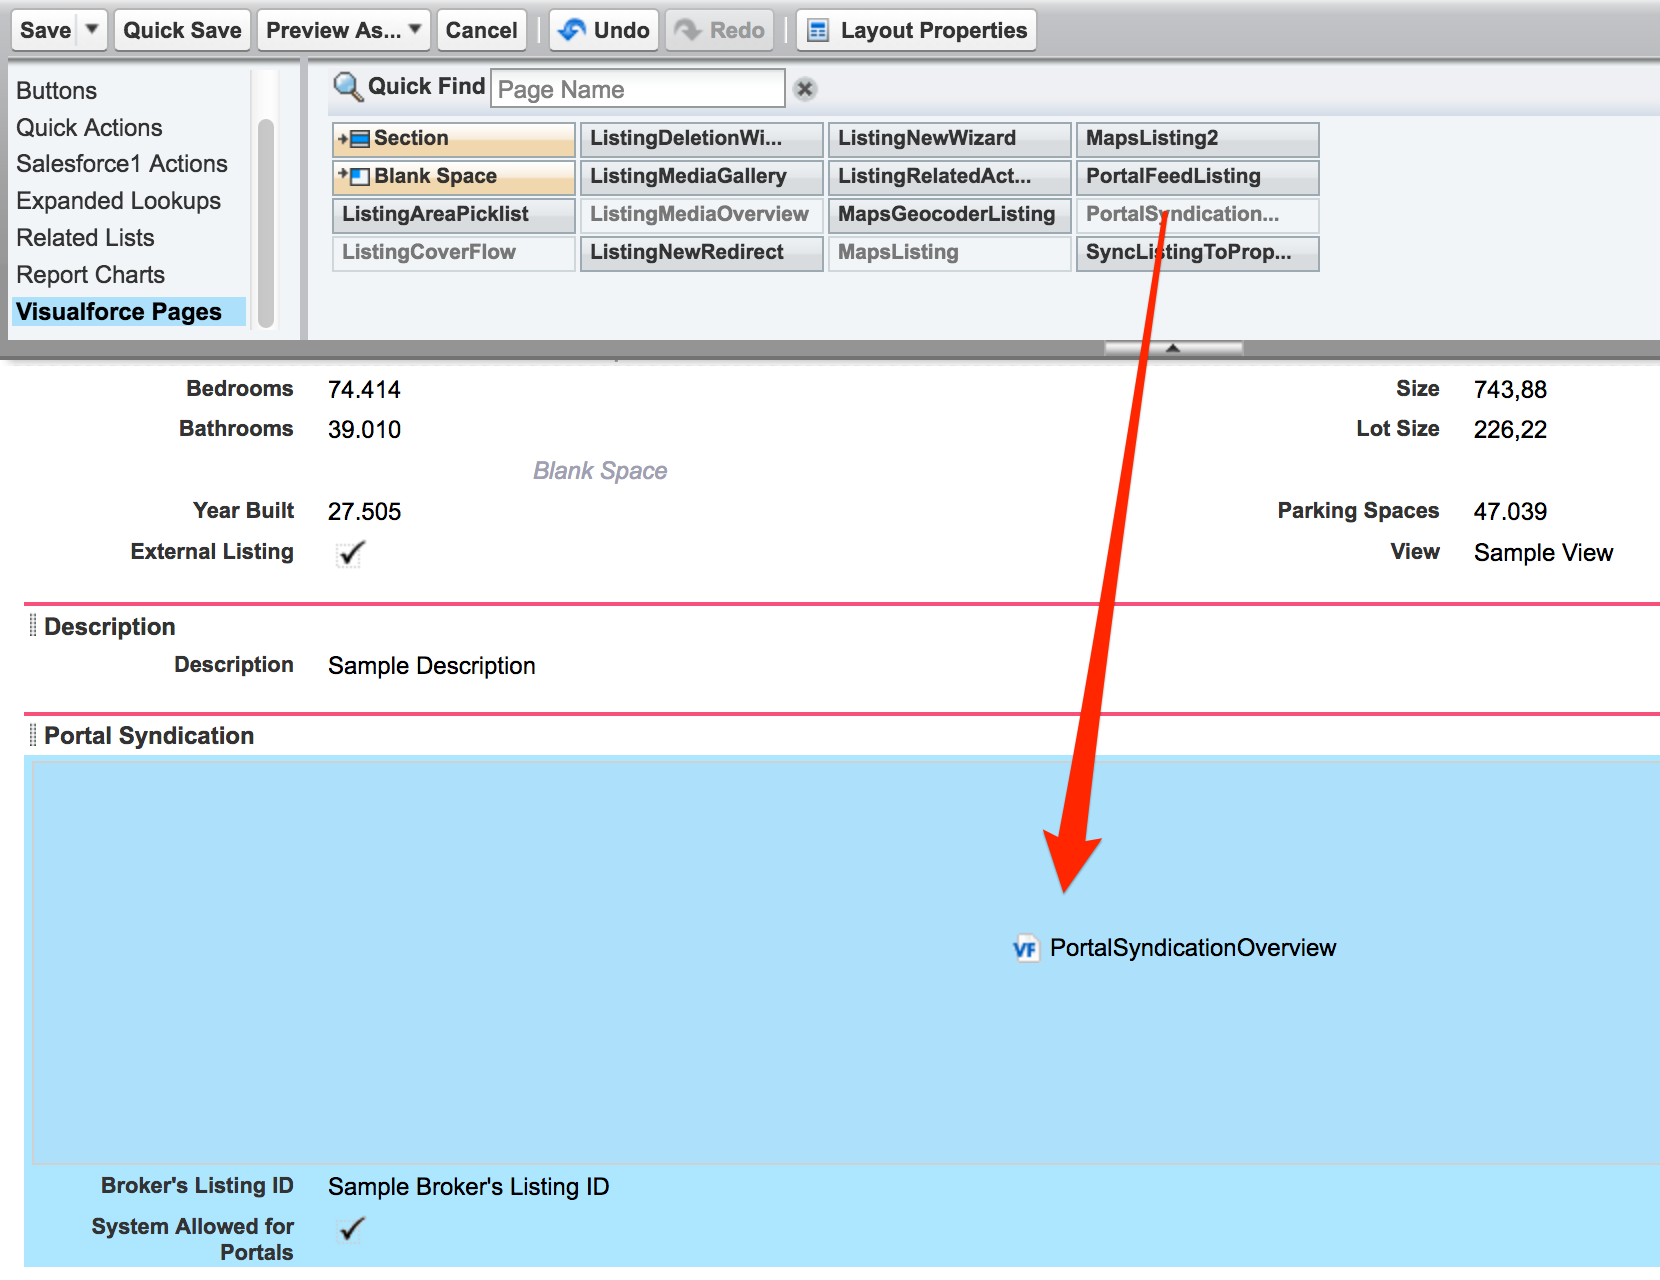
Edit the page layout of both the Rent and Sale record types and add a new section. Name it: Portal Syndication. Make sure it is a one column section. Add the fields "Broker Listing ID" and "System Allowed For Portal" to this section. In addition add the Visual Force page "Portal Syndication Overview"
3. Add the related list "Listed on these portals" to all page layouts:

4. Adding all details and information to each field. You can include custom fields, just add them to the page layout. Use as many of the Propertybase standard fields as possible as this will ensure compatibility.
5. Upload all relevant images to the media manager of each listings and ensure to add them to the Portal Feed pool so that they are available for the portals.
6. Every listing record is required to have a Broker Listing ID (unique reference number). The value can be anything as long as it is unique to that listing.
7. Also, it is important that you populate all fields that are required on the Portals you wish to publish. You should consider creating Validation rules to not forget such fields and to keep data quality at a high standard
Once your Listings have been prepared you will need to activate them for publishing:
There is a checkbox field name System Allowed for Portals which needs to be checked in order to tell the system that this listing may be published. Normally, this should happen when a listing becomes "active" and there is a Process Builder automation that can do this for you. If you never used this, you can try it out manually, though, too:
To do this check the "System Allowed for Portals" checkbox on a listing (add it to the layout if it is not there). There may be Validation rules* that will trigger to ensure that your listing is ready for publishing. If an error appears, make sure to fill out the required fields.
*Please consider creating or amending Validation Rules to ensure all mandatory information makes it to a portal.

You can automate this step by connecting it through a Workflow Rule or Process Builder rule to your Status field (ex. Active).
This can be done by following these steps (Process Builder recommended):
Process Builder Rule
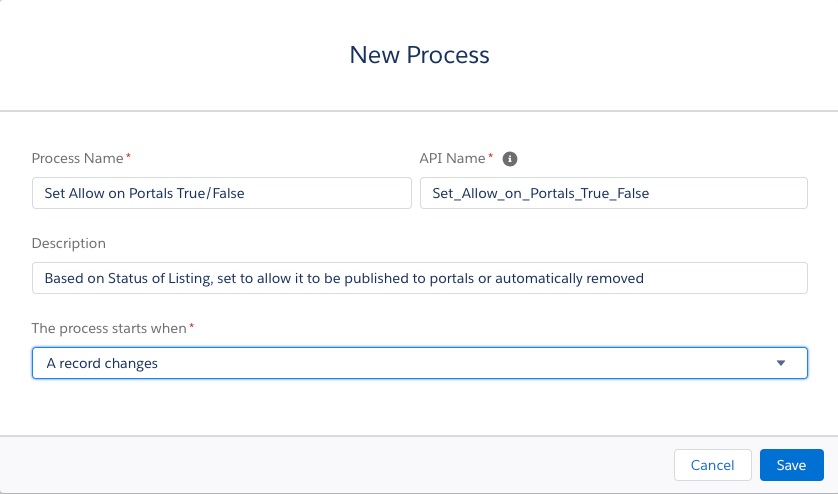
1. Go to Setup > Process Builder and click "New"
2. Name the new Process e.g. "Set Allow on Portals True/False", give it a description you understand and change to start the process when "A record changes" and click "Save":
3. Choose "Listing" as the Object and make sure it runs whenever the "record is created or edited". Click "Save" to get to the next point.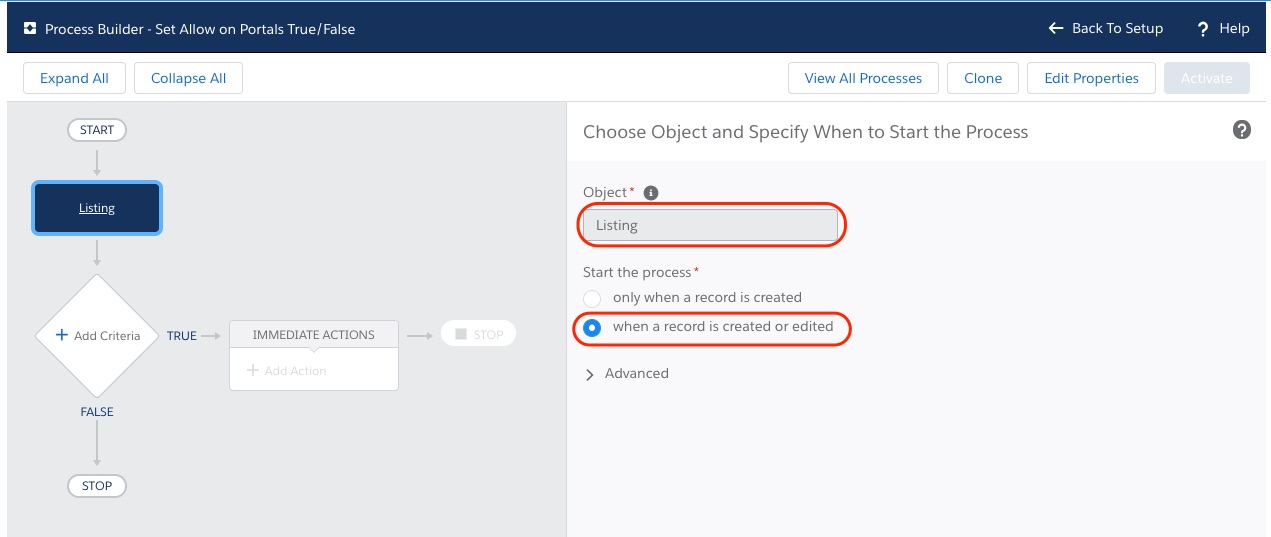
4. Click on "+ Add Criteria" and name it e.g. "Status = Active (for marketing)" and add the conditions to check for: If the field "Status" equals "Active".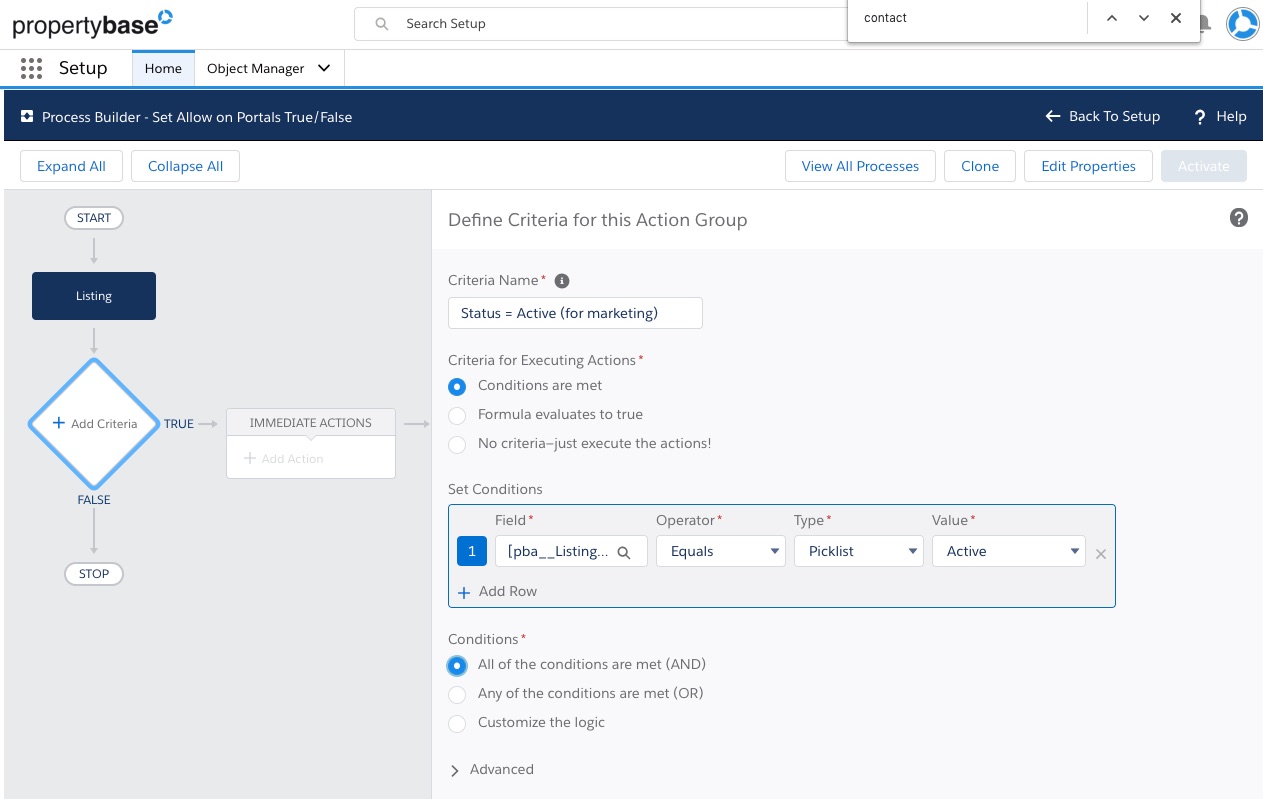
The field selector will open in a layover. Simply type "Status" (or the field you are using for this) to select it from the list in the dropdown. This way of field selection will repeat in the next steps and will not be pointed out again.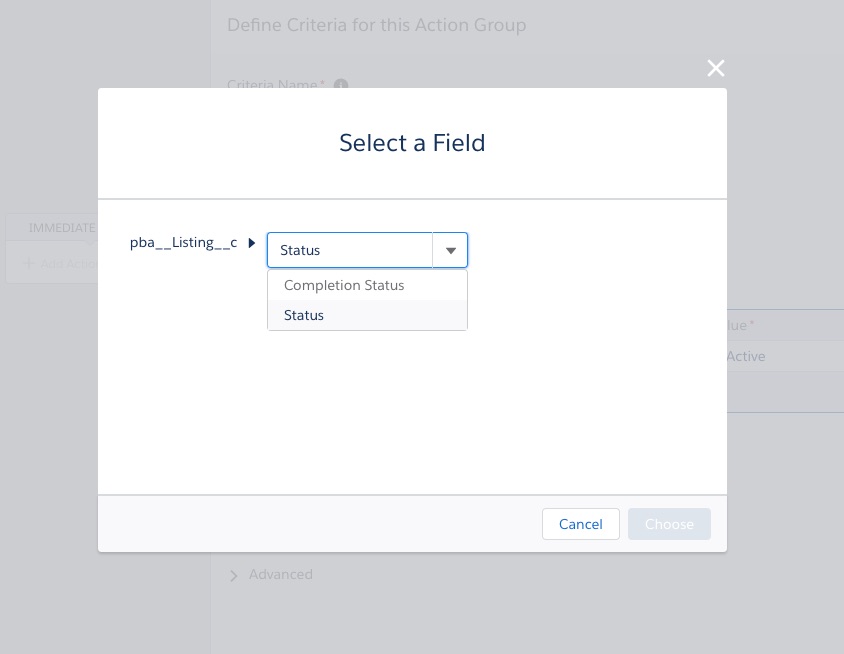
If you have multiple statuses that you want to be able to show the listing on a portal, add more rows for each status you consider "active" and change it to check on each by switching to "Any of the conditions are met (OR)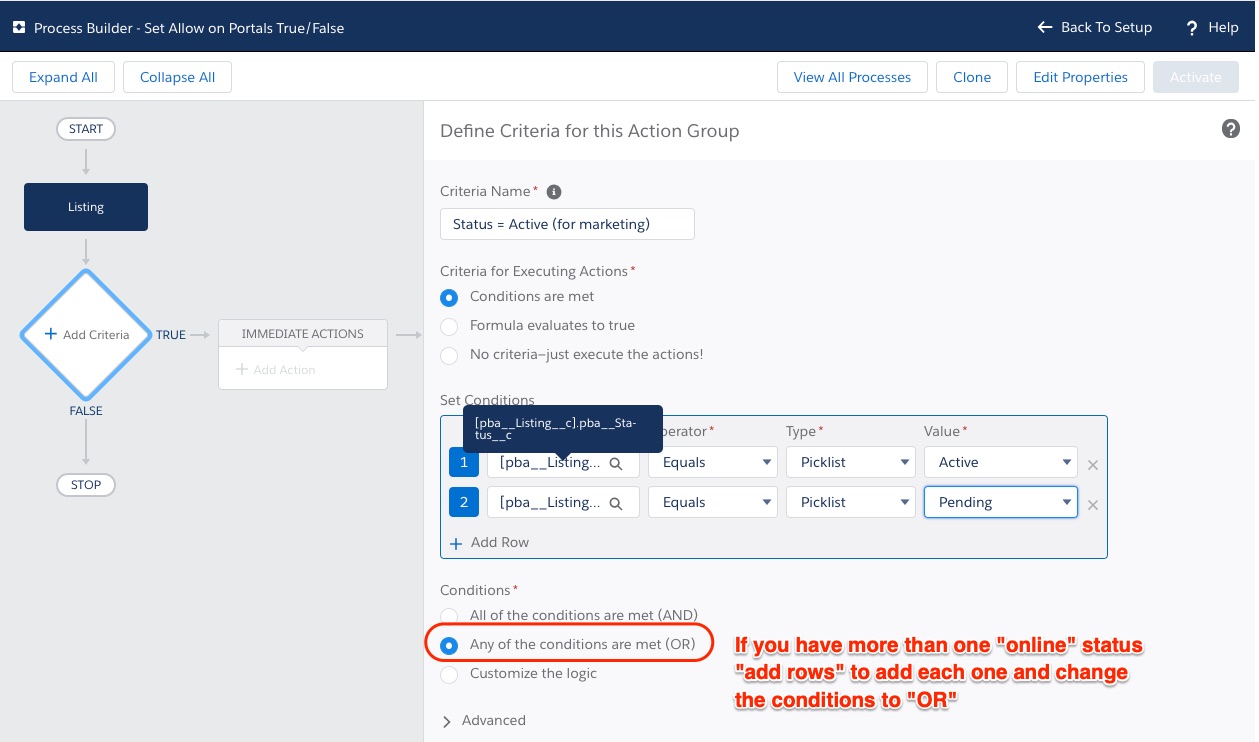
Save the changes to get to "Immediate Actions"
5. Click on "+Add Action" and choose "Update Records", then give it a name e.g. "Set SystemAllowedForPortals to TRUE" and choose the record it should work on.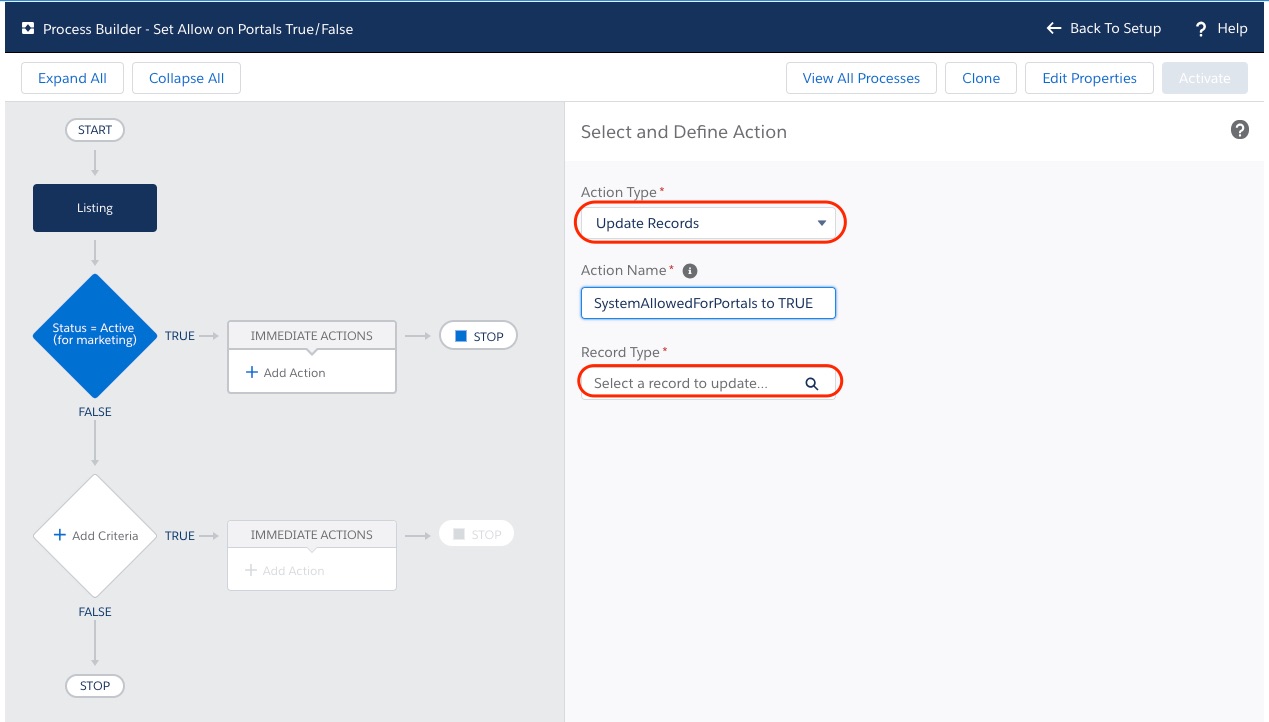
This will offer you to select whether the listing that started the process should be updated or a related record. Choose "Select the pba__Listing__c record that started your process":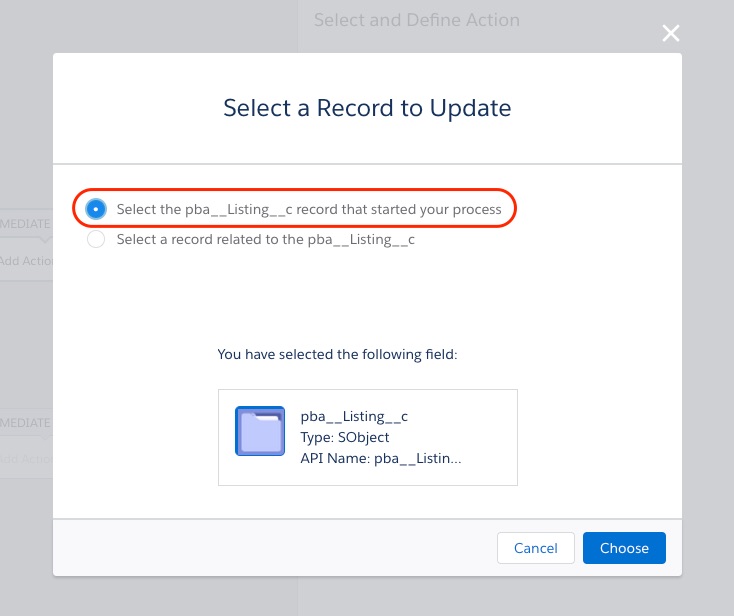
6. Then add the update it should do: select the field "System Allowed for Portals" and set it to "True" and click "Save"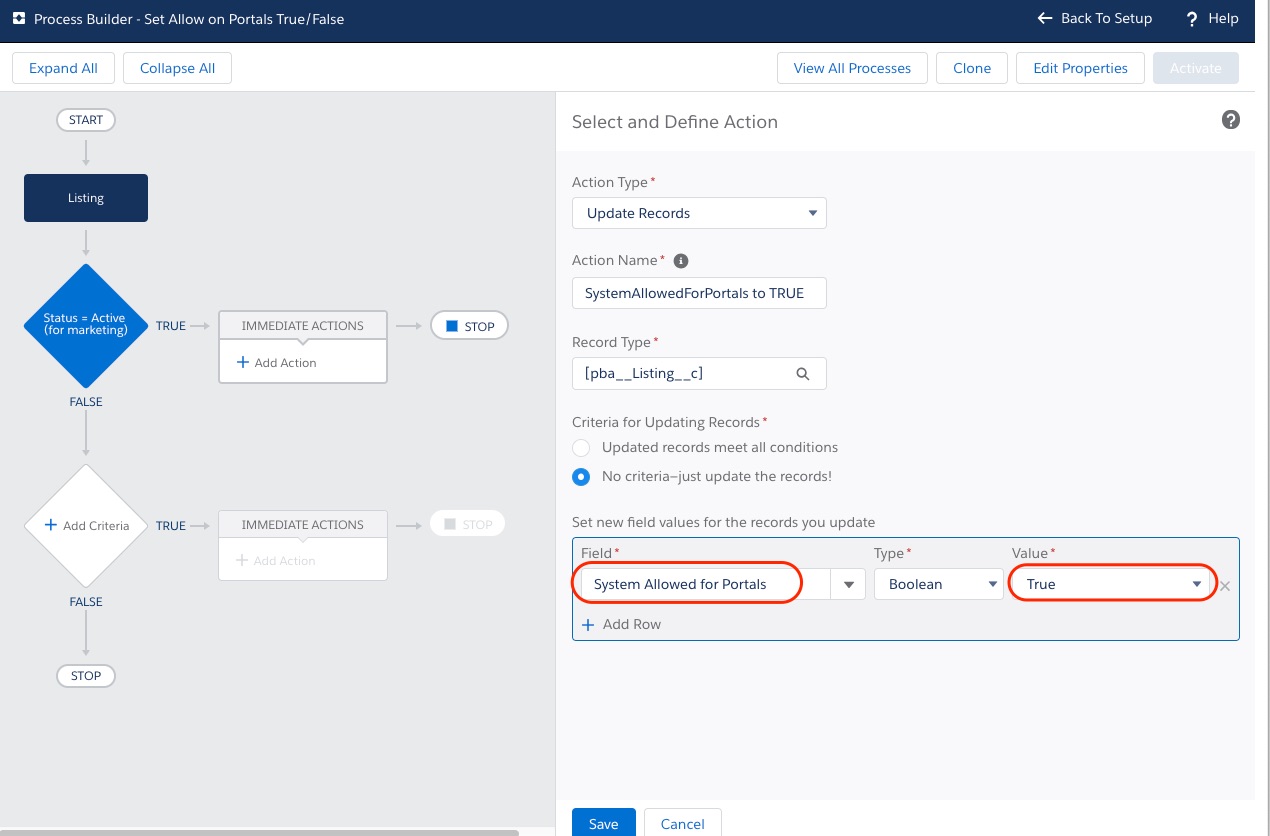
Perfect! You have added the first part to allow listings to go to portals. Now we will add a second "node" to make sure the listings are not allowed to go to portals if the status does not equal an active status. In the same process continue and
7. Click on "+Add criteria" below your first node, name it e.g. "Status ≠ Active (for marketing) and now add the opposite criteria compared to the first one, so when status does not equal Active. If you have multiple "active" statuses add them as well and change the conditions to "OR":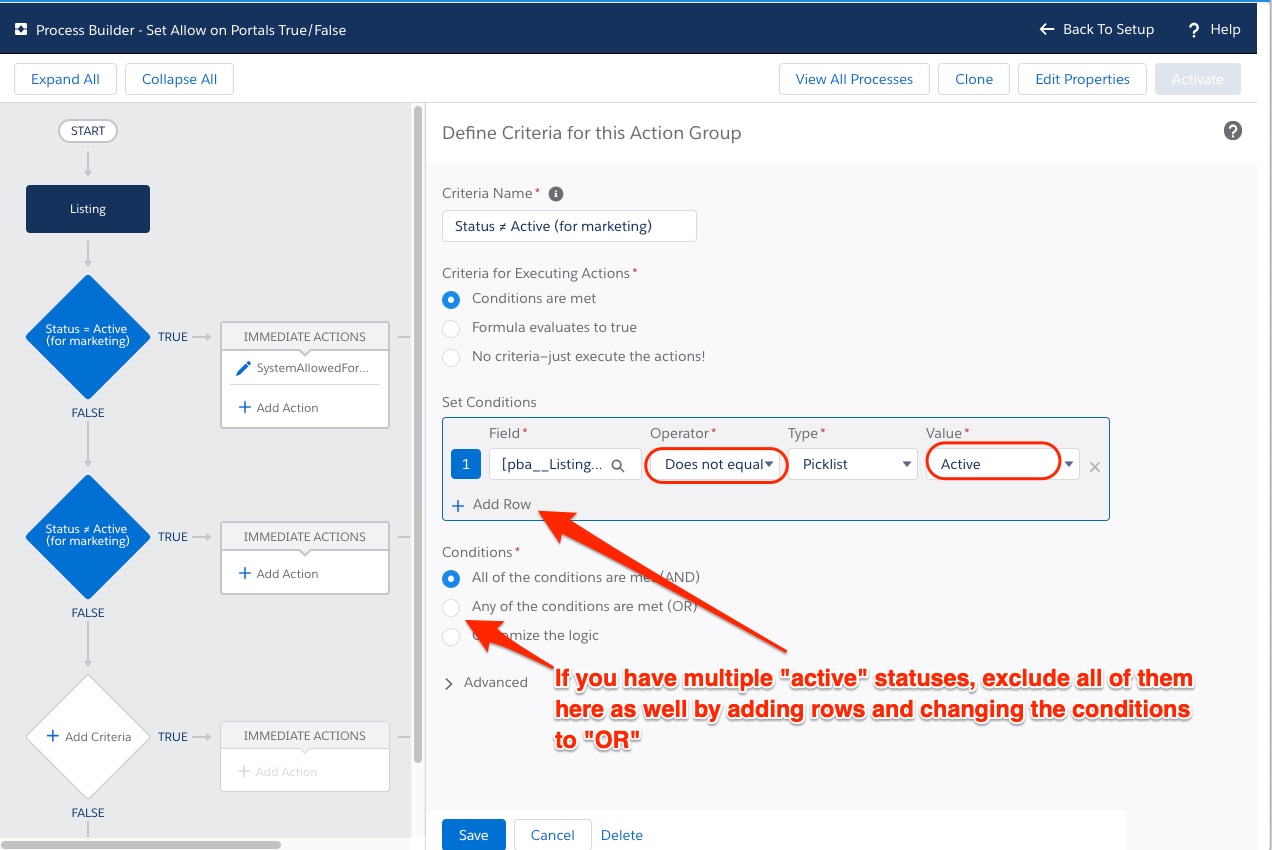
Save the change and
8. Click on "*Add Action" to define the change to "SystemAllowedForPortals" to "False" in this case: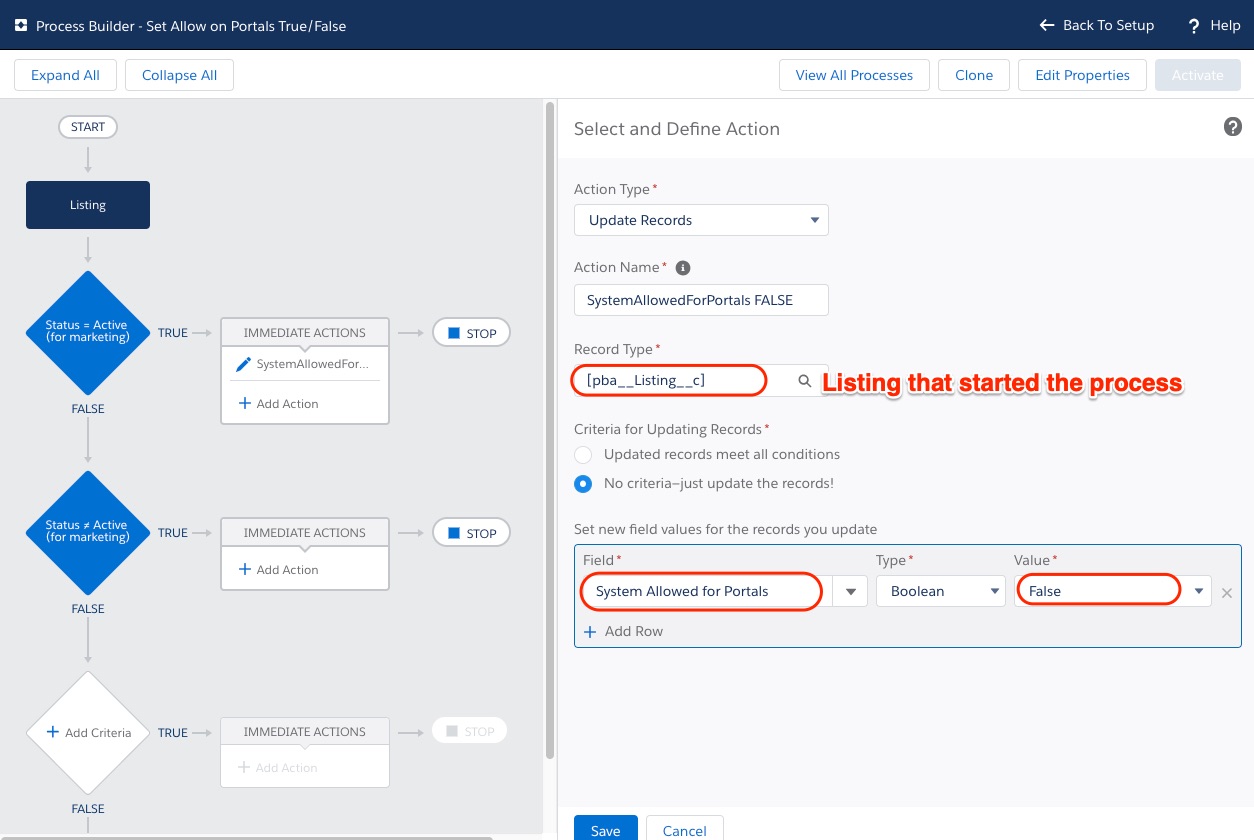
Save the last step as well.
9. Activate the process with the button in the top right corner and confirm activation.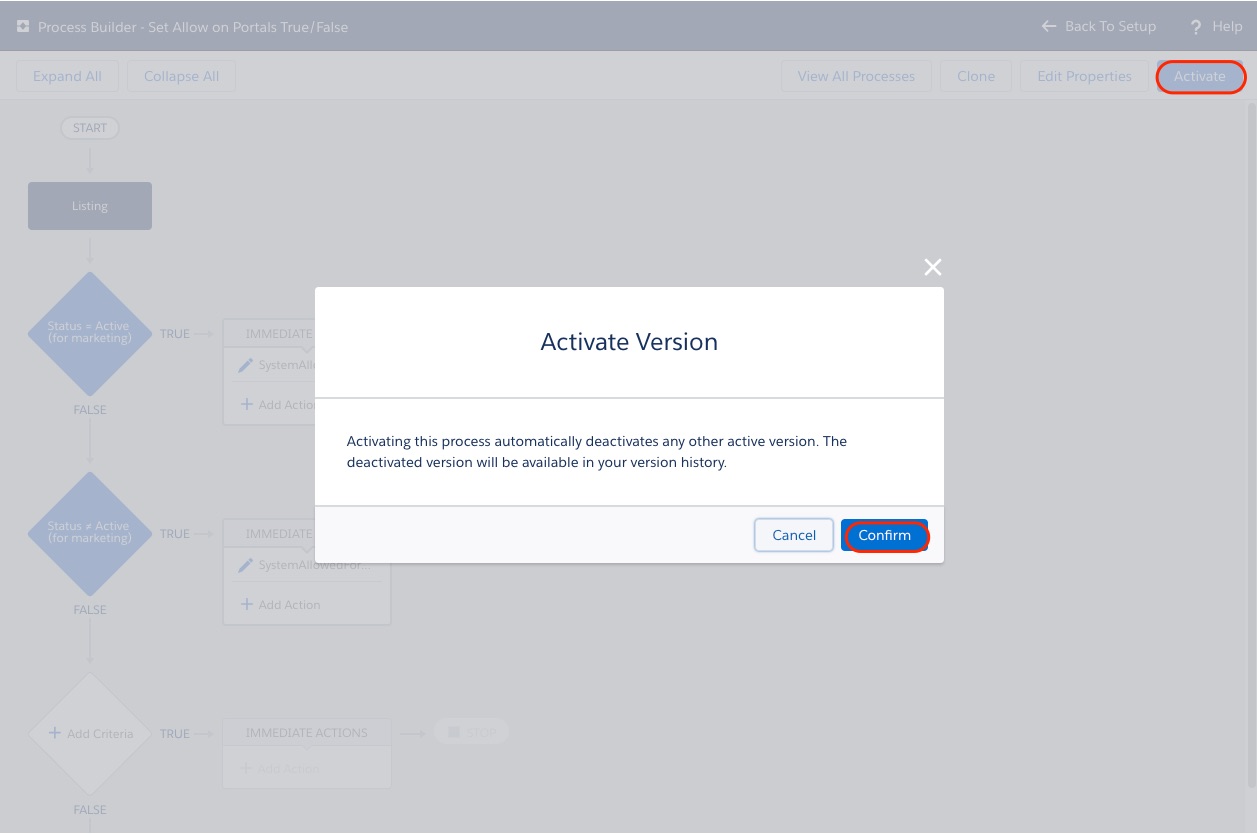
Once completed, continue reading from "Test the automation"
With Workflow Rules
Workflow 1:
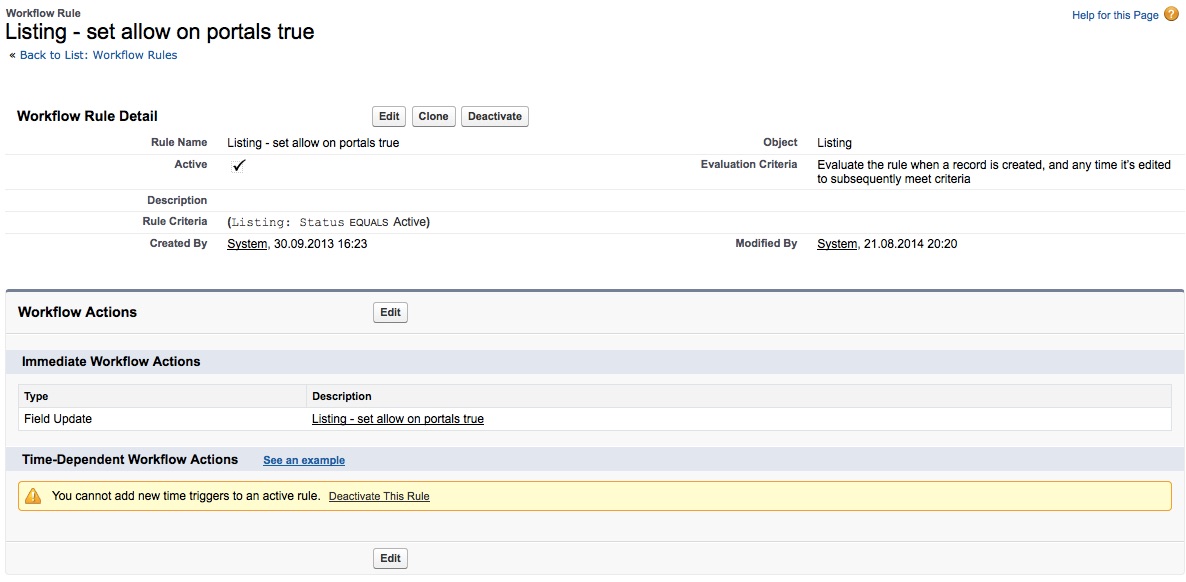
and then create the workflow Action: Field update
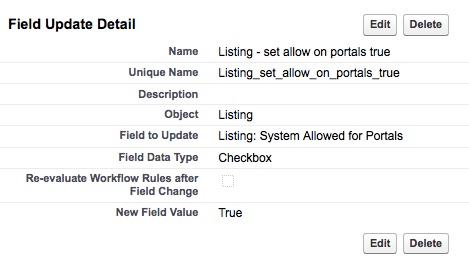
Workflow 2
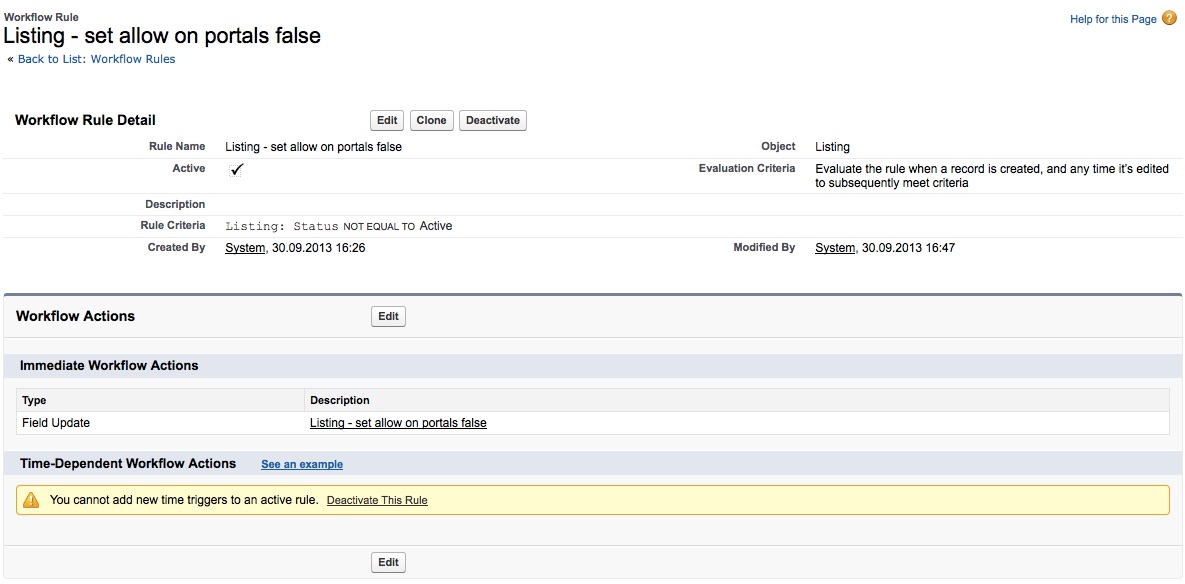
Again create the workflow actions with a field update.
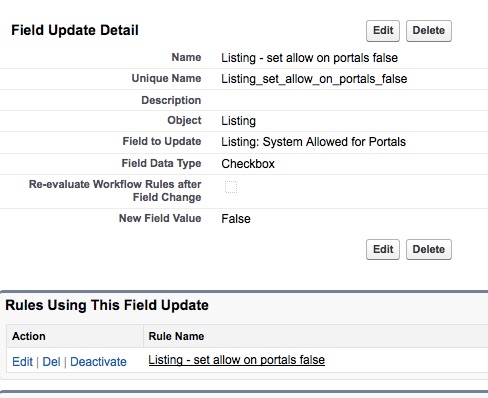
Please do not forget to "Activate" the workflows after creation!
Test the automation
Check your process to work by changing a listing status e.g. to active from any inactive status and vice versa. If you have the SystemAllowedForPortals field on the layout you will see it check and uncheck depending on the status you choose for the listing. Consider taking it off the layout once the automation works.
Note: The Visualforce component "Portal Syndication" may only update after a page refresh.
Once the listing has been validated, so "is allowed to be published", simply click the "Publish" or "Add" button to add the listing to your feed:
Propertybase Lightning:
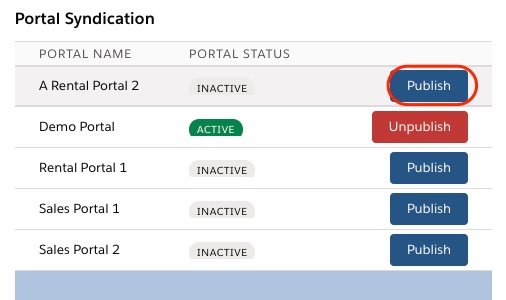
Propertybase Classic:

5. Your XML Feed URL
Now you will need to generate you XML feed URL to send over to XML2U. The following link provides you the general structure of that URL. All that is required is to enter your 18-character Org ID and the 18-character Portal Record ID replacing the bolded section between the two dashes:
With "generic" in the URLhttps://manda.propertybase.com/api/v2/feed/<ORG_ID, 18 chars>/generic/<PORTAL_ID, 18 chars>/fullOr with "xml2u" in the URL (result is the same thing as with "generic")
https://manda.propertybase.com/api/v2/feed/<ORG_ID, 18 chars>/xml2u/<PORTAL_ID, 18 chars>/full
By default you may be provided with a 15 character ID. To convert this to the 18 digit version please go to this ID Converter, paste the 15 and generate the 18-long version. The Portal Record ID can be found in the URL of the portal record you created.
After adding the two ID's you will be able to see the XML feed and all your published listings in it. Send this URL to XML2U after creating your account (or other 3rd party).
If you don't have this field, consider creating a URL field on the portal object to save the feed URL for future reference.
FAQ:
- How often are my listings published? - It completely depends on the portals. Any "Save" on a listing will instantly update the feed that listing is currently on. With some portals we have "real-time" connections, so every "Save" on the listing will reflect on the portal almost immediately. But we also know of portals, that only update once a night or every few hours.
With XML2U it depends on them how often they pick it up from your feed URL and send to portals. - My pictures are not shown on the portal? - Make sure that you have check the "Portal Feed" checkbox next to the picture in the listing Media Manager.
- What do I do if there is an error in my feed? - If the feed does not load, make sure that at least one listing is published to it. If that is the case, please create a ticket with our support sharing the feed URL, at least one listing record ID that is published to that feed and the error description.


Comments
0 comments
Article is closed for comments.