Using Transactions Follow
In Propertybase version 1.606, we have enhanced the Workspace Integration to include Transactions from your Propertybase CRM. This will now sync all existing and new Transactions so they are visible in the CRM and allow report creation based on these Transactions.
If you don't currently use Workspace, you can still use the Transaction objects within your CRM, however, all data will need to be populated manually. Want to get Workspace? Reach out to your Account Executive or Support and let them know!
More information about the initial setup of Workspace and how you can filter Transaction Contacts (NEW) can be found here.
Overview
We have added two new Objects to your Propertybase CRM. These are Transactions and Transaction Members.
Transaction Tab:

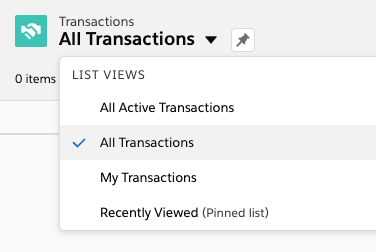
On the Transactions Object you will have four new list views by default:

When you select All Transactions you will see all active Transactions. If you go into one of the Transactions, you will see the Related and Details tabs at the top.
In the Details tab, you will see the details of the Transaction which has been filled from the information sent over from Workspace. Any time a Transaction is saved in Workspace this information is sent over to the CRM to either create a new Transaction in the CRM or update information if this customer already has a Transaction.
To see the Fields that will be synced between Workspace and your CRM click here:
Transaction Field Mapping Table - Sheet1.pdf
You will also see 5 phases in the Details tab that consist of Start, Contract, Showing, Pre-Closing, and Post-Closing. You will see these in the status bar across the top of the Transaction:

Also contained in the Details tab will be Property, Timeline, Financial, and Commission information.
Related Tab:
In the Related tab, you will see the Transaction Members, which contain the Contact, User, Side (Seller, Buyer, etc.), and Role (Seller, Buyer, Title, etc.). Along with that you will see any Notes and Attachments.
How Transaction Members work:
- All transactions will be assigned to the Owner who created the Transaction in Workspace. If the Owner is not a User in the CRM (matching based on Email Address), it will be assigned to the default admin, who performed the initial authentication.
- For all Contacts related to a Transaction, the system will check if there is a User that matches the email of a stakeholder. If there is, that User will be assigned as a Transaction Member with the correct side and role.
- If there is no User match, we will create a Contact, (Owner will be the Transaction Owner) with the correct side and role.
How Listings/Properties work:
- If a Listing matching the MLS Name and MLS ID is in your Org, it will show in the lookup fields.
- If a Listing is not available but you have access to Propertybase Websites and an MLS on both Workspace and Websites, the Listing will be downloaded into your Org.
- If none of the above scenarios are true, these fields will remain empty.
Activation
When the first Transaction is created in the CRM through the SSO (single sign-on) on the Contact, all existing Transactions will automatically be downloaded into the Org.
If you have a lot of Transactions stored, this can take several days depending on the number of API calls that you have available. We strongly recommend Transactions to be activated on a Friday.
Configuration
In order to configure Transactions, you will need to go to the Contacts tab in your CRM

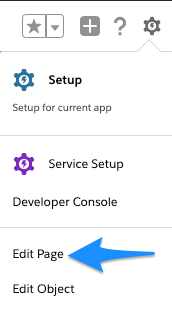
Select any Contact from the list and use the Setup dropdown and select Edit Page

In the list on the left side of the page (scroll down), you'll see Visualforce

Drag and drop this to your desired location on the template and select anywhere inside it. You'll see the Label options on the right side of the screen. From here, select New Transaction

And set the height to your preference (a height of 40 is standard for this component)

Once you Save this and use the Back button to get back to your contact you'll see the new component:

When you select New Transaction, it will use your single sign-on into Workspace to create a new Transaction.
When you select More Information, you will be directed to this Help Center Article for Transactions.
This component is specific to the Contact Object as it contains Contact information.
As stated above, when you click on New Transaction it will automatically sign you in to Workspace. There, you'll see the types of Transactions you can look at.

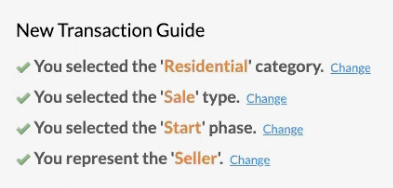
You'll also see the New Transaction Guide where you can change any of the selections as these are the default:

Below that, you'll see the Seller and their contact details (Name, Email, Phone). If these all look correct you can go ahead and create a New Transaction by clicking on the Create New Transaction button:

Once this New Transaction is saved in Workspace the information will be sent to your CRM and saved as a Transaction record.
Any changes made in Workspace to Transactions will update the Transaction Record in your Propertybase CRM.
Once the Transactions have been saved into the CRM, you can see them by going to the App Launcher and selecting Transactions:

This will take you to the Transaction and allow you to see the Stage of the transaction and all information that has crossed for it.
Again, you can use the View Transaction button on the right to single sign-on into Workspace to see the Transaction there and make any changes necessary.
Changes made to the Transaction in PB CRM will not update the Transaction in Workspace!
To see a list of the Fields mapped between the CRM and Workspace, look here:
Transaction Field Mapping Table - Sheet1.pdf
Setting object permissions
After the above-mentioned configuration, we recommend that you change the object permissions of Transactions and Transaction Members to "Read-only" for all profiles your agents currently use.
You can do this by following these steps:
- Go to Setup
- Select Profiles
- Select the appropriate Profile (for example "PB Agent")
- Select Object Settings
- Then select Transactions and check the "Read" object permission
- Click Save

Afterward, repeat the same for "Transaction Members" and all profiles you want to set to "Read Only"

Reports
Now that you know how to use Transactions in Propertybase we can start reporting on them as well! Watch this video to find out how:
For these Reports we have provided a spreadsheet with the following:
- Report type
- Columns
- FIlters
- Groups
You can reference those here and use them to build your reports:
You can follow the below steps to set up your Reports
First go to the Reports tab, followed by selecting New Report:

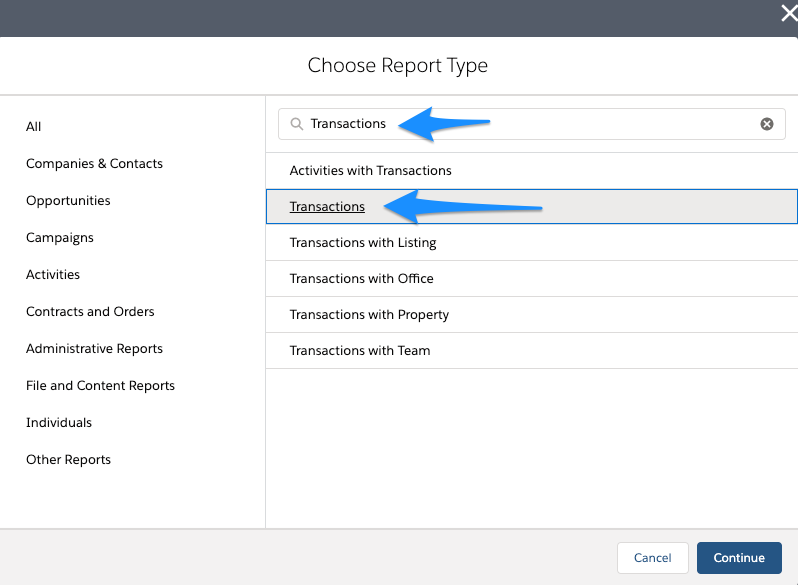
Then, you will search the Report Type by entering it in the search bar, selecting it and hit Continue at the bottom:

In the screen that follows you will need to add the Columns and Groups that match the attachment above:

Once the Columns and Groups are entered you can go into the filters and add those as well:

Add your desired title for this report and either Save or Save and Run at the top:

Now you're all set to use add reports on our newly enhanced Transaction Feature!
FAQ
Q: Do I have to have Workspace to use Transactions?
A: No, you can use Transactions inside the CRM without a Workspace integration.
Q: Is information synced both ways between the CRM and Workspace?
A: No, information is pushed from Workspace to the CRM initially so all transactions are synced. Once this is done, transactions will be updated in the CRM when an update is made in Workspace. Click on "View Transaction" in the CRM to view and edit your transaction in Workspace.
Q: Can Transactions be assigned to users other than the Owner that created them?
A: Initially, the Owner that creates the Transaction or default admin will own each respective transaction. If you want to change the assigned owner, please reassign the transaction in Workspace.
Q: Can I place the Visualforce page to start transactions on an Object other than the Contact Object?
A: No, Transactions contain contact information, therefore they must remain in the Contact section.


Comments
0 comments
Please sign in to leave a comment.