Building Stack: Visualizing Property Hierarchies Follow
Note: Building Stack is only relevant to those that have the need to visualize larger building entities or even developments. Usually this is the case for Developers and agencies cooperating with them. In a regular setup you might not need this at all or perhaps only the basic relation Building+Unit.
This article is related to our version on Lightning Experience. For Building Stack on Classic, please go here.
Organizing and visualizing spaces within a building has become simple with the Building Stack. This feature allows real estate agencies to construct a building hierarchy (building, floors, units), which enables agents to easily work with and find the listings that matter in the moment.
The Building Stack consists of a customized page, which displays a building record with every single unit found within it. This facilitates the organization of your data and its visualization. Let's take a glance at the feature and its functionality.
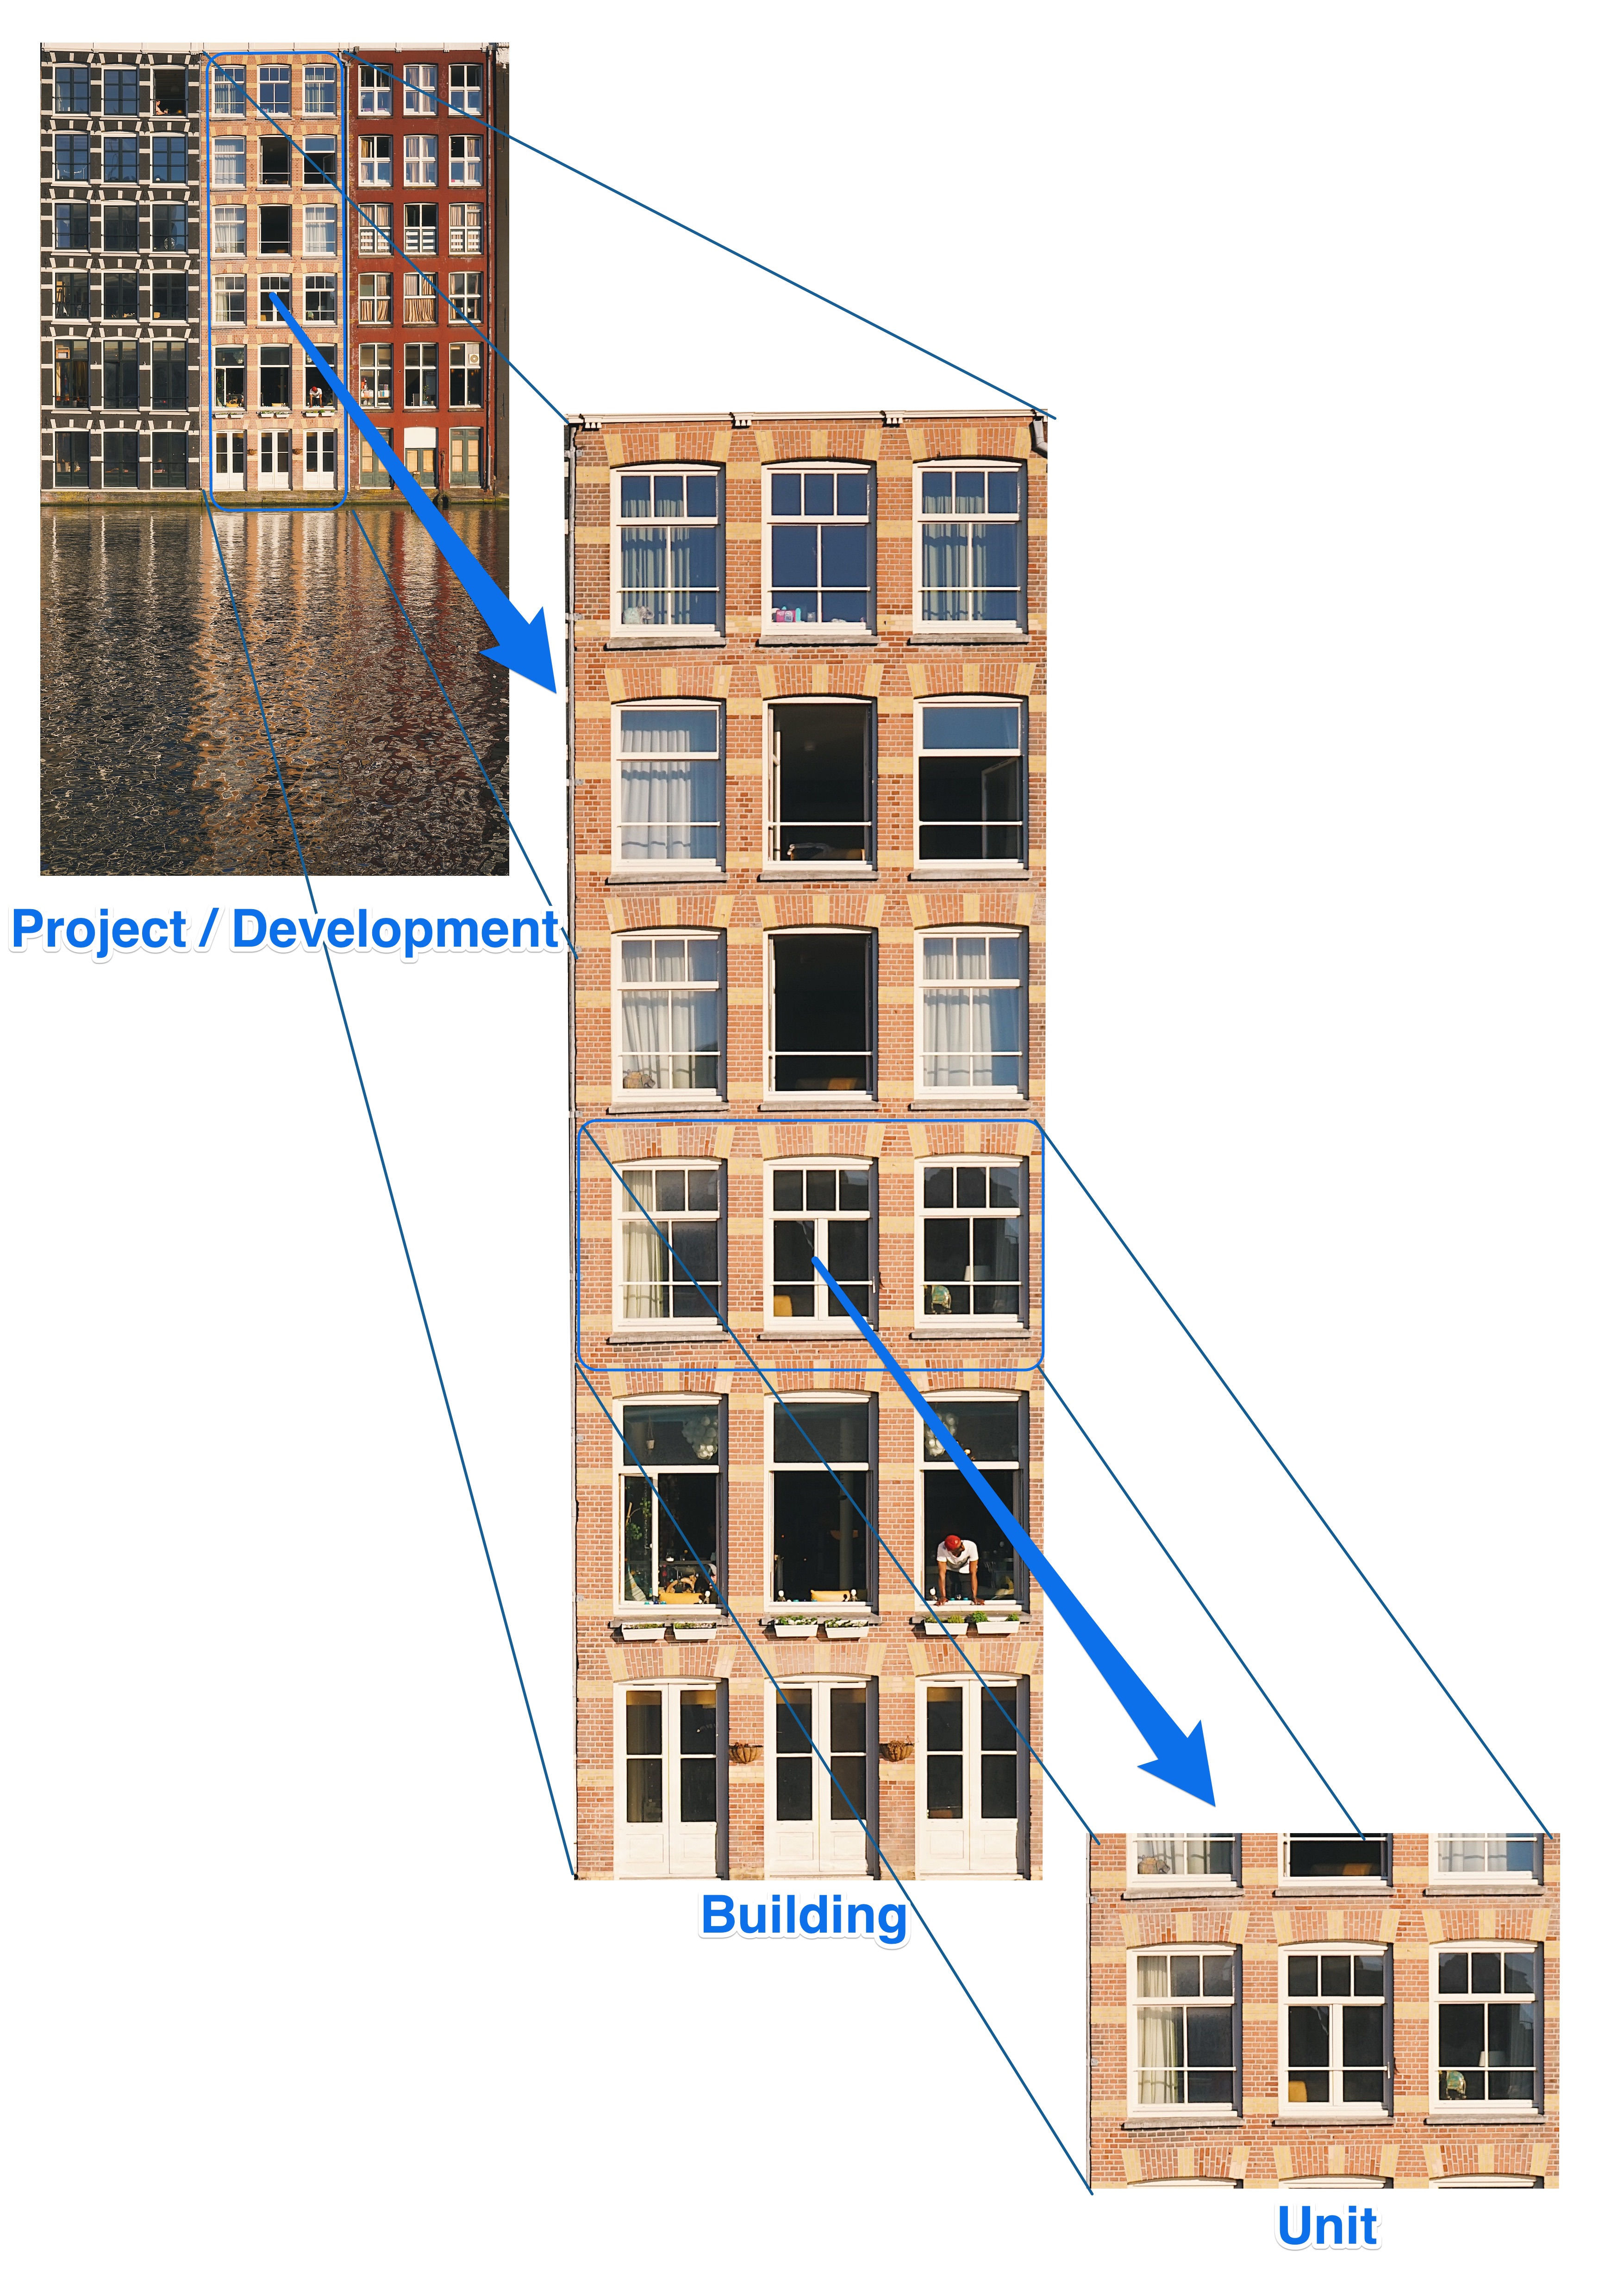
Accessing the building stack can be done by opening the "Building Stack" tab on a main property record (e.g. building or a project/development if the latter has been already configured; continue reading to fully understand).
If you don't see a tab "Building Stack" on your property record, please see the FAQ below to add it.

Once the Building Stack has loaded, all of the units that are found related to this master property record will appear. By default they are grouped by the floor they are found in the building. The floor is a field found on each of the unit records. The following image displays this view:
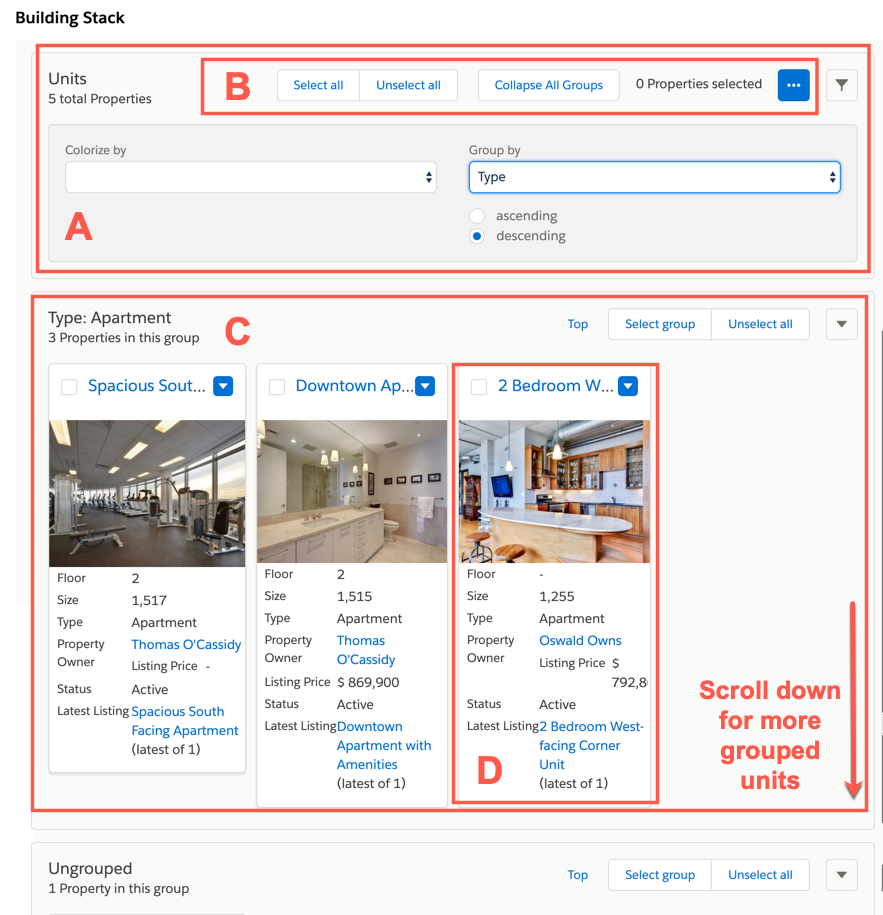
This units section can be divided into four major parts:
A. Advanced Filtering
- Filter: Upon clicking the filter button a section will appear:

- Colorize by - This section allows the user to colorize units by a specific field found on the units listing. By default the fields for colorizing by are Status, Lease Expiration Date, Listing Price, Type and Amount/Month. When selecting one of these fields the values within those fields are then segment by a range of values depending on field type. In the example provided, the Status field is colorized by Active, In Preparation, Reserved, Blocked and Closed. In this matter the users can easily differentiate listing units by the color the adopt. This section can be customized and custom fields and color ranges can be defined via the "colorization pattern" setting in the Building Stack Settings (see "Settings" tab at the top of this page). Fields can be added either from the unit property or listing record.
- Group by - This section groups the units by the field select from the dropdown. By default the grouping fields available are Floor, Status, Lease Expiration Date and Type. This section can be customized and custom fields and color ranges can be defined via the "group by fields" setting in the Building Stack Settings (see "Settings" tab at the top of this page). Fields can be added either from the unit property or listing record. In addition the user can choose wether the groups are sorted in ascending or descending matter.
B. Mass Actions
Mass Actions can be used once an user selects at least one unit in the Building Stack:

On the right hand side of this section the number of selected units appears in grey. By clicking "Select all" all units will be added for the mass action. Clicking "Unselect all" will in turn deselect all listings.
The button "Create Listings" allows users to create multiple listings for units at once. This saves the user time from creating each listing individually.
C. Groups
As mentioned above, by default all units are grouped by the field Floor. Using the Advanced Filtering "Group by" section the units can be grouped by the available fields.

The amount of units found in this group can be seen in grey next to the title of the group. By click the "Select group" link, all units from this group will be selected and a mass action can be done against them.
On the far right the "Top" link will take the user back to the top of the building stack. This link is useful when a building has multiple groups to avoid excessive scrolling.
D. Unit Details
With in a group units are found. Each unit displays unique information specific to its record.

The fields available with this section are customizable and can be defined via the "child property fields" setting in the Building Stack Settings (see "Settings" tab at the top of this page). The last field in the section, Latest Listings, displays the amount of listings found against this property unit. Clicking the listing title will take the user to that latest listing record created.
On the top left corner the selection box is found. Upon marking this box the unit will be available for a mass action.
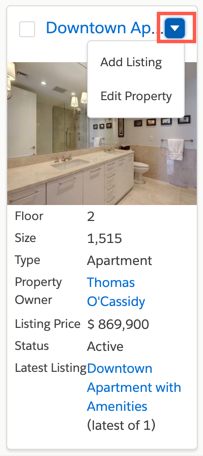
When the "Add Listing" button is clicked it will redirect the user to the Listing Creation Wizard and a new listing will be associated to that unit.
The "Edit Property" button will direct the user to the edit page of the typical Salesforce user interface to edit that unit.
Setting up a hierarchy
With the following instructions you can implement a 2 to 3-level hierarchy in the Property object in a few steps.
You will have to change the following attributes in the different page layouts/record types within the Property Record:
Out of the box you will find Building and Unit (Property) record types and page layouts in your system. There is also a third record type "Project" that is not active. We will show you the steps to use the 2-level hierarchy with Building and Units and the 3-level hierarchy with a Project pulling them together.
We will start with the basic setup of the 2-level hierarchy. You will have to adjust or make sure the following attributes in the different page layouts/record types within the Property Record are setup:
2-Level hierarchy
- You will need:
- 2 Page Layouts (Property(Unit) and Building).
- 2 Record types mapping directly to the corresponding page layout (Property and Building) - On the Building Page Layout you will have related lists showing
1. Units in this Building
2. Listings in this Building. - On the Property Page Layout (Unit) you will have related lists showing
1. Listings for this Property (Unit).
You will also have lookup fields to the "Building" on this Layout, so e.g. the "Master Property" lookup. - You will have added lookup fields on the listing page layouts pointing to "Building" and "Property (Unit)".
Make sure once you have added the fields, that you populate them, so start by adding a building, then add a unit to that building. Make sure you populate the "Master Property" lookup field.
3-Level hierarchy
- You will need:
- 3 Page Layouts (Property(The Unit), Building and Project). Activate "Project" record type if not yet done so
- 3 Record types mapping directly to the corresponding page layout (Property, Building, and Project) - On the Project Page Layout you will have related lists showing
1. Buildings in this Project
2. Units in this Project
3. Listings for this Project - On the Building Page Layout you will have related lists showing
1. Units in this Building
2. Listings in this Building.
You will also have a lookup field to the "Parent Project" in this Layout. - On the Property Page Layout (Unit) you will have related lists showing
1. Listings for this Property.
You will also have lookup fields to the "Project" and "Building" in this Layout. - You will have added lookup fields on the listing page layouts pointing to"Project", "Building" and "Property (Unit)".
Make sure once you have added the fields, that you populate them, so start by adding a building, then add a unit to that building. Make sure you populate the "Master Property" lookup field.
For more levels, you simply expand the above instruction by the amount of levels you want to add. We recommend not to overdo it, though, as it gets very confusion for users if there are too many levels.
In a 3-level+ hierarchy: Depending on what level in the property hierarchy you are on, there will a title link above the Building Stack that can be clicked and it will redirect the user to the building stack of that particular unit/level. This can be handy when a multi level hierarchy is set in place. An example of this could be Project(Development), Blocks/Phases, Buildings and Units.
Note: This part is absolutely optional as it does make more work, but it will allow you to see the records in the hierarchy properly on related lists and have the additional lookups populated by field updates. / Ensuring only a certain type of property can be added to a lookup
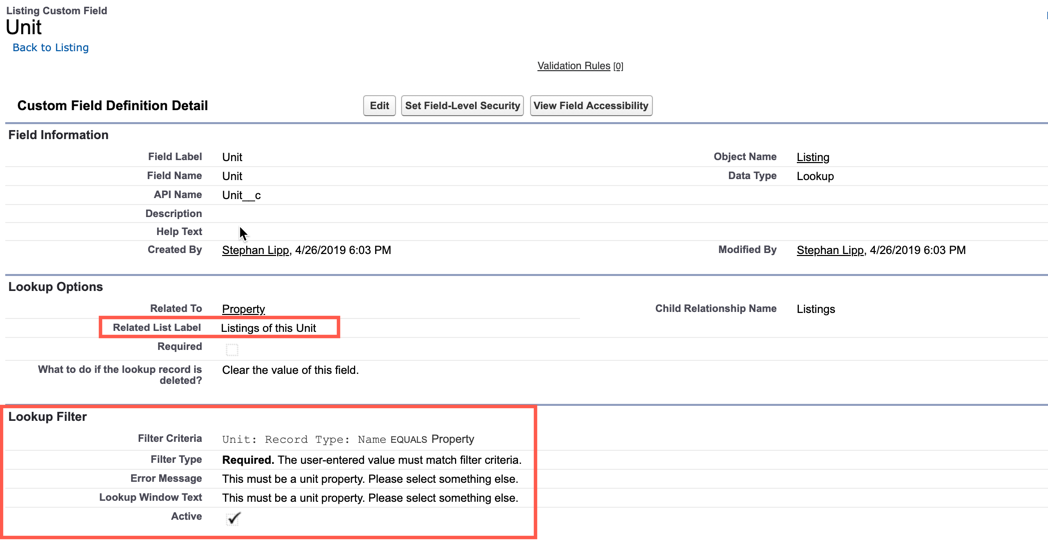
The relationship lookup field used in Building Stack "Master Property" is the same on all levels. Hence, the related lists can only have on single label and will not differ between the levels. If you want very specific related lists that only show the corresponding listing, unit or building, you can achieve this by creating additional lookup fields, that are specific to their connection.
Similarly as the existing "Project" lookup field, you could create a "Building" and a "Unit" lookup field on the listing page layouts, a "Project" and a "Building" lookup on the unit page layout and so on.
You would limit the new specific lookups to only allow certain record type records to be added to them by setting conditions on the field. This allows the user to select a real building and not mistakenly looping two units together. This would be a lookup from a listing to its unit allowing you to define the name of the Related List:
Once you have this setup and see that it is working in a hierarchy, you would then use the known information to populate those fields with process builder automations. This will reduce the number of times you have to fill in the same redundant information.
And as a last step, you would hide some of the automatically populated fields again from user view.
The complexity is in the setup depending on how many specific related lists you want to define.
Note: if you don't know how to add settings, please read the article "Adding Settings to Propertybase"
building_stack_colorization_patterns
Specifies the available colorization patterns.
- Each entry needs a unique key (which is not a field, name it as you like).
- The colors map to predefined css classes (we will add a variety of default colors). Also color codes will be available in the future.
- You may choose either categorical or ordinal as pattern type. In the first case a field value is mapped to a color. In the latter case a numeric field value is clustered into a range which is mapped to a color.
Example (this is also the default configuration):
[
 {
 "key": "status",
 "field": "latest_listing.pba__Status__c",
 "type": "categorical",
 "mapping": [
 {
 "label": "Active",
 "value": "Active",
 "color": "green"
 },
 {
 "label": "In Preparation",
 "value": "In Preparation",
 "color": "yellow"
 },
 {
 "label": "Reserved",
 "value": "Reserved",
 "color": "gray"
 },
 {
 "label": "Blocked",
 "value": "Blocked",
 "color": "red"
 },
 {
 "label": "Sold",
 "value": "Sold",
 "color": "red"
 },
 {
 "label": "Rented",
 "value": "Rented",
 "color": "red"
 }
 ]
 },
 {
 "key": "price_range",
 "field": "latest_listing.pba__ListingPrice_pb__c",
 "type": "ordinal",
 "parseWith": "normalizeRange",
 "mapping": [
 {
 "label": "Lower",
 "to": "30",
 "color": "green"
 },
 {
 "label": "Medium",
 "to": "66",
 "color": "yellow"
 },
 {
 "label": "High",
 "to": "100",
 "color": "red"
 }
 ]
 },
 {
 "key": "property_type",
 "field": "pba__PropertyType__c",
 "type": "categorical",
 "mapping": [
 {
 "label": "Apartment",
 "value": "Apartment",
 "color": "green"
 },
 {
 "label": "Studio",
 "value": "Studio",
 "color": "green"
 },
 {
 "label": "Duplex",
 "value": "Duplex",
 "color": "green"
 },
 {
 "label": "Condo",
 "value": "Condo",
 "color": "green"
 },
 {
 "label": "Townhouse",
 "value": "Townhouse",
 "color": "yellow"
 },
 {
 "label": "Single Family",
 "value": "Single Family",
 "color": "yellow"
 },
 {
 "label": "Villa",
 "value": "Villa",
 "color": "yellow"
 },
 {
 "label": "Multi Family",
 "value": "Multi Family",
 "color": "red"
 },
 {
 "label": "Other",
 "value": "Other",
 "color": "red"
 },
 {
 "label": "Lot/Land",
 "value": "Lot/Land",
 "color": "red"
 },
 {
 "label": "Penthouse",
 "value": "Penthouse",
 "color": "green"
 }
 ]
 }
]
building_stack_group_by_fields
Specifies the fields that are available for grouping.
Example (this is also the default configuration):
[
{
"key": "pba__Floor__c",
"default": true
},
{
"key": "latest_listing.pba__Status__c"
}
]
You may specify the default group by field by using the default option. You have access to the latest associated listing via a virtual relation latest_listing. The latest listing is the one having the latest possible creation timestamp.
building_stack_child_property_fields
Specifies the fields that are shown on the child property level.
Example (this is also the default configuration):
[
{ "key": "pba__Address_pb__c" },
{ "key": "pba__Floor__c" },
{ "key": "pba__Totalarea_pb__c" },
{ "key": "pba__Propertytype__c" },
{ "key": "latest_listing.pba__Listingprice_pb__c" },
{ "key": "latest_listing.pba__Status__c" }
]
Q: I want to see my buildings or blocks from the development/project level. How can I achieve that?
A: Follow the steps to setup the lookup relations and follow the instructions to connect them via the "Master Property" lookup field. This lookup is the heart to the Building Stack and if related properly, Building Stack will show e.g. all Buildings in a Project
Q: I have more levels I would like to categorize my projects in. How many levels can I build?
A: You can build as many levels as you like. Simply keep connecting them via lookups to the higher level. Master property is the lookup to use, should it also be visualized in Building Stack. However, we don't recommend more than 3 or 4 levels as it will get complicated to maintain and keep an oversight.
Q: I regularly receive new developments in form of a spreadsheet table from our partners with multiple buildings and hundreds of units. Can I import them?
A: Yes, that is actually recommended. You will however need to decide on which level you start importing (importing a single development/project name is a bit over the top) and start from top down. You will need the higher levels record IDs and map them with VLOOKUP to their corresponding lower level lookup (Master Property/Project) to create the relation on import. See also our Data import articles (e.g. company & contact import) for more insight on this.
Q: I do not have a tab "Building Stack". Can I get it so I can use the feature?
A: Absolutely, you can add Building Stack as a tab.
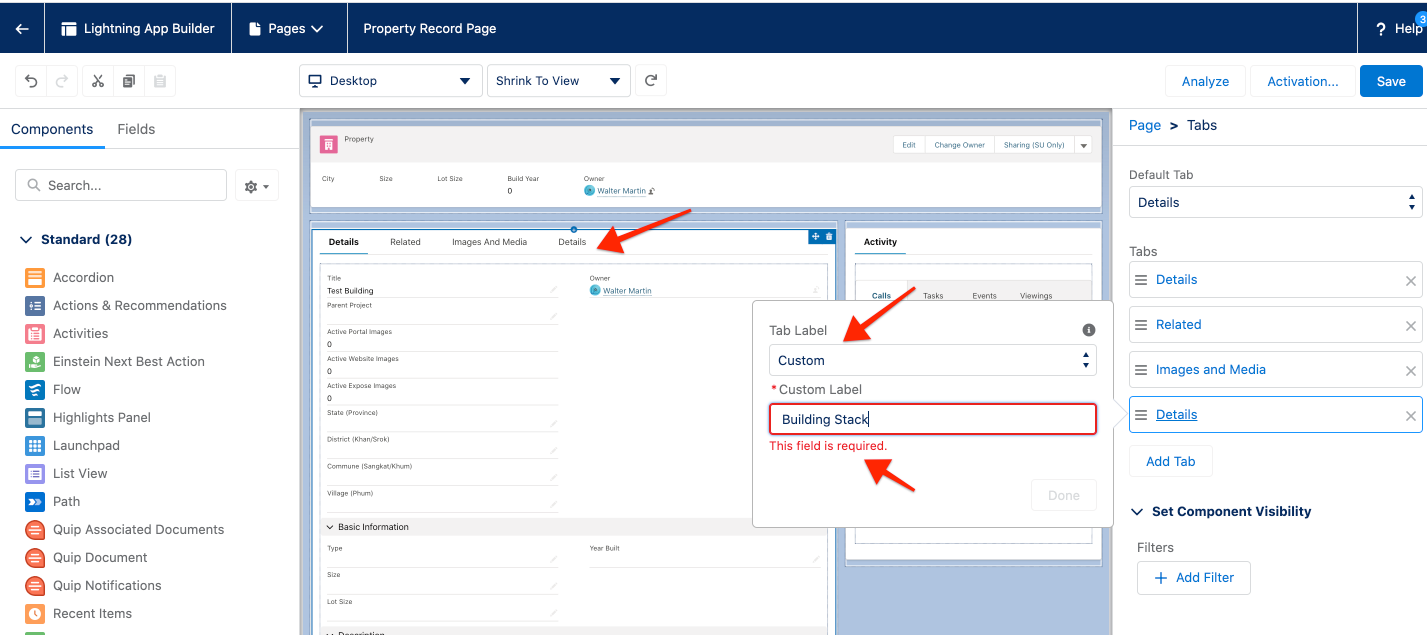
While on a Property record, select Setup > Edit page as in the below screenshot.
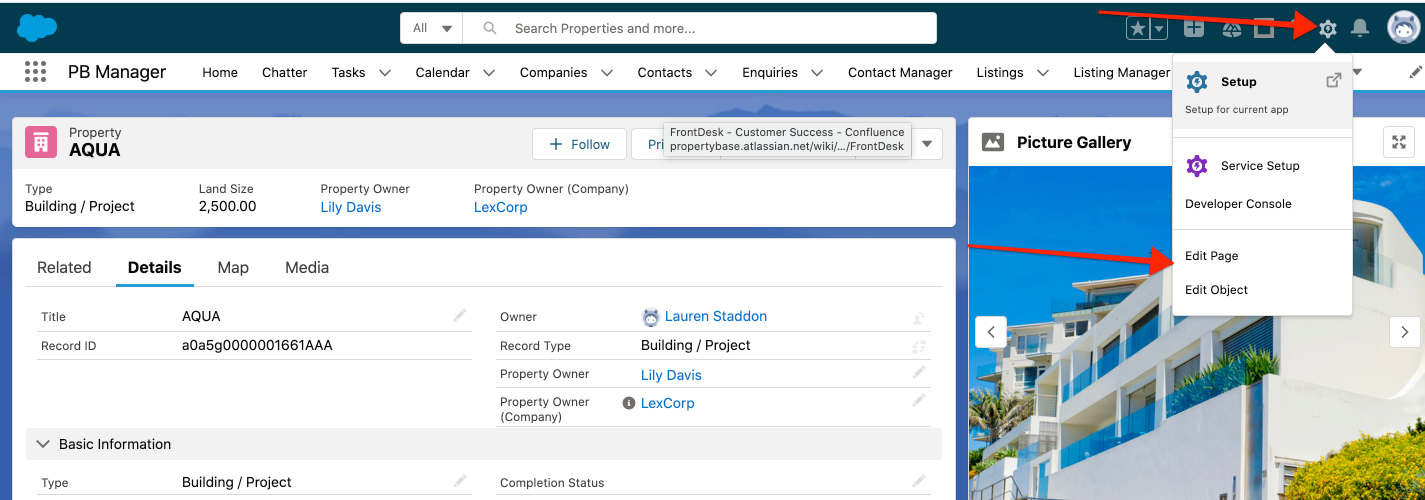
Then click on the label of a tab, for example Images and Media, to navigate to the tabs section of the page. This opens in the menu to the right. In the tabs section add a custom tab and call it Building Stack or the desired label name.
Following this you can drag in the Visualforce Component to the tab content section you just created and then select the Visualforce Page Name called Building Stack as in the below screenshot. Save your changes. Then you can navigate back to the page and it will have added the tab for you.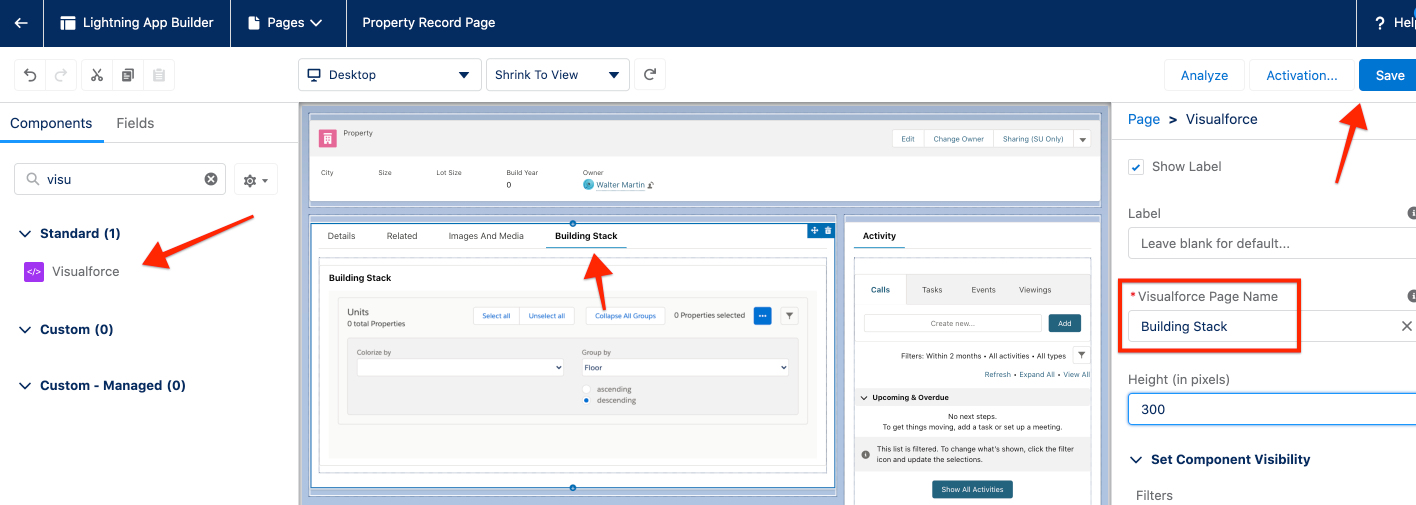
For any further assistance please contact support@propertybase.com
>>> Information on how to import hierarchies will be added soon. <<<


Comments
0 comments
Article is closed for comments.