Data Loader - Part 3: Map and Import Follow
A great way to get new records into your Propertybase ORG is to use the import functionality within the Data Loader.
Backup your Data!! Before you import anything new please create a Backup or export the object your are importing to and export all fields. This way you can have a backup if you mess anything up, because there is no undo function in the DL.
The following are the steps to get your data in the system:
- The first step, as stated in our article "Data Loader - Part 2: What to know before you import",
is to prepare your CSV file with all the records that will be imported into your org.
Make sure that all data is cleaned up and is entered with the correct format in your CSV file depending on the corresponding field type. - The easiest way to make sure your fields are mapped correctly is to use the API name of the field as the header of your column. This way you can auto map the fields and save time.
- Next you will need to open the Data Loader, select Insert and use your Propertybase login credentials to start.
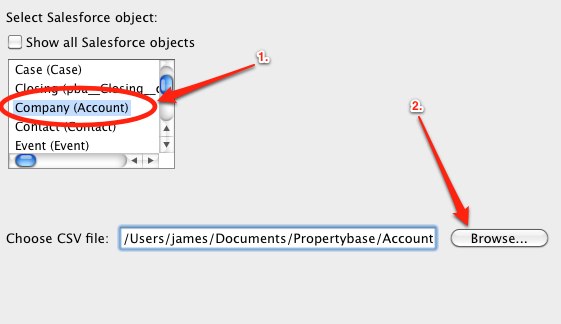
- Once logged in you have to choose the object you want to import into, in this case we will import to the Accounts (Company) object.
Click the browse button to select the document (.csv) that you have prepared.
Then click Next.
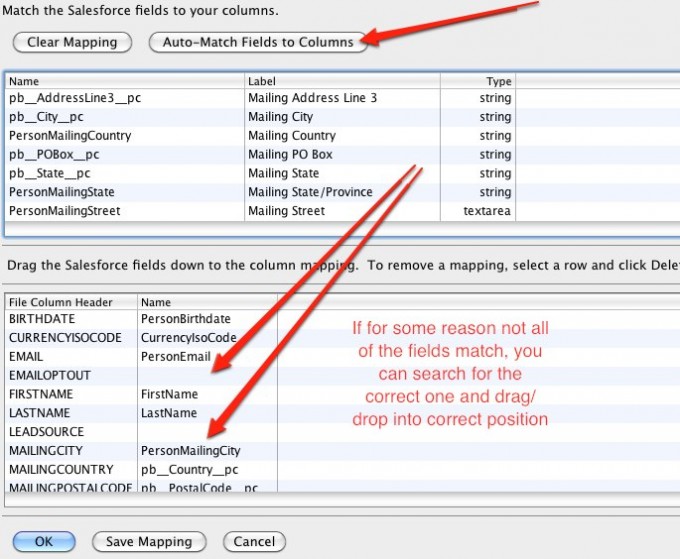
- The next step is a very important part of the Import, which is the mapping of the fields. On the left-handed side of the table are the fields you have recently updated from your file. On the right-handed side will be the fields that are going be matched in Propertybase. Click on Create or Edit Map.
- Select Auto-Match Fields to Columns. This should map all of your API field names from your CSV file to the fields that will be in Propertybase. If for some reason all of the fields are not auto mapped you can drag and drop the remaining fields in place.
- On the next page you will be prompt to select the directory of where your success and error files will be saved.
The desktop is selected as default. Next click Finish. - The Import will begin, when finished the success and error files will provide you with the details of each record. If for some reason some records weren’t imported you can check the error file to see exactly why.
Then you can fix the file and reimport these specific records.
Having issues with mapping fields in the Data Loader?
Check out this helpful video
Importing Contacts - Individual Clients
When importing individual contact records 2 important fields will need to be added to your CSV file for upload: "RecordTypeID" and "pba__SystemIsIndividual__c".
- RecordTypeID will need to be set to contain its appropriate ID.
To do this you will need to go to
Setup > Customize > Contacts > Record Type > Individual Client.
Then in the URL of the page you will find the ID of the record type:
- The field "pba__SystemIsIndividual__c" needs to be set TRUE
Importing Contacts - Company Contacts
Importing Company Contacts consists of a 2 step process when using the Data Loader. The first step is to import the Companies (Accounts) that the contacts are associated to.Then use the salesforce id's generated by the system and associate them to the contacts in your contact file.
Step 1 - Import Companies
Create a CSV file for the company records and include all necessary data. Use the data loader with the Insert function to upload the companies to Propertybase. After the import is completed a success file will be generated containing the Salesforce ID's that have be created for each record. This ID is key for matching the contact records in the system.
Step 2 - Match Companies to Contacts and Import
Utilizing the success file with the ID's match them to the contact record. This is can be done using the Vlookup function in Microsoft Excel. It is possible to use the Company name found in the contact file to use as the identifier for the ID mapping. The field to be map the contact ID's to in Propertybase to is called: AccountID. Once this is complete save a CSV file and import the contacts.
The contacts will then be associated to the companies correctly.
Importing Multiple Objects - Companies, Contacts, Properties, Listings, Etc.
Remember you can only import one object at a time then you can tie the next object to other existing object in the database. You will want to start with the lowest object first. For the most part objects go in this order Companies, Contacts, Inquires, Properties, Listings, Offers, Closings.
This is a great place to add External IDs to your files, so you can make that connection to other objects and not use a regular ID from the system. John Doe = 1, everywhere 1 is referenced that means link it to John Doe via the external id. The video series covers this in the last video and the article below go in much more detail. In Propertybase we have the field "pba_SystemExternalID__c" for most objects as the External ID field.
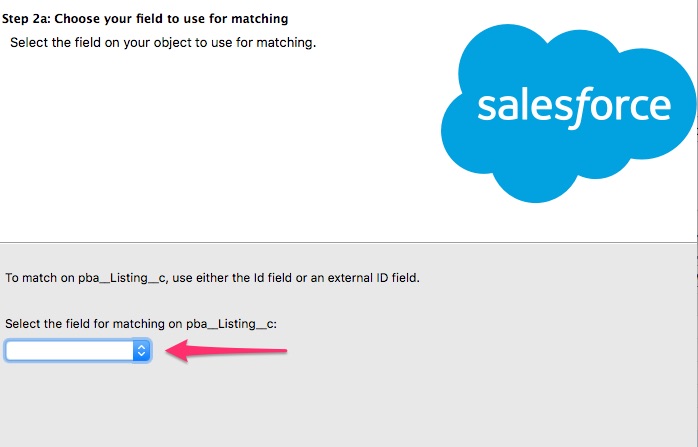
Importing the second object you will want to use the Upsert button(Updating and Inserting), you will be asked what is your identifier, either ID or SystemExternalID depending on what you are using for the records of this object.
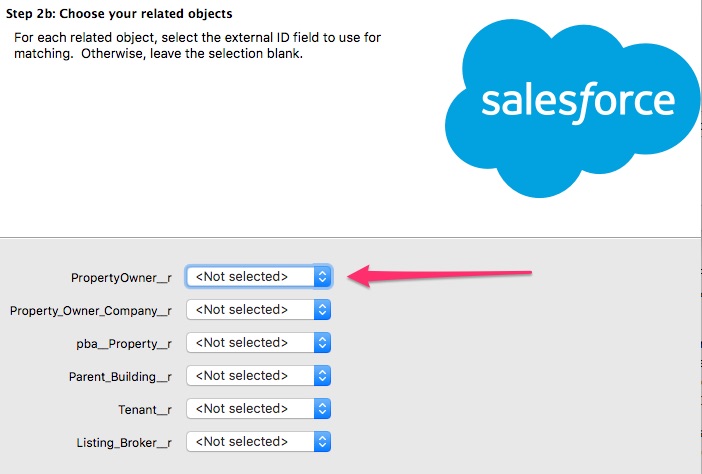
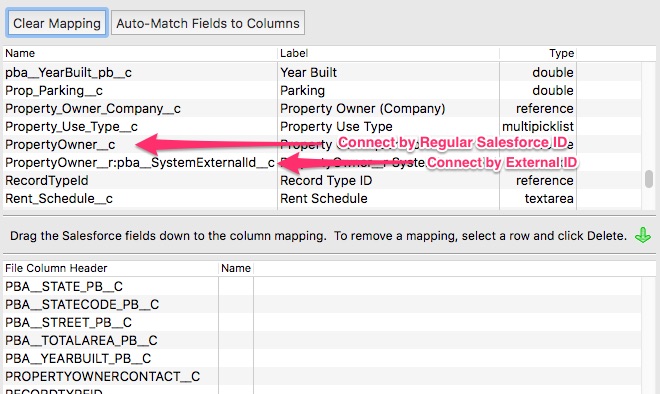
The next page will ask you how do you want to connect to these other objects by each field. By default it uses the ID and you can skip this step, but if you want to use the External ID then you will need to set to SystemExternalID for the field using the drop down. Example if I gave External IDs to my contacts and listings, I will want to connect them with those IDs. I will want to set the Property Owner as John Doe using "1" as the identifier.
In the Mapping you will still have the option to connect with the ID, but you will need to use the other to connect via the External ID. Make sure you save your mapping before you leave this page.
Once you have finished importing your data, you can use the saved mapping file to Upsert again and again to fix any mistakes or things you have missed. Most likely it will take you a few tries to get the data exactly how you want it. Saving your mapping will cut down on time or if you multiple files from the same source.
Tip: Check out this great video series on using the Data Loader!


Comments
0 comments
Please sign in to leave a comment.