

Using the Listing Manager Follow

The Listing Manager allows you to quickly and efficiently browse all of your Listings. In this article, we will cover available features and configuration options.
Not sure how to access the Listing Manager? Click here.
You can access the Listing Manager through the app launcher, as shown below.
- Click the App Launcher in the top left corner of the screen, then click Listing Manager.

- Feature Overview
- Saving Lists
- Configuration Options
- Installation (Required)
- NEW: Listing Favorites
- FAQs
Feature Overview
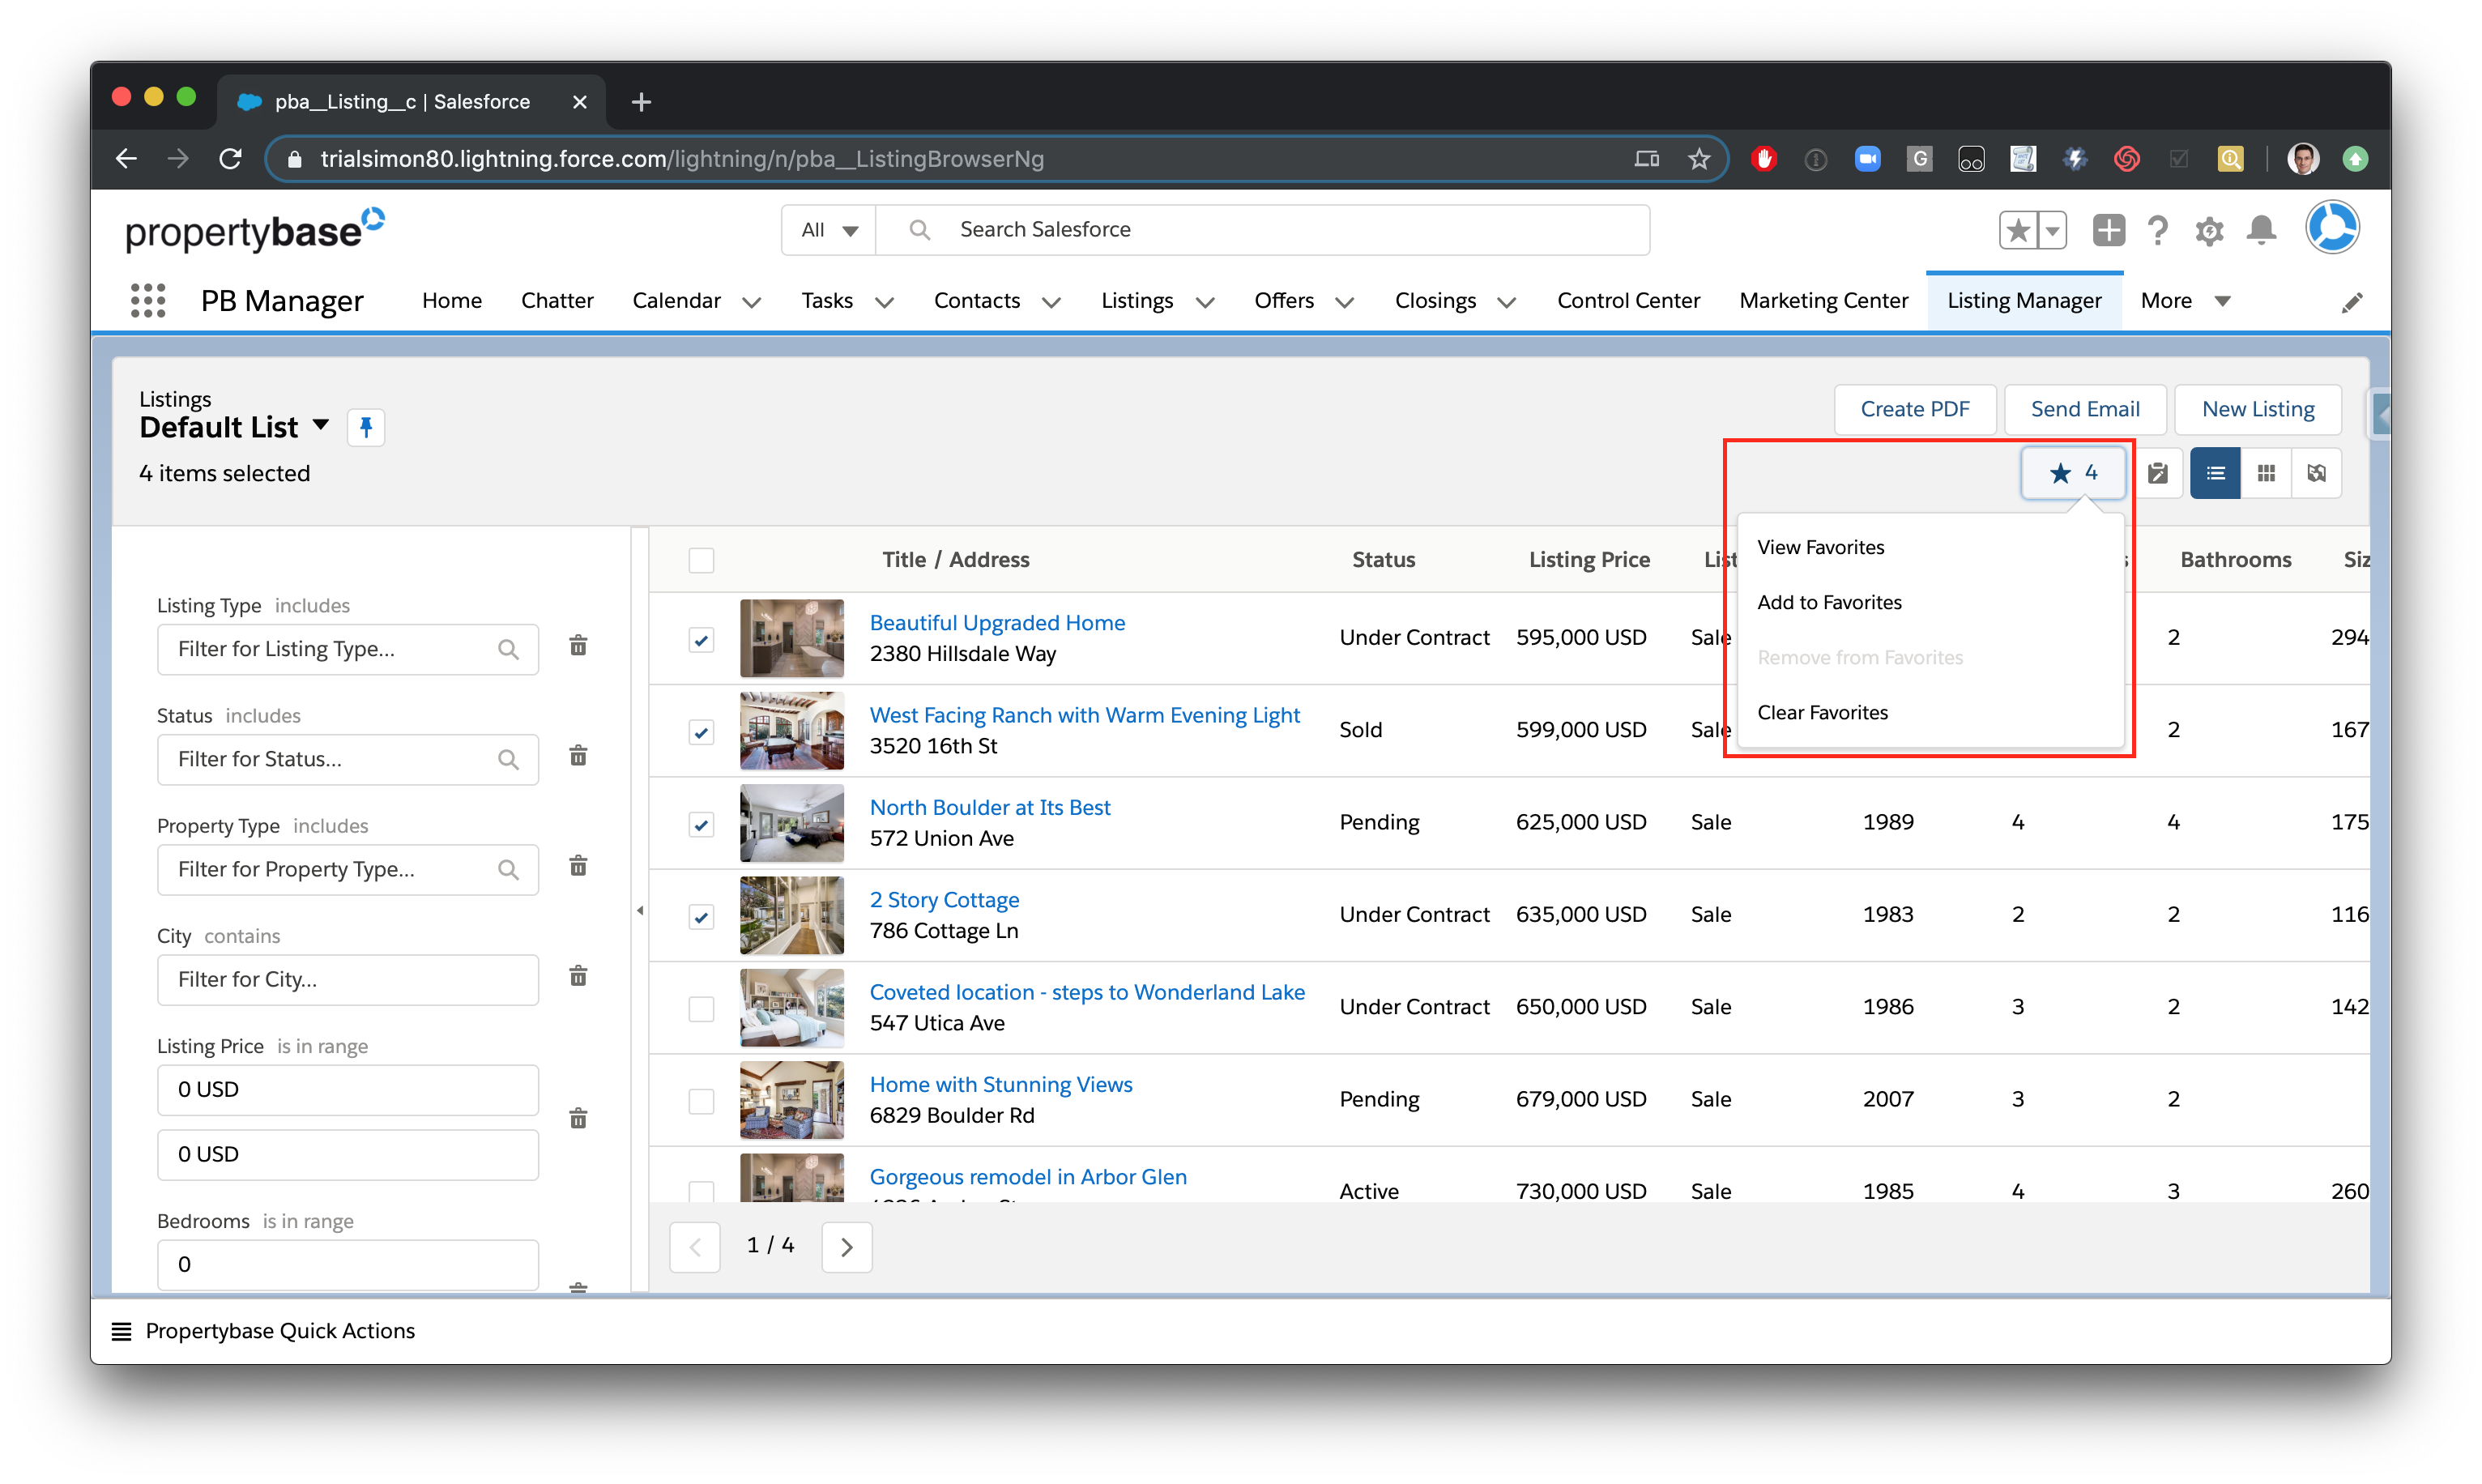
The Listing Manager is made up three main sections: filter options, results, and actions. The following section will explore these in more detail.
|
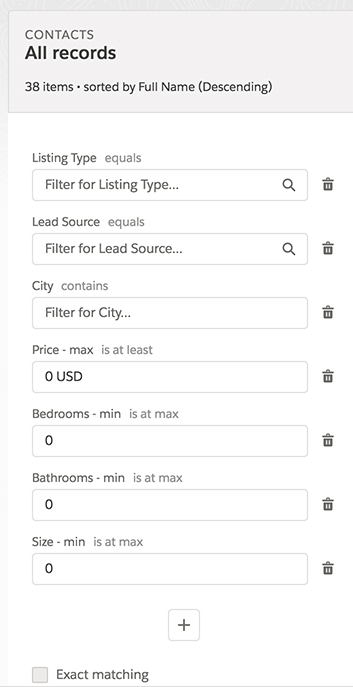
Filter Options On the left side of any List Manager are filtering options. Filtering options control what results display in the following section (ride side of the screen.) By manipulating different filter values, you can narrow (or broaden) your results list. This is helpful for finding specific Listings, as well as dividing your inventory into specific segments. NEW - Filter by OwnerWith the release of Propertybase 1.579, it's now possible to filter by the record owner. This allows users to view all Listings or just their own. 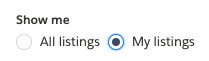
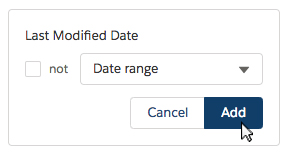
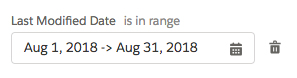
Note: Administrators can turn this feature on by default under "Record Managers" in the Control Center. Filter by DateWith the release of Propertybase 1.538 it's now possible to filter using a date range. Not sure how? Follow the steps below to learn more about using a date range filter.

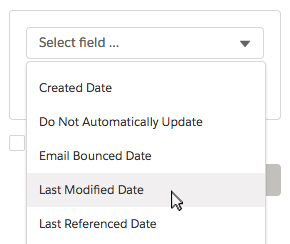
Next you need to decide if you want to filter by a date range, date maximum (created before the selected date) or dat minimum (created after the selected date.) Additionally, you enable the "not" checkbox which will inverse your filter to only show records that "do not" match your filter.

|
|
|
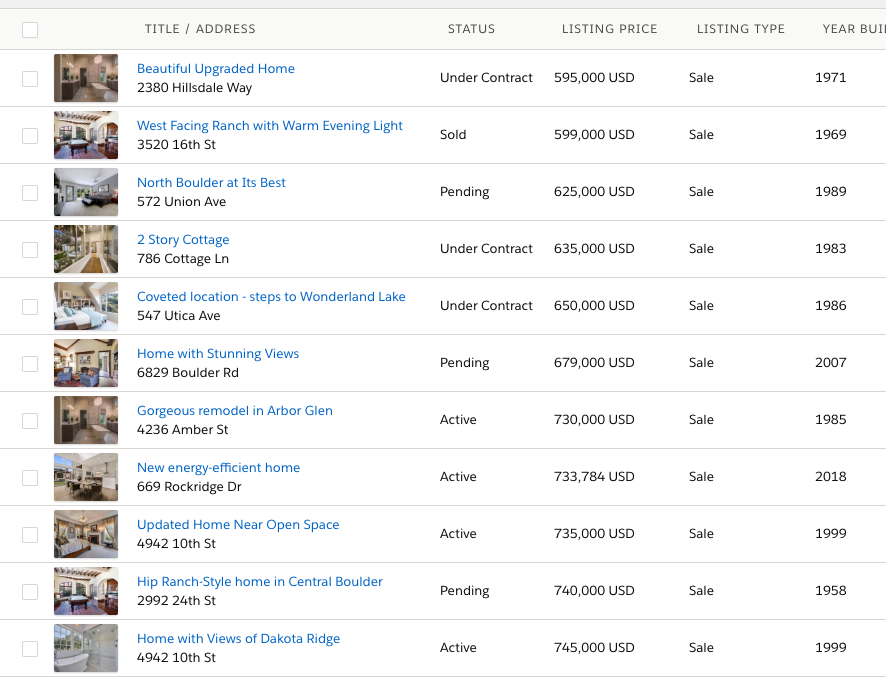
List Results On the right side of the screen, you will find a list of results. Results are determined by filtering options (explained above.) You can use the checkboxes to the left of each record to select it. There is no limit to the number of records you can select. Once you have made a selection, you can use actions to perform specific tasks with your selection (more on that below.) |
|
|
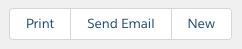
Actions In the top right corner (top row) of any List Manager are action buttons. Actions allow you to perform specific tasks with a selection of records. "Print" will generate a list of selected records in PDF format. From there you can email or print the PDF for your records. "Send" allows you to send a selection of Listings to specific Contacts. "New" simply allows you to create a new record. |
|
|
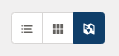
View Controls In the top right corner (bottom row) of any List Manager are view options. View options allow you to switch between standard "List View" and "Thumbnail View". Depending on the data being displayed, one view may be more beneficial than the other. NEW - Map ViewPropertybase 1.545 introduced a brand new map view to the Listing Manager. With this view, users can view Listings on a map and switch between standard and satellite view. |
|
Table of Contents
Saving Lists
Starting with Propertybase 1.513, you can now save filter criteria in the form of lists. This allows you to quickly and regularly view Contacts and Listings that match certain criteria, without the need to select filters each time. Before you can start using this feature, you must update to Propertybase version 1.513 or later. Click here to update.
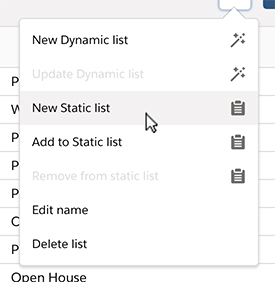
- To save a list, click the filter icon in the top right corner and then click New List.
Note: There are now two options when creating a new list: dynamic or static. Click here to learn more.

- Enter a name for your list and then click the New List button.
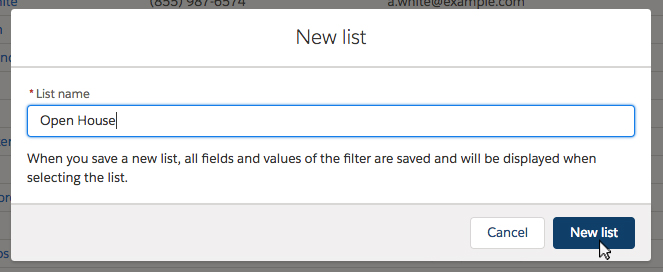
Bam! You just successfully created a new list. However, without filter criteria, this new list won't be able to offer much. Next, let's add some filters and then save our criteria.
- Using the options available on the left side of the screen, select some filter criteria.
In the example below, we have selected "Open House" as the Lead Source. However, filter criteria should be unique for each list you create.
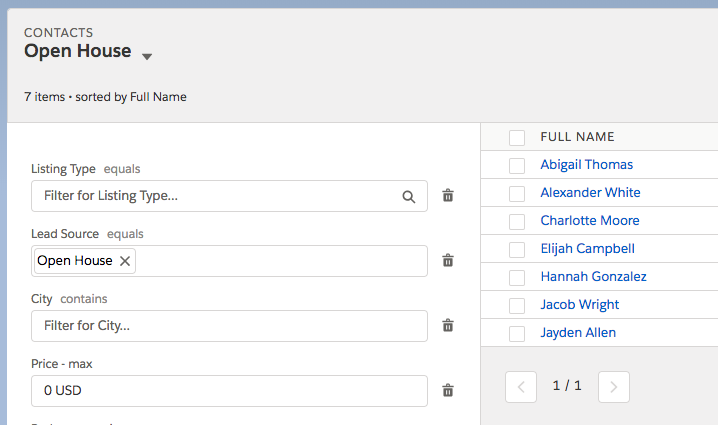
Note: You can add additional filters by clicking the "plus" icon at the bottom of the filter area. Additionally, you can remove filters by clicking the "trash can" icon to the right.
Updating Lists
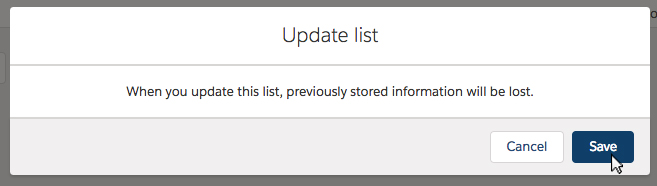
Whenever you make changes to filter criteria, you must update the list. Otherwise, you will lose your changes. Let's do that now.
- To update a list, click the filter icon in the top right corner and then click Update List.

- When prompted, click Save to update the current list with your latest changes.
That's it! You have successfully created a new list, added filter criteria and updated the list with your changes.
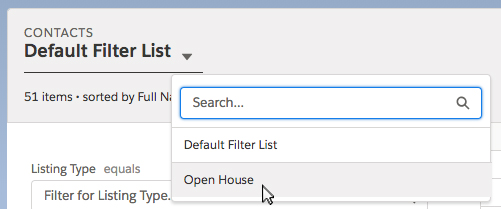
Now you can quickly reference this list anytime, by selecting it from the list drop down menu, as shown in the image below.
Static vs Dynamic Lists
Previous versions of Propertybase offered one type of list. Starting with version 1.545 it is now possible to choose between a "dynamic" or "static" list. Need to upgrade? Click here.
Dynamic ListWhen you create a new dynamic list, all filter options (located on the left side of the screen) are kept and the list will update dynamically as your contact database grows. For example, a list that displays all contacts that live in Boulder will update itself each time you add a new contact from Boulder. |

|
Static ListA static list is simply created once and does not change. When you create a new static list, the contacts selected will remain the same regardless of how your contact database changes. |
|
Configuration Options
You can configure settings for List Managers and change default filtering options are in the Record Managers in the Control Center. Settings for List Managers are broken down into two sections: Filter Fields and Results Fields. Filter Field settings control what filters are displayed and Results Field settings control how results are displayed.
Not sure how to access Settings in the Control Center? Click here.
- Click the App Launcher in the top left corner of the screen, then click Control Center.
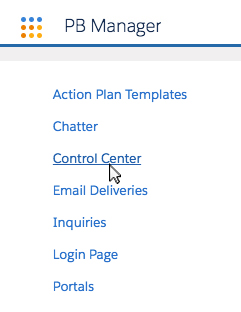
- Inside the Control Center, click Record Managers.

Filter Fields (Search Criteria)
|
NOT This option allows you to essentially "inverse" the entire filter option. So instead of filtering for the specified criteria, you are filtering for the opposite. For example: If you selected this option for "Listing Type = Sale", Propertybase would search all Listings that are not Listing Type of Sale. |

|
|
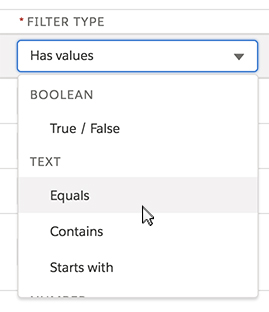
Filter Type Filter type allows you to specify how to filter against the specified criteria. To name a few: "Has values" should be used on fields that can contain multiple values. (E.g. listing type, property type, status, etc.) "Contains" is essentially your most traditional version of "search". "Range" should be used on any field that contains a value range (I.e. any field containing numerical data: bedrooms, bathrooms, area, etc.) |
|
|
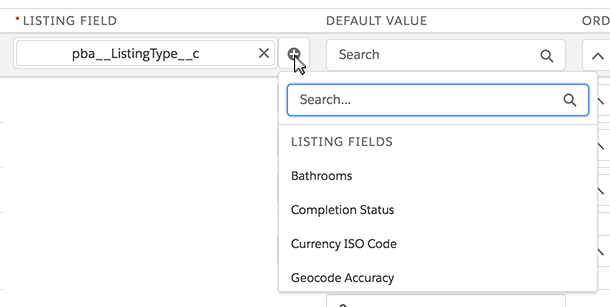
Field The field option allows you to select which fields should be included in the default filtering options. You can use the "plus" icon to search for and select different fields. |
|
|
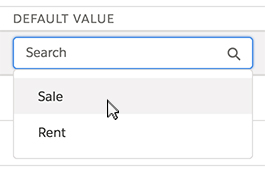
Default Value If applicable, the default value option will allow you to select a value to populate by default. For example, this can be helpful if your brokerage only deals with a single type of Listing, etc. |
|
|
Order Use the up and down arrows under order to specify the order in which filtering options appear. |

|
|
Delete This button can be used to completely remove a filtering option. |

|
|
The "Add new filter" button at the bottom of filtering options allows you to add additional filters. |

|
Result Fields (Column Headers)
|
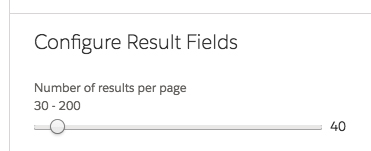
Configure Result Fields This slider is used to determine how many results should display on each page. |
|
|
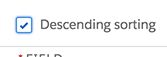
Descending Sorting Checking this option, in conjunction with "Sort By" will reverse the sort order from last to first. Example: Enabling "Descending Sorting" with "Sort By" set on the "Contact Name" field, would sort your Contacts backwards from Z to A. Example: Disabling "Descending Sorting" with "Sort By" set on the "Contact Name" field, would sort your Contacts normally from A to Z. |
|
|
Display Format "Website Image" is meant for the Listing Manager only. Specifically the "pba__Property__c" field. "Clickable title" is generally meant for fields like "Name" or "Title", which would link to the full record. For most fields, you will probably leave the "Display Format" option blank. When a display format is selected, it can be unselected by clicking on the value again. |

|
|
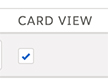
Card View Enabling the Card View option on a select number of fields will group them together and save space. |
|
|
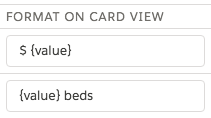
Format On Card View When using card view, you can specify how the data should be formatted. If left blank, only the specific field value is displayed. For example: If you would like to add a label, like "beds" or "$" you can do that by using the formatting shown on the right. |
|
|
Sort By Selecting a field for "Sort By" tells Propertybase what field should be used to sort the results list. |

|
Installation
Before using the new Contact & Listing Managers, you must update to the latest version of Propertybase.
After updating the latest version, please follow the configuration steps below.
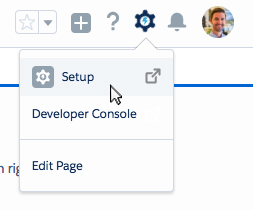
- Click the gear icon in the top right of the screen, then click Setup.
- Click Profiles in the Setup navigation menu.

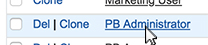
- Click PB Administrator in the list of profiles.
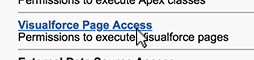
- Scroll down and click Visualforce Page Access.
- Click Edit.

- Enable the Visualforce Pages shown in the image below. (Hold down "Command" on Mac or "Control" on PC to select multiple Visualforce Pages, then click the "right arrow" to add them to the list of enabled pages.)

Note: All Visualforce Pages should always be enabled. (The left column should be empty for all profiles.)
- Click Save.
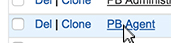
- Repeat the steps above for the PB Agent profile, as well as any custom profiles.
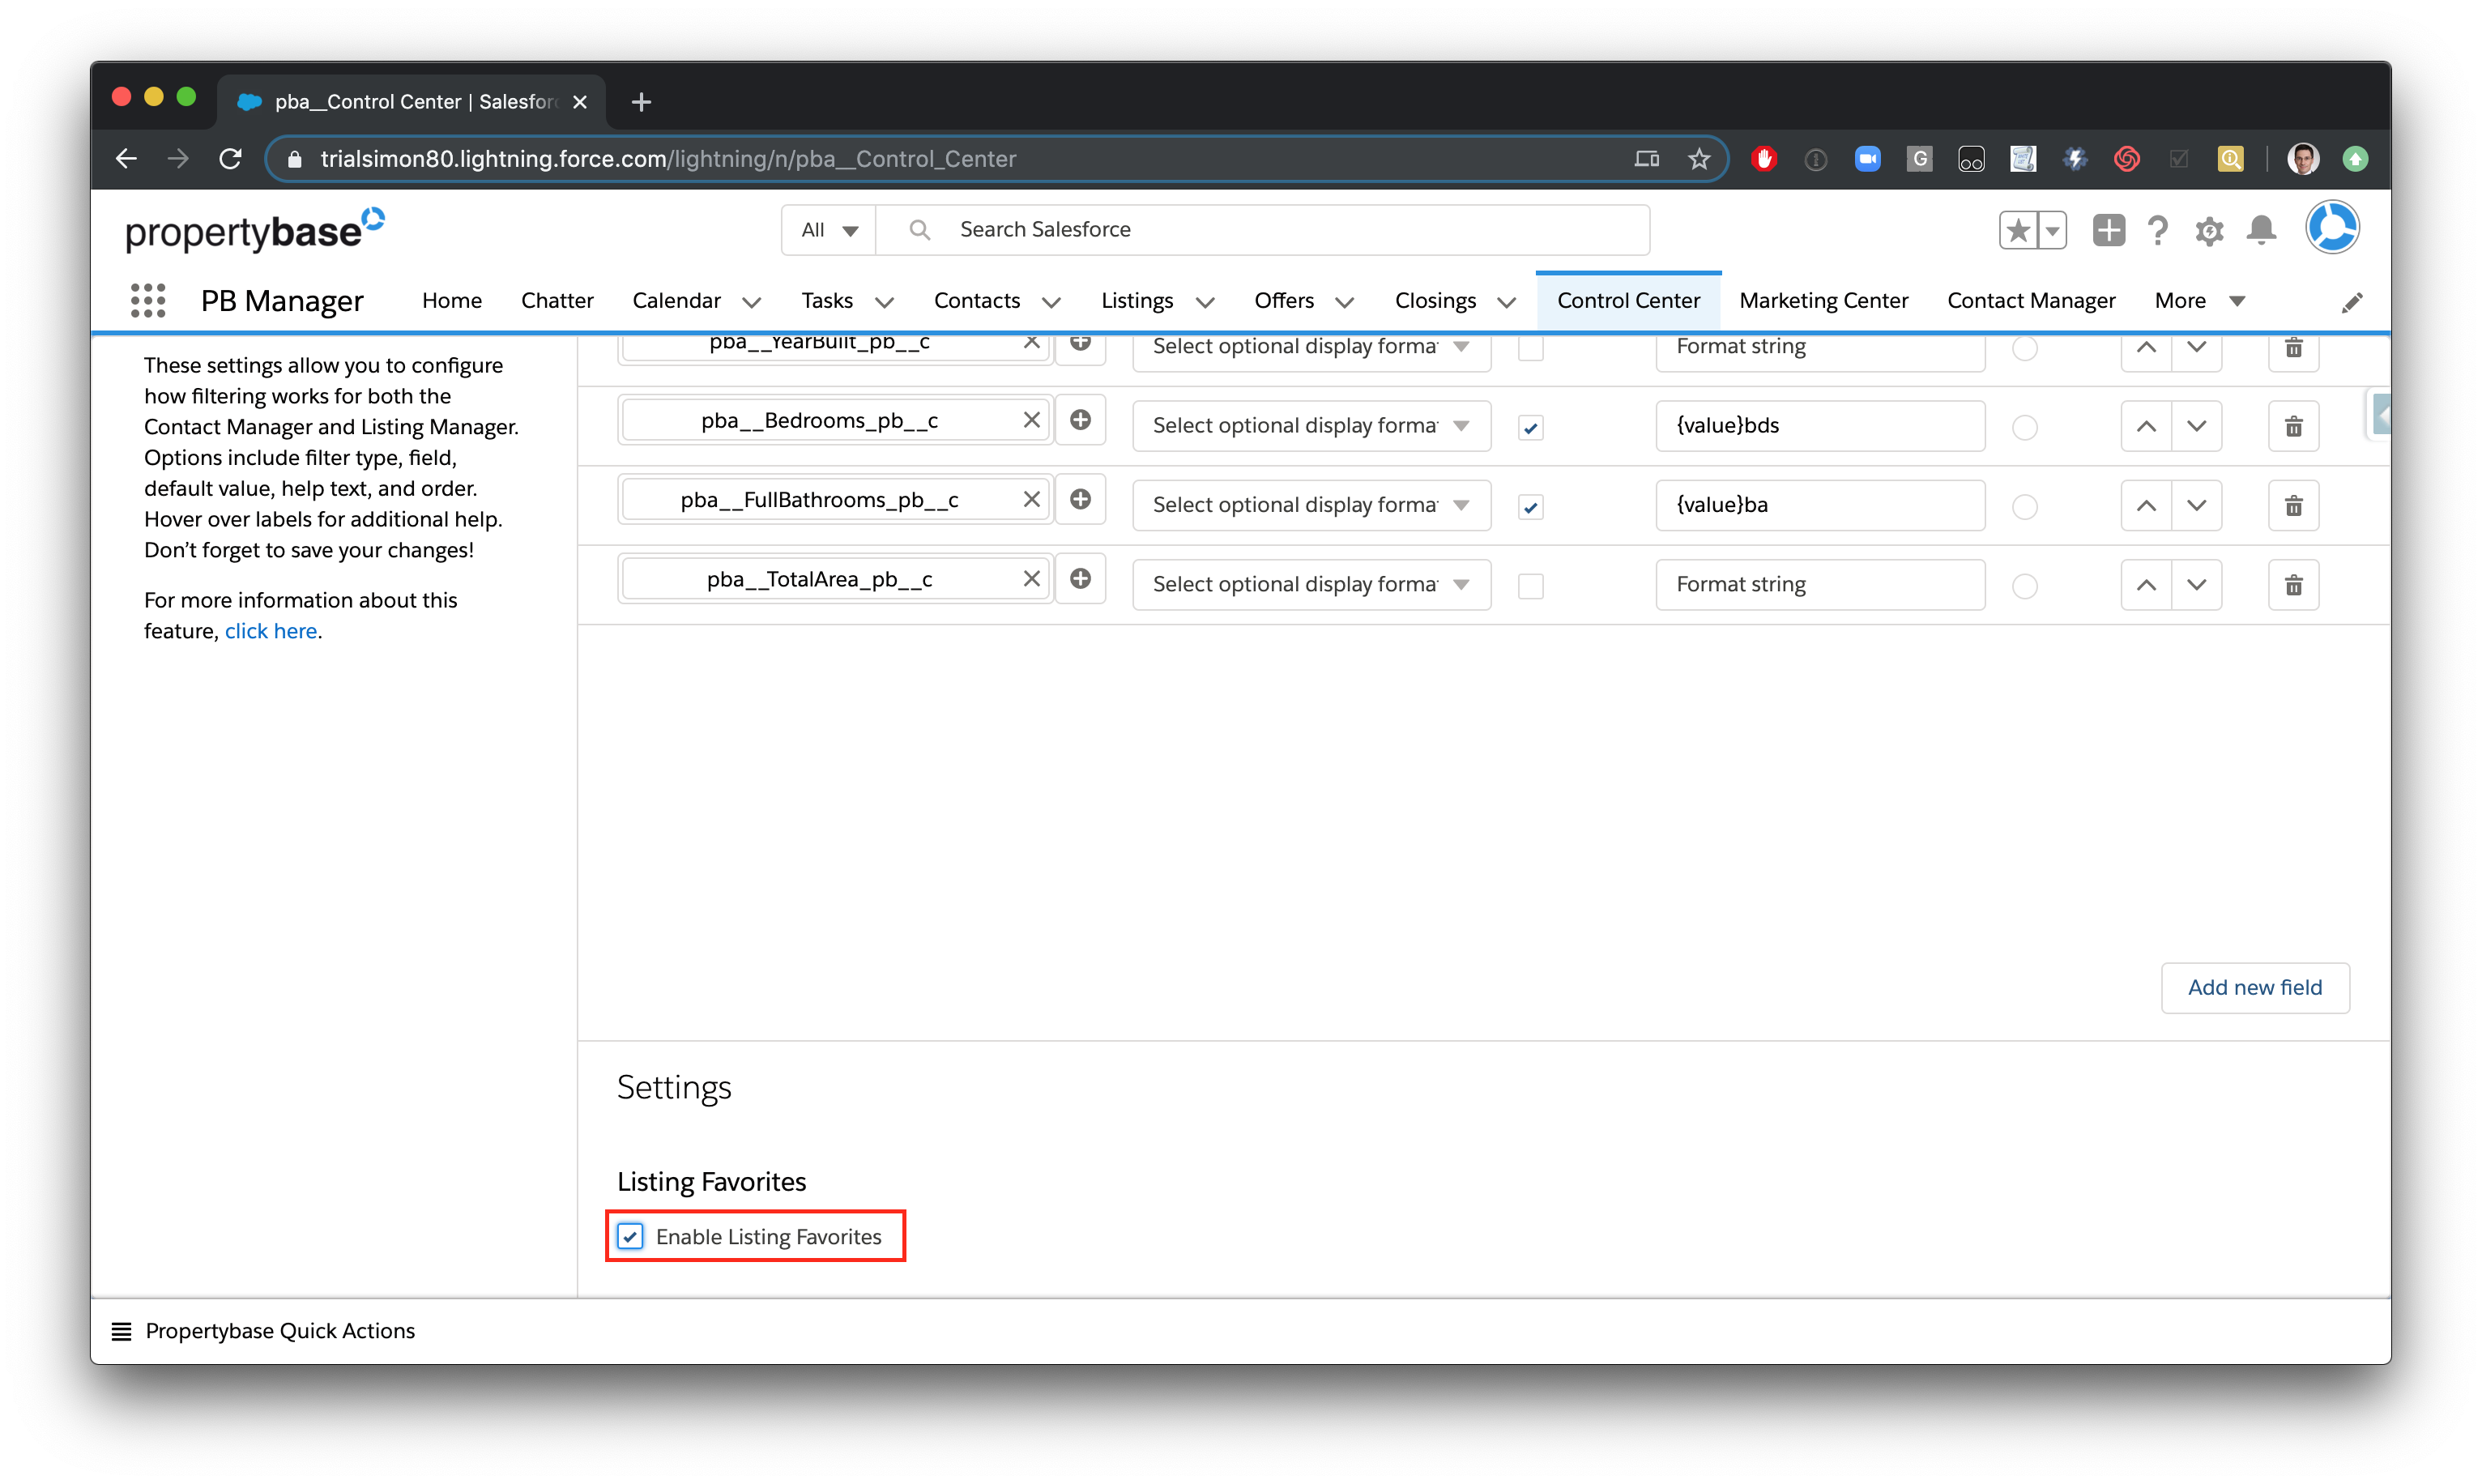
Listing Favorites
Listing Favorites can be used to temporarily store Listings selected using different filter criteria. You can select listings, add them to Listing Favorites, view Favorites, remove Listings from Favorites and clear the list. When you leave the Listing Manager, the list is cleared automatically.
Configuration:
Go to the Control Center section "Record Managers", scroll to the bottom to the section: "Settings" and check the box: "Enable Listing Favorites"
FAQ
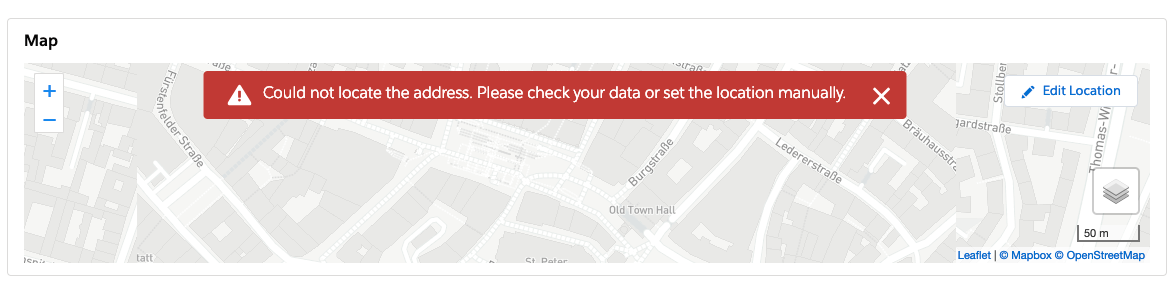
Q: When I open the map view in Listing Manager, I see a message like this on:

A: Please check the geolocation fields "Latitude" and "Longitude" on your listings. They likely have no or invalid values. You can update them by changing the pin on the map while on a listing, adding an address or manually adding the lat/long coordinates to the corresponding fields.
Note: the fields "Latitude" and "Longitude" are usually not on the layout and you will want to add them even temporarily to check if they are populated correctly.
Q: When I open a listing, the map shows an error message like this one:
A: Please make sure your listing has address fields commonly used to identify locations on maps. Or please click on "Edit location" on the map and find the listing location manually, set the pin and save.
Comments
0 comments
Article is closed for comments.