Propertybase Score Follow
Propertybase Score allows you to track the interactions your Contacts have with you and/or your brokerage. By assigning point values to specific activities (and setting a weekly reduction rate) Propertybase is able to sort Contacts based on activity. Using Propertybase Score allows you to focus more time on Contacts that are ready to buy or sell. In this article, we cover the basic configuration steps required to use Propertybase Score as well as a general overview of the feature.
Note: Configuration is required prior to using this feature. (See the "Required Configuration" tab.)
Feature Overview
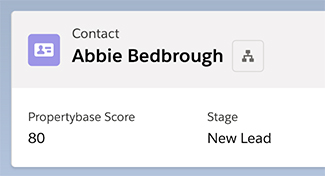
Once configured, using Propertybase Score is as easy. Simply use Propertybase as you always have, however you will now have additional insights into your Contacts and their activity. As you can see in the image below, all Contact records now include a Propertybase Score.
How It Works
When a new Contact is created in Propertybase (manually or automatically) the Contact is given an initial score. (See "New Contact Score" below.) Each time that Contact performs a supported action, their individual score will increase or decrease. To determine the amount of increase or decrease see "Reviewing Point Values" below.
Reviewing Point Values
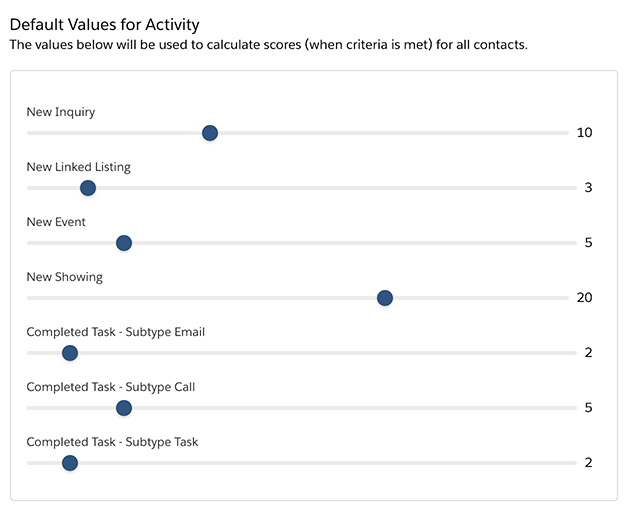
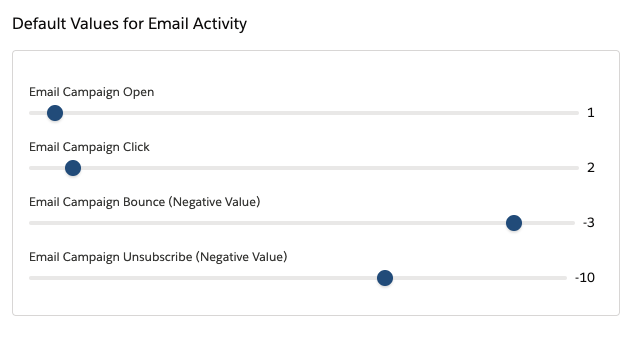
Once enabled, Propertybase Score will begin tracking activity for all Contacts. However, the point values attached to those activities are completely up to you. For this reason, it's important to review the default point values and adjust them to fit your specific preferences.
- Adjust the slider for Weekly Depreciation and New Contact Score to fit your specific preferences.

Note: See the "FAQs" tab on this page to learn more about Weekly Depreciation and New Contact Score.
- Adjust the sliders for Activity.
- Adjust the sliders for Email Activity.
- Adjust the sliders for Website Activity.
Note: Only Propertybase Website customers will see Website Activity.
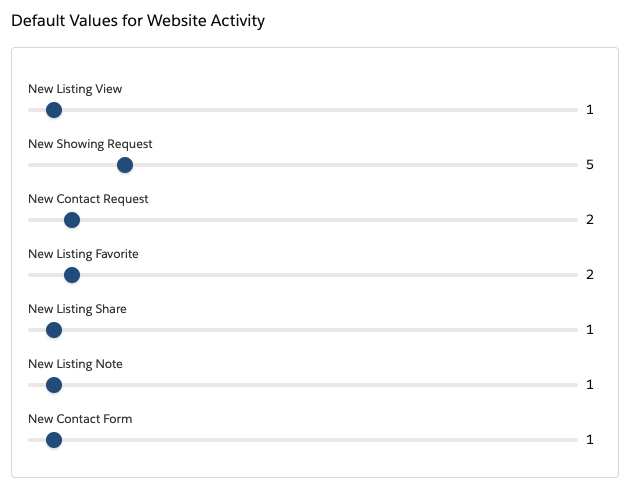
Table of Contents
- Configure Contact List View
- Configure Contact Page Layout
- Enable Email Events - NEW
- Enable Propertybase Score
Note: You must be on the latest version of Propertybase to use this feature.
Configure Layouts
Before using Propertybase Score it's necessary to configure a few page layouts. This will allow you to see Propertybase Score when viewing Contact list views and record pages. Follow the steps below to get started.
Configure Contact List View
- Click the Contacts tab at the top of the page.

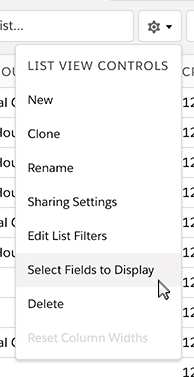
- Open List View Controls and then click Select Fields to Display.
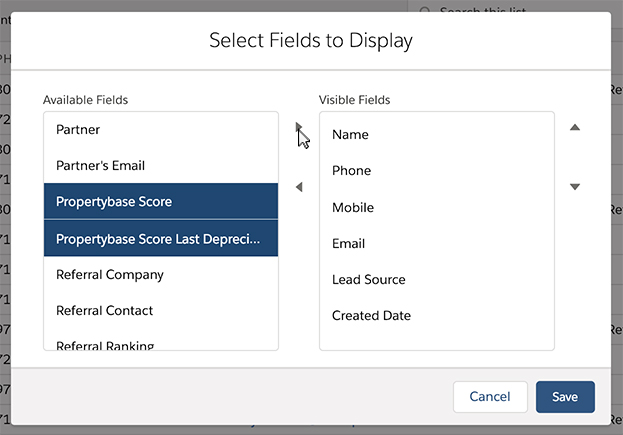
- Select both "Propertybase Score" and "Propertybase Score Last Depreciation" and use the top arrow in the center of the modal to add them to the Visible Fields column.
- Once finished, click Save.
Configure Contact Page Layout
Now that we've updated List Views to display Propertybase Score, we need to do the same for Contact Page Layouts. To get started, open any Contact record and follow the steps below.
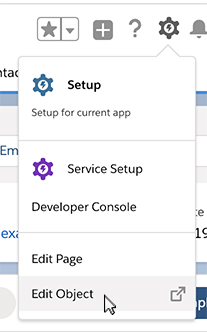
- Click the gear icon at the top of the page, then click Edit Object.
- Click Compact Layouts.

- Next select Contact Compact Layout.

- Click Edit.

- Select Propertybase Score and then click the "right" arrow to move it to the Selected Fields column.
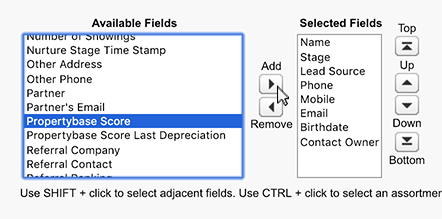
- With Propertybase Score selected, click the "up" arrow to move it so that it's right after Name and right before Stage.
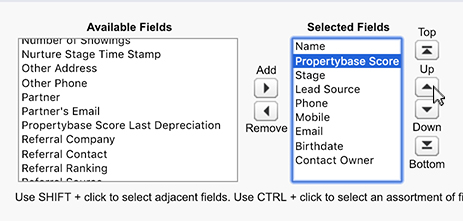
- When finished, click Save.

Now that you've configured your account to display Propertybase Score, it's time to enable the feature. Propertybase Score can be activated in the Control Center. Once activated, point values should be assigned for each available activity. Additionally, the weekly depreciation rate should be set to a value relative to the average activity rate. Without weekly depreciation, scores would increase indefinitely and it would be difficult to determine the integrity of scores.
Enable Email Events
Before enabling Propertybase Score, you will need to enable the "Email Events" feature. Doing so will allow Propertybase Score to properly track email activity in your account.
Follow the steps below to activate Email Events.
- In the Control Center, click Email Settings.

- Next click the Mass Email Campaigns tab at the top of the screen.

- At the bottom of the page, check the box next to Display Email Events.

- When finished, click Save at the bottom of the screen.

Enable Propertybase Score
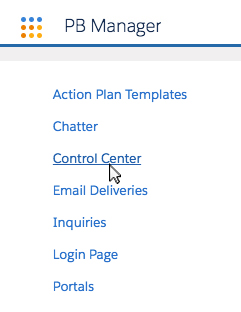
- Select the application launcher and then select Control Center.
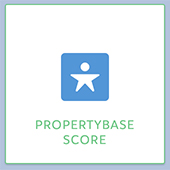
- From the Control Center, select Propertybase Score.
- Enable Propertybase Score by clicking the toggle at the top of the page.
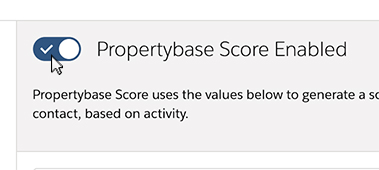
Once configuration is complete and Propertybase Score has been enabled you should review default point values. Click the "Feature Overview" tab on this page to learn more.
Frequently Asked Questions
What is Weekly Depreciation?
As your Contacts interact with your business and begin to accumulate points, it's important to have a method to keep points relevant.
For example, Bobby Buyer accumulates 50 points in one week but has no further interaction with your business afterward. Sally Seller accumulates 10 points per week for five weeks. Without weekly reduction, in the fourth week Bobby (50 points without weekly depreciation) would appear to be a better lead than Sally (10 points without weekly depreciation), however the reality is that Bobby hasn't interacted with your business for three weeks (0 points with weekly depreciation) and Sally (10 points with weekly deprecation) has interacted with your business on a weekly basis.
When is Weekly Depreciation applied?
The first weekly deprecation will happen one (1) week after the creation of the Contact record.
For example, if a Contact is created on Tuesday the weekly deprecation will happen on the following Tuesday and each subsequent Tuesday.
What is New Contact Score?
New Contact Score is simply the score that a new Contact starts with.


Comments
0 comments
Article is closed for comments.