Marketing Campaigns and ROI Tracking (Classic) Follow
Creating campaigns enable you to take advantage of your marketing activities to promote your product and engage additional clients so you get the most out of your business.
The Campaigning Module is the tool to track your marketing expenses and compare them with actual results your campaigns are producing within Propertybase. With this feature you can ensure that your campaigns are pulling in the right prospects and your actual/potential ROI is tracked correctly. If it´s not configured yet you can find here the setup information.
Creating a Campaign
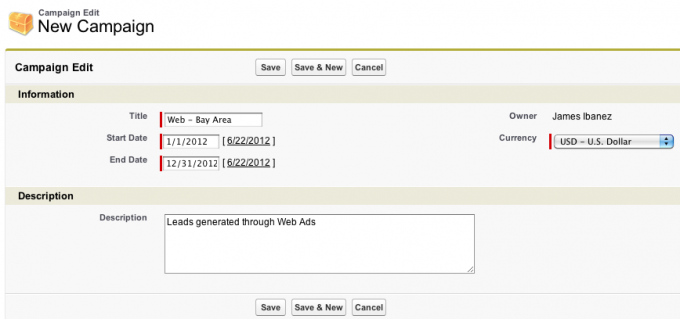
To start building a campaign, click into the Campaigns tab and click the New button. The first step in creating a campaign is to name it and determine the length of how long it will run. Insert the title, start date, end date and optionally add a description to help you understand what the campaign is about. The chosen currency will be that which is set as default in your personal settings, if your organization uses other currencies you may select any of them within the drop down menu. Finally click the Save button.

The next page is the actual Campaign record, which will now have to be filled in with the corresponding information. There are 3 steps to creating the Campaign:
- Add your campaign expenses
- Assign contacts to the campaign
- Reviewing matching clients to ensure that all data is correct

Step 1 - Budget your Promotion Expenses
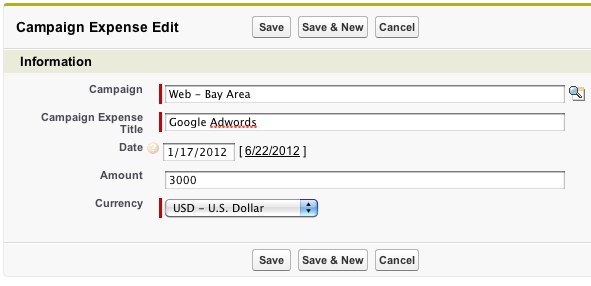
At first glance the campaign is completely empty and needs to be filled in. Lets start by adding expenses to this new campaign. From the related list titled “Step 1 – Budget Your Promotion Expenses” click the New Campaign Expense button. Next, add a title to identify this particular expense, the date it was paid and the exact amount. If you have more than one expense click the Save & New button and this will bring you to a new campaign expense edit page where new information can be added. An unlimited number of expenses are allowed to be input. When finished, click the Save button. This will bring you back to the campaign record page.

Step 2 - Assign Contacts to this Campaign
Now that the expenses have been added and identified, the contacts brought in by the Campaign itself will need to be assigned. From "Step 2 - Assign Contacts to this Campaign", click New Campaign Assignment Rule. Contacts are brought into the campaign by rules, so what ever matches the rule will be assigned to it. Choose one or more criteria to define which ones will be picked up to calculate the campaign result. The fields for defining the criteria are from the contact object. Next you must provide the logic to which these criteria will be fulfilled. By default, all conditions above will be fulfilled (AND operator). To enhance your filter for specific results you may modify the logic to fit your needs.
As an example, the contacts will be assigned based on the lead source and city they are from. All contacts created within the date range of the campaign that have a lead source as Web will be added. To make the selection even more specific, we would like to include only the contacts that are from the San Francisco or Oakland. The logic for this specific criteria would be written out as “1 AND (2 OR 3)”. When contacts have been correctly filtered, click the Save button to continue.

Step 3 - Refresh and Review
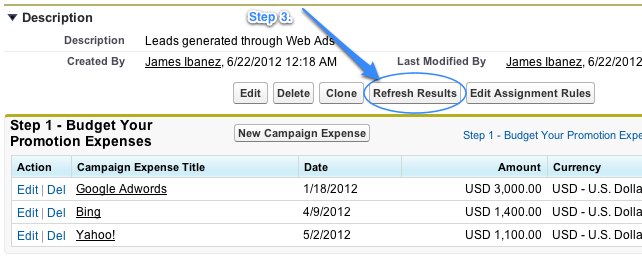
The expenses and contacts have now been defined for the campaign. Please review and make sure that all data has been correctly input. The campaign is now ready to be calculated by the system. This can be done be clicking the Refresh Results button found above the Step – 1 on the campaign record page. Depending on the number of results, the calculation may vary in the amount of time it takes to finish the results. You will be notified by email when the final results are in. Refresh the page and voila your contacts will be added.

From the related list “Step 3 – Review Clients Matching This Promotion” you will find all contacts that fit the specified criteria with the information Potential Sales Amount and Sales Amount included. Both contacts with and without offers are included in this list. If the Offer has been accepted it will appear in Sales Amount, if an Offer has been made to the contact but is still pending it will appear in the Potential Sales Amount.
Step 4 - Results!
The last related list “Result” provides all contacts with Offers included directly related with the campaign. Scrolling up to the top you’ll find a graph titled Return on Investment. Totals are demonstrated at the top and the graph depicts the behavior over time of the ROI and Potential ROI in your selected currency.

For any further questions or comments regarding the Marketing Module, please contact support@propertybase.com.
**This feature is no longer available in the Propertybase Lightning version**


Comments
0 comments
Please sign in to leave a comment.