Workflow Rules Follow
Propertybase Workflows are a great way to automate day-to-day business processes. Although workflows take some effort to set up initially, the amount of time they can save you in the future easily makes up for it. In this article, we'll walk through the structure of a workflow and how to set one up.
Workflow Basics
All workflows contain a beginning, middle and end. The beginning of a workflow is simply an object. Once defined, a workflow rule will constantly be watching this object for changes.
The middle part of a workflow consists of rule criteria. Rule criteria tells a workflow when to start. This criteria can be defined by any object or any set of fields within that object. For example, a workflow can start anytime a new record is created AND/OR anytime a field meets certain criteria. When rule criteria is met, a workflow executes a set of pre-defined actions.
These actions are the third and final part of a workflow. Workflow actions can be immediate (fire the moment a trigger is activated) or time-dependent (wait a pre-determined amount of time and then perform a specific action.)

Email Workflow
Workflows can be used to automate several types of actions; assigning a task to a user, sending an email to a contact or updating record values - to name a few. In the example below we build a workflow that automatically emails a thank you email to new leads.
Since our example workflow involves sending email, we need to create a new email template first.
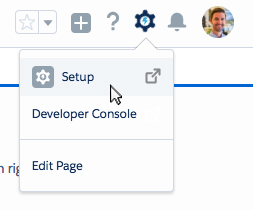
- Click the gear icon in the top right of the screen, then click Setup.
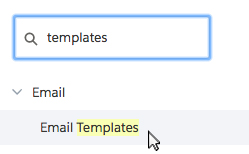
- In the setup menu, click Email Templates.
- Click New Template.

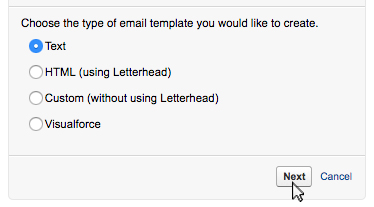
- For email template type, select Text and click Next.
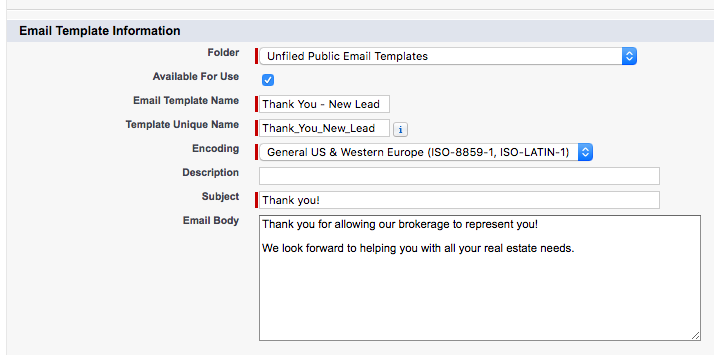
In this next step, we need to write content for our email template. You can use the sample content we created in the image below, or customize it to fit your individual needs.
Note: You must select a public folder if you want to share this template with other users in your organization.
- Copy the information as it appears in the image below (or write your own.)
- Click Save.
Done! Now that we've created a new email template, let's start building our new workflow.
- Click the gear icon in the top right of the screen, then click Setup.

- In the setup menu, click Workflow Rules.
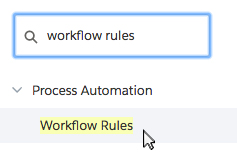
- In the middle of the screen, click New Rule.

On the next screen, we will define the object that will trigger our workflow. In this example, we want to send an email to new leads. Leads in Propertybase are defined as Contacts. So for this workflow rule, we want our trigger to exist on the Contact object.
- In the dropdown field, select Contact.

- Click Next.
Now that we've selected the object for our workflow, we need to name our rule and establish some criteria.
For our example (sending an email to new leads) we only want the workflow to trigger once, so let's select "created" under evaluation criteria. This means our workflow will fire when a contact is created and only then. However, we don't want to send an email to all new contacts, only new leads. We can do this by setting "contact: stage" equals "New Lead" under rule criteria.
- Copy all the information as it appears in the image below.
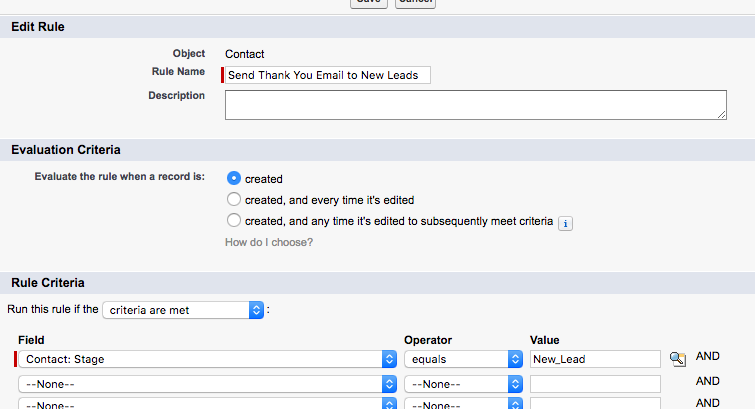
Note: You can select specific field values for rule criteria by clicking the "magnifying glass" icon to the right of the value text box.
- Click Save & Next.
Now that we have defined our starting object and rule criteria, we need to define our actions. In other words, what should happen when our trigger criteria is met? In this example, we want to immediately send an email. Let's define that action now.
- Click the Add Workflow Action button and select New Email Alert from the list of workflow actions.
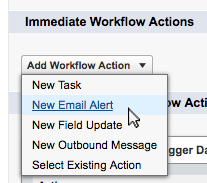
- Copy all the information as it appears in the image below.
Note: To select the email template we created in the steps above, click the "magnifying glass" icon next to Email Templates.

- Click Save.
- Click Done in the top right corner.

- At the top of the page, click Activate.

Done! You have sucessully built and activated a new workflow. Propertybase will now send a thank you email to all new leads.
You can deactivate this automation at any time by clicking the deactivate button on the workflow detail page.
Field Update Workflow
Another powerful workflow feature is the ability to update record values. In the example below we will build a workflow that does just that.
Note: If you followed along in the previous email workflow section, many of the initial steps will be identical.
- Click the gear icon in the top right of the screen, then click Setup.

- In the setup menu, click Workflow Rules.

- In the middle of the screen, click New Rule.

On the next screen, we will define the object that will trigger our workflow. In this example, we want to update the lead ranking on a Contact record when the contage stage field equals a certain value. So for this workflow rule, we want our trigger to exist on the Contact object.
- In the dropdown field, select Contact.

- Click Next.
Now that we've selected the object for our workflow, we need to name our rule and establish some criteria.
For this example (updating contact lead ranking) we want the workflow to trigger when the Contact record is created, but also anytime the Contact record is edited - this is our evaluation criteria. We want to update the contact lead ranking value to "Hot", but only if the Contact stage value equals "Active" - this is our rule criteria.
- Copy all the information as it appears in the image below.
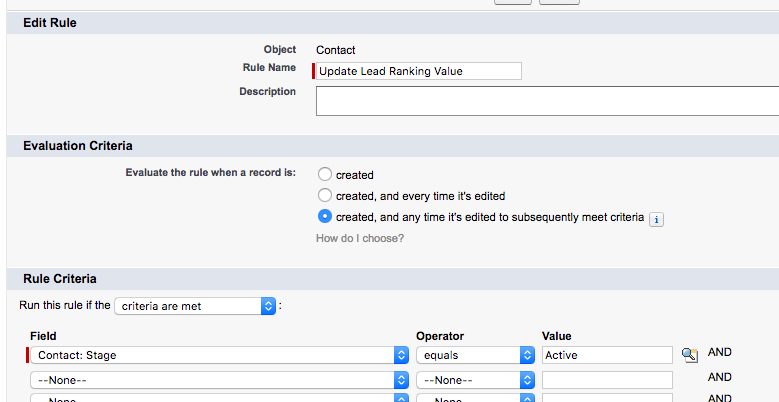
Note: You can select specific field values for rule criteria by clicking the "magnifying glass" icon to the right of the value text box.
- Click Save & Next.
Now that we have defined our starting object and rule criteria, we need to define our actions. In other words, what should happen when our trigger criteria is met? In this example, we want to update the Contact lead ranking value. Let's define that action now.
- Click the Add Workflow Action button and select New Field Update from the list of workflow actions.
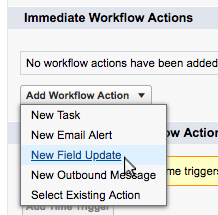
- Copy all the information as it appears in the image below.
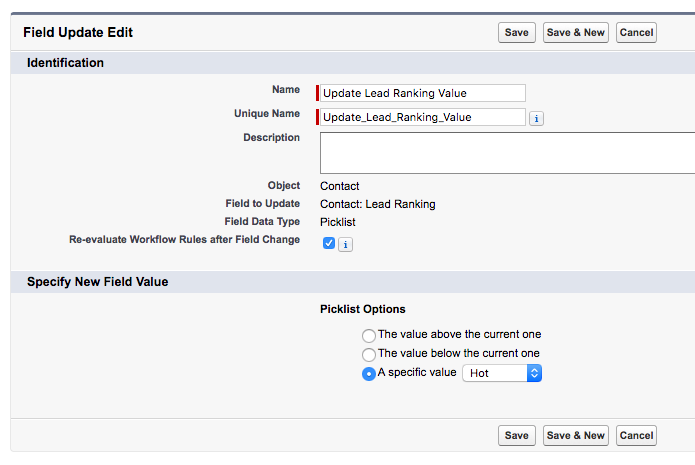
- Click Save.
- Click Done in the top right corner.

- At the top of the page, click Activate.

Done! You have sucessully built and activated a field update workflow. Propertybase will now update the lead ranking value anytime a Contact stage is updated to "Active".
You can deactivate this automation at any time by clicking the deactivate button on the workflow detail page.
Note: If you want to take your automation a step further, set up aditional workflows that update the lead ranking value back to "normal" or "cold" for the stage values of "working" and "nuture" respectively.
Additional Features
In this section we will cover functionality available to workflows not covered in the previous two examples.
Time Triggers
In addition to immediate actions, workflows can contain time-dependent actions. This means that you can create actions that happen after a predetermined amount of time. Workflows can have multiple time triggers. Using our example from the previous section, let's add a new, time-dependent action.
- Open the workflow from the previous section (or any existing workflow.)

- Click Edit next to Time-Dependent Workflow Actions.
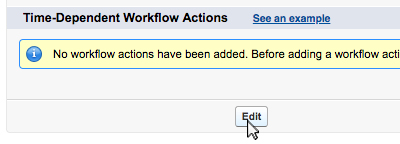
- Click Add Time Trigger.
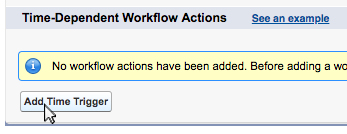
On the next screen you are presented with three options. An amount of time (days or hours), the selection of before or after and the event to base that time measurement off of. Want to generate a task to follow up with new leads 10 days after they are entered into Propertybase? Using our example from the previous section, we would select "10 days" "after" and "rule trigger date".

Once saved, you can add actions to this trigger date just like you would immediate actions. Let's add a follow up action now.

In the example below we are creating a follow up task that is assigned to the record creator, which will be due 20 days after rule trigger date.

Even though our task's due date is "rule trigger date plus 20", our task will actually be due 10 days after creation. Why is this? Because "rule trigger date" refers to our original workflow rule trigger date, not our time-dependent trigger date.
Note: If your organization uses time-dependent actions, please review the Default Workflow User information below.
Default Workflow User
If your organization uses time-dependent actions (discussed above), then you will need to select what is a called a "Default Workflow User". This is because sometimes the user who triggered a workflow rule isn't active. When this happens, Propertybase displays the username of the default workflow user in the Created By field for tasks, the Sending User field for email, and the Last Modified By field for field updates.
To select a Default Workflow User, go to setup and in the menu select Process Automation Settings.
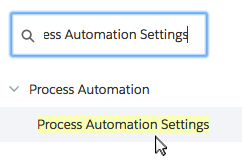
On the following screen, use the "magnifying glass" icon to select a Default Workflow User for your organization.

To automize your business workflow our platform (Force.com) includes Workflow Rules. These rules are used to trigger specific actions within your Propertybase based on criteria you suggest. This can be from auto populating fields, creating tasks for users or even sending out emails to customers. As an PB Administrator you can create these by going to Setup/ Create/ Workflow Rules & Approvals/ Workflow Rules. The creation of a workflow consists of 4 steps.
Step 1. Select Object - Workflows only work within one object. The first step is to select the object you would like this workflow to trigger in.
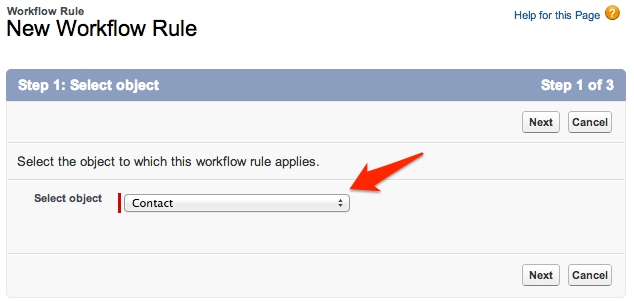
Step 2. Add your Workflow Rule's criteria - In this step the criteria of when your workflow will be triggered is added.
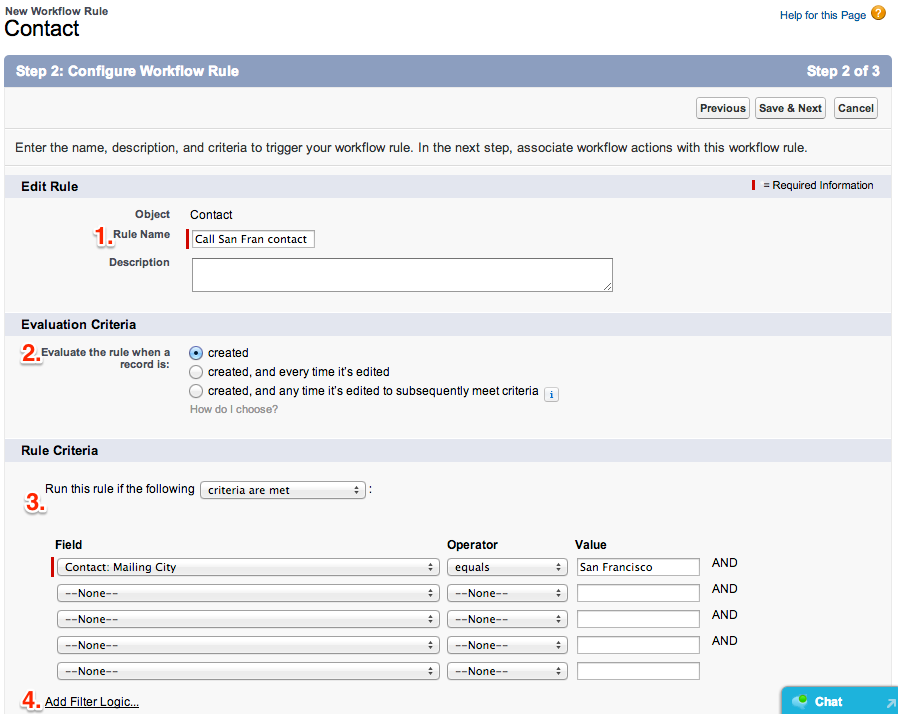
- Rule Name - Create a title for your workflow that identifies what it does and is easily recognizable
- Evaluation Criteria - Determine when this workflow rule will trigger. There are three main options:
- a. created - workflow rule only triggers when a record is created
- b. created, and every time it's edited - workflow rule triggers when record is created, and every time record is edited and saved.
- c. created, and any time it's edited to subsequently meet criteria - workflow rule trigges when record is created and when ever the rule criteria is met again in the future.
- Rule Criteria - Specify when workflow rule will trigger (activate) based on values that are changed within the system. In this case when values of fields found within that object are modified
- Add filter logic - In the case when various criteria are specified you can add filter logic to determine when the workflow rule will trigger
Step 3. Adding Workflow Actions - Configure which actions will occur after workflow rule is triggered.
There are 3 main types of workflow actions available to perform within a workflow rule:
- Tasks - Assign a task to a user within the system
- Email Alerts - Send an email to a user, contact or specific person of interest
- Field Update - Change a value of a field based on the workflow rule
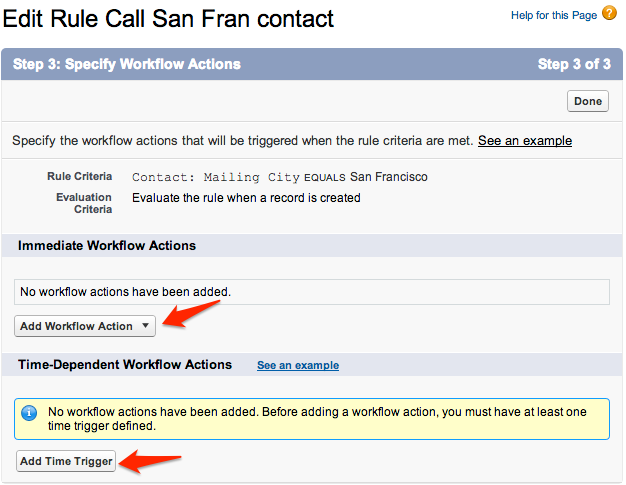
Workflow actions can be performed immediately when the workflow rule is triggered or can be time dependent to trigger in a determined date in the future (specific time after rule trigger date) or before specific time before the rule trigger date). To add a Time-Dependent action, a Time trigger will first need to be added.
- Determine whether the action should trigger within hours or days
- Select if the action will be made after or before the rule date trigger
- Finally select which date field the action will depend on
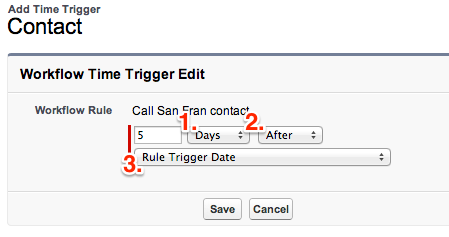
After the Time Trigger has been defined all the necessary actions can be added. Once all actions have been added you will need to finalize the process by activating the workflow rule. Simply click on the Activate button.
Keep in mind that you can't add or remove time triggers if:
The workflow rule is active.
The workflow rule is deactivated but has pending actions in the queue.
The workflow rule evaluation criteria is set to Evaluate the rule when a record is: created, and every time it’s edited.
The workflow rule is included in a package.
You can deactivate a workflow rule at any time. If the rule has pending actions in the workflow queue, editing the record that triggered the rule removes the pending actions from the queue. If you don't edit the record, the pending actions are processed even though the rule has been deactivated.

Activating the Workflow Rule will put it into affect and whenever the rule criteria is matched on the object specified, the actions will take place!
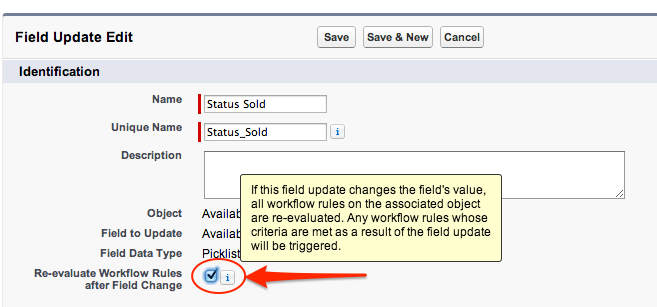
Field Updates can also be a very powerful action to automate you business flow. One of the interesting features of the field updates is that you are able to trigger a second workflow based off a initial one. In order for this to take place make sure that you mark the checkbox "Re-evaluate Workflow Rules after Field Change" to TRUE on the first Field Update, so the system knows to run the second workflow.
For further documentation please see the Help for this Page link at the top right corner of the Workflow Rule page in Propertybase. There you will find detailed information on every aspect of the Workflow Rules.
For further information and examples on this topic, check out these Examples of Workflow Rules.


Comments
0 comments
Article is closed for comments.